DIY Fabric Painting: Safe for Your Quilts
Have you ever wanted a completely one-of-a-kind fabric for a special quilt or quilt label? Or are you running low on fun projects for your kids at home during the quarantine? OR BOTH?? Well, it just so happens that DIY fabric painting is the answer to both questions!
If you caught Suzy's guest blog tutorial on printing your own fabric through Spoonflower, this creative process is in the same vein. Check out that post, How to Turn Your Watercolor Artwork into Fabric here! That project uses the Sew Mojo mini quilt patterns, which are just perfect for an afternoon of DIY-ing or crafting with the kids. You can get the Sew Mojo mini quilt patterns here!
But I'm Not An Artist...
Ah yes, I can hear it already. Although some quilters are gifted with magical talents of drawing and painting, let's face it, a lot of us aren't. That is completely okay. For this DIY fabric painting tutorial, we are going to keep it simple.
You don't need to be a master artist to be able to paint easy repeating shapes. Or better yet, maybe you want to cut out a shape from a sponge or potato and stamp it on your fabric. Simple is the way to go - we aren't expecting the Mona Lisa!
If you're still not convinced, what if you painted words instead of shapes? Maybe you want to write out your grandma's favorite recipe, inspirational words, or a favorite quote!
Trending patterns!


Quilt Patterns


Quilt Patterns


Quilt Patterns


Quilt Patterns


Quilt Patterns


Quilt Patterns


Quilt Patterns


Quilt Patterns


Quilt Patterns
DIY Fabric Painting Supplies
- Fabric - I used Kona Cotton in Suede
- Acrylic Paint - Any cheap craft paint will work
- Textile Medium - I used the cheapest brand from JOANN'S but there's lots of options that work great.
- Something to paint and/or stamp with (paintbrush, sponge, foam brush, even a potato cut into a shape would work!)
- A washer & dryer

What is Textile Medium?
Since most of you are probably new to fabric painting, I'm going to give you a quick run-down on the "secret ingredient" to making acrylic paint magically turn into fabric paint: textile medium.
When mixed with regular acrylic paint, this thin liquid helps the paint to adhere to the fabric, making it permanent. Although it does make the paint a little thinner, it helps to make the paint less "crunchy" after it's been washed and dried. More importantly, it prevents the paint from running or bleeding, which means your hand painted fabric is safe to use in quilts!
Here's a pic of the exact stuff I used...

Step 1: Prewash Your Fabric
Because some fabrics come with a bit of residue from production chemicals still in them, the first step is to prewash your fabric. I'm not normally someone who prewashes my fabric when quilting, but for DIY fabric painting, it's important that nothing prevents the paint from bonding directly onto the fabric.
If you choose to use your painted fabric in a quilt, be sure to also prewash all your other fabrics so they are all preshrunk. Feel free to use this as an opportunity to teach your kids how to do laundry - maybe they'll start doing their own from now on?? (Hey, we can dream, right?)
You May Also Like...

Step 2: Mixing the Paint
Okay, you've gathered your supplies, prewashed your fabric, your child is anxiously awaiting the opportunity to make any kind of mess, and you're ready to DIY your way through a fun, new project.
The first step is simple: Mix 2 parts acrylic paint to 1 part textile medium. Mix it up realllll good.

Step 3: Practice
Now if you're already confident in your painting abilities and vision, you can probably skip this step. But for the other 99% of us, practicing is a good idea! Try out some simple shapes, patterns, and designs. Vary the scale, proximity, and shape of what you're painting until you come up with something that you like!

Step 3: Painting the Fabric
Now we're getting to the good stuff. Time to paint your fabric! Before you actually start painting, be sure to slip a couple pieces of paper underneath your fabric because the paint will soak through!
On the same note, be sure you/your kiddos are not wearing their Sunday best - if this gets on your clothes, it's not coming out. Wrapping your table/child/self in newspaper may be advised if you're attempting this with an especially young kid.
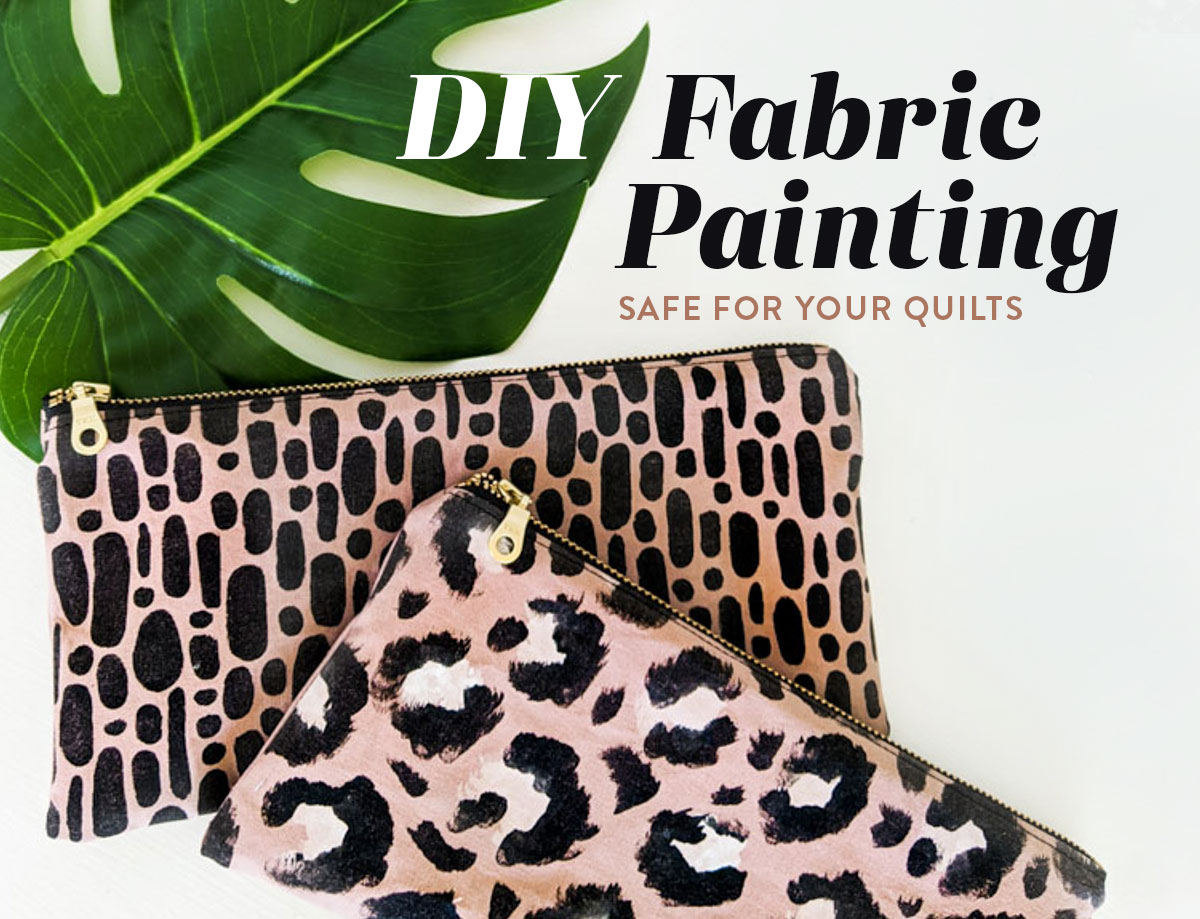
I knew that I wanted to use my fabric in zipper pouches, so I cut the size of my fabric to the size of my zipper pouch (plus a little extra, since the edges will fray a bit when you wash it.)
Use your paintbrush/sponge/potato to apply the paint directly onto the fabric.
If you're looking for a simple pattern that's super trendy, try leopard print! First, paint some white splotches all over your fabric.

Then, paint some black patches around the white splotches, and fill in some of the negative space with black spots. I loved this print on my mauve fabric - it's really a shame real, live leopards aren't this actual color.

Step 4: Dry Your Fabric
Once your painted fabric is dry, I recommend sticking it in the dryer for 60 minutes with heat. Although you probably won't find this step on the textile medium instructions, I found that it greatly helped with preventing the fabric from fading.
As you can see in the photo above, the top piece spent 60 minutes in the dryer to set the paint before washing and drying, and the bottom was just washed and dried, and definitely faded significantly more.

Perfectly Painted Fabric!
Take a look at your new, totally unique fabric, and give yourself a pat on the back. If the majority of the paint stayed on the fabric (and not all over you,) we're going to call it a win. You're ready to create anything you can dream up - and you'll always be able to look back and remember what a crazy time it was while you made it.
Although there is much uncertainty in the world right now, I hope you've been able to soak in some of this extra time to work on something you enjoy, relax a little, or just spend more quality time with your family.


Yeah! I have been doing this for a couple years with personalized milestone quilts and I never heard of setting the paint for an hour in the dryer! Brilliant!!! I can’t wait to paint some fabric with my 4 year old son and test it out!
Thank you! What a great project for my kids who always want to help mom with sewing!
Thank you sooo much for this tutorial!! I’ve been wanting to paint on fabric for the longest time and your tutorial took all the guess work out of it. Can’t wait to try this.
Wow! The fabric painting and quilt color sheets will be perfect for my grandkids this summer!!! Thank you! Meanwhile I am working on the Maypole and Shattered Triangles quilts. Love your patterns!!
That’s wonderful! Thanks, Mary!
Wondering if painting on fabric is too stiff for a baby quilt? Will it irritate a baby’s skin?
It’s pretty soft after you wash it, but I suggest doing a small sample to make sure you’re OK with the texture.
Is acrylic the only paint you can use? What about water colors?
I’ve tried water colors and the pigment is incredibly faint. If you do want to go that route, get the tubes and not the cakes and use as little water as possible when applying. You could also try guache. It’s kind of like an acrylic/watercolor hybrid.
Would a small amount of craft paint and a lot of water applied with a spray bottle onto wet fabric be permanent if heat set in dryer? I want to have a “mottled” look to patterned fabric I’ve purchased. I would only use one color so no “muddy” color.
It would be permanent, but probably pretty faint. It could also potentially ruin the spray nozzle of your water bottle. As long as you’re not sentimental about your spray bottle, try it!
I’m wanting to do this with a quilt and handprints for a baby shower— does it stain skin for long periods?
The right paint shouldn’t stain the skin at all. Fabric dye, on the other hand, can stain the skin and be more harmful if inhaled without proper ventilation.
Please do not advocate using a dryer for anything! It burns up the electricity and is so bad for the environment, one of the worst offenders and a lot of countries (including the UK) are trying to reduce their use. You can air dry fabric or just hand over the shower screen or something, before ironing on the back to set the paint.