Easy Tutorial: Envelope Pillow Cover with Binding
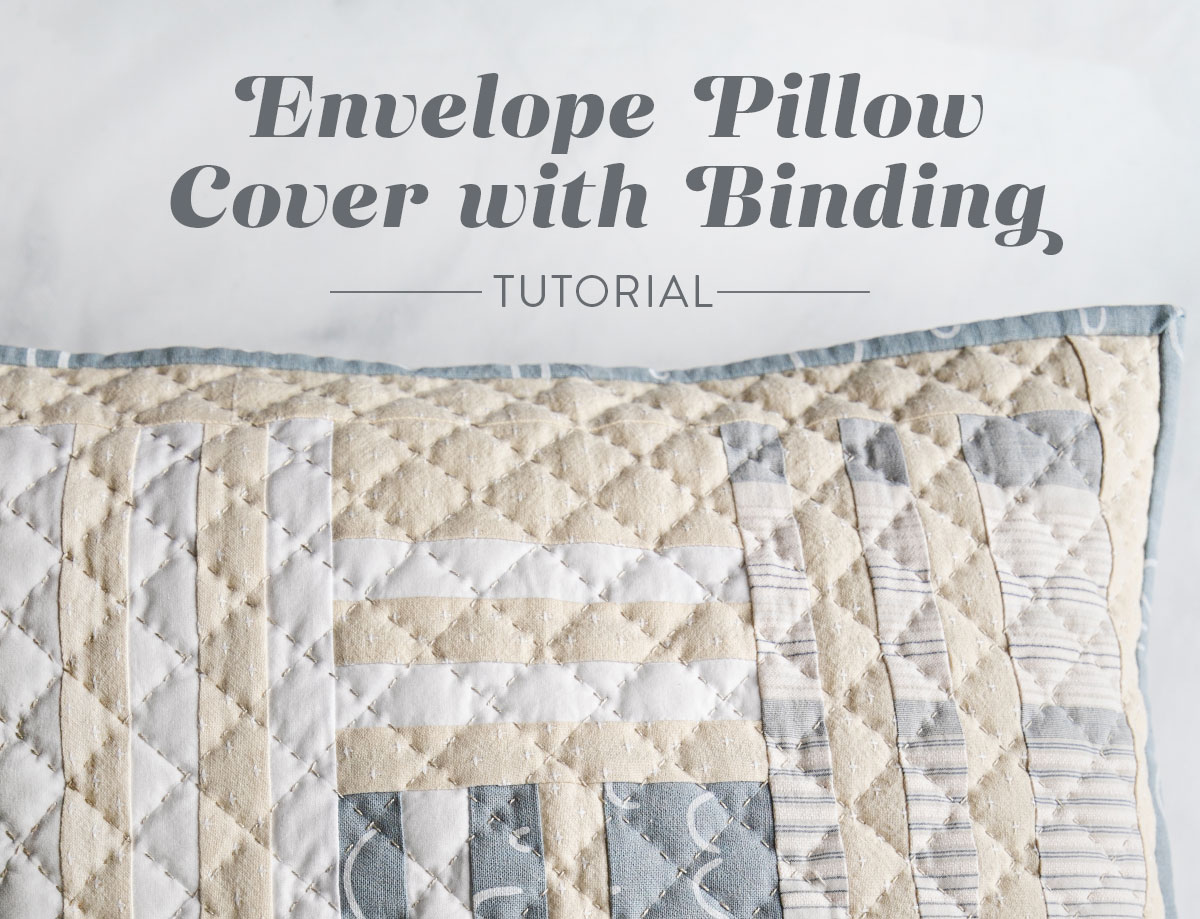
Hello fabulous sewist! Are you looking for a project that's a bit faster than making an entire quilt, but still looks great in your living room? Quilted pillows are fast, fun and totally addicting to make! This easy, beginner-friendly tutorial will show you the simplest way to finish a pillow. We're going to make an envelope pillow cover with an option to add binding around the edges.
Binding is not necessary in following this tutorial, but I do think it adds polish to the final look. And we quilters are nothing but polished and sophisticated. Now brush off those stray threads from your pants and let's get started! 😉
You May Also Like...
- Tutorial: How to Insert an Exposed Zipper into a Pillow
- Make a Quilted Zipper Pillow: Photo Tutorial
- 3 Fun & Fresh Quilted Pillow Patterns
- How to Hand Quilt (with Video Tutorial!)
- Maypole Pillow Extension Pattern (Download)
- A Moody Blue Reflections Pillow
- How to Make a Modern Appliqué Pillow With Knits
- Pillow Talk: 25 Lovely Pillows for Your Home Sweet Home

How to Sew an Envelope Pillow Cover
Because this is mostly a quilting blog, we will start our easy peezy envelope pillow cover tutorial with a finished quilted pillow top. The pattern used in this example is the FREE Grow pillow extension pattern.
This free pattern is based on the not-so-free but oh-so-beautiful Grow quilt pattern found in the shop. So after you make a beautiful Grow pillow you can make a matching quilt too!
Envelope Pillow Cover Supplies
- Finished pillow top OR a piece of fabric that is 1/2" larger on all sides than your pillow insert. In this example my pillow insert is 18" square so my pillow top is... you guessed it – 19" square!
- Backing Fabric – to make an envelope pillow cover for an 18" pillow, you need 1/2 yd. of backing fabric or scraps large enough to cover the two pieces. Measurements for those pieces are in Step 1.
- Binding – this is optional. If you do want to add binding to your pillow, measure the perimeter of your unfinished pillow and add 10". For a finished 18" pillow, the math looks like this – 19 x 4 = 76 + 10 = 86. That means the binding needs to be at least 86" long. If using 42" wide fabric, you can probably squeak by with 2 strips. For the most part we will be using this binding tutorial, but the strips will be wider because our perimeter seam is wider than a 1/4", but I'm getting ahead of myself...
- Glue Stick (optional)
- Basic Sewing Supplies
- Pillow insert – I bought this 4-pack of 18" pillow inserts back in 2018 and have been really pleased with how they've held up over time.
Step 1: Cut Your Fabric
In this tutorial I will give you instructions and math for making an envelope pillow cover for an 18" square pillow insert. This math is easily adaptable, though, and can be applied to pillows of any size.
Trending patterns!


Quilt Patterns


Quilt Patterns


Quilt Patterns


Quilt Patterns


Quilt Patterns


Quilt Patterns


Quilt Patterns


Quilt Patterns


Quilt Patterns
- Trim your pillow top to measure 19" on all four sides.
- Cut two pieces of backing: 1 - 19" x 14" and 1 - 19" x 11".

My quilted pillow top got a little wonky in one corner and came up slightly short of 19". Since this pillow will finish with a 1/2" seam around the perimeter, I trimmed it to 19" even though the top fabric doesn't reach all the way to the edge. There is enough of the top fabric that it will still get sewn into the seam and this way the pillow will be the correct size.

Step 2: Finish the Envelope Edges
With wrong sides facing up, lay the two pieces of backing fabric so they overlap each other. I like to place the pieces on top of my pillow top so that I know I have them oriented correctly.
The sides of the backing fabric that overlap need finishing seams since this will create our envelope. Fold both pieces of backing fabric 1/2" twice. This will encase the raw edge. With a hot iron crease the fabric and use either a glue stick or pins to baste it in place.

Topstitch as closely to the edge of the fold as possible on both pieces of backing fabric. Be sure to backstitch at the beginning and end of both seams. Once your seams are sewn, set them with an iron.

Step 3: Sew Around the Perimeter of the Pillow
At this point you have two options. Depending on what you choose, you will face your backing fabric right sides up or right sides down.
- No Binding - backing right sides down: If you do not want to add binding, place your two backing pieces right sides down on top of your pillow top that is right side up and pin into place. Once you sew the 1/2" seam around the perimeter of your pillow, flip your pillow inside out so that the right sides of the backing and the pillow top are facing out. You're finished!
- Binding - backing right sides up: Place your pillow top right side down then place the two backing pieces right sides up on top of the pillow top. An easy way to think about this is "what you see is what you get." Since we will be covering our seam with binding, how you lay the pillow out is how it will look once it's finished. Once the layers are pinned and ready, sew a basting seam 1/4" around the pillow. Continue reading for binding instructions.
Since I sewed binding to the edges of this pillow cover, I followed the second instructions listed above.


Step 4: Sew Binding on Your Envelope Pillow Cover
For the most part sewing binding on your envelope pillow cover is exactly like sewing binding on a quilt, with two slight differences:
- Cut your binding strips 2 3/4" wide. Typically binding strips are cut between 2 1/4" - 2 1/2", but since the seam of our pillow is wider than a 1/4" seam, our binding needs to be wider.
- When sewing the binding to the front of your pillow top, use a 1/2" - 3/8" seam allowance. After a pillow insert is crammed into this pillow cover you will see first hand how this perimeter seam experiences more stress than a regular quilt edge – thus the wider seam allowance.
Before sewing your binding around the entire pillow, sew about 5" and then wrap your binding over the raw edge to double check that it fully covers it. Extra puffy batting and thick fabric can play a role in whether or not your binding will fully wrap over the edge. If it's not covering well, rip out what you've sewn and make your seam allowance slightly smaller.
Use this binding tutorial for full instructions and a video tutorial on how to connect the two ends then whip stitch it to finish – How to Sew Binding on a Quilt.

I used 12 wt. 100% cotton thread by Sulky to hand sew the binding down.


Step 5: Cram a Pillow Insert Inside Your Envelope Pillow Cover
Viola! You're finished! All that's left to do is put a pillow insert inside your beautiful envelope pillow cover and step back to admire your handiwork! Nicely done!
What's your favorite way to finish a pillow? Tell us in the comments and if you have any tips, please share!


Please tell me the quilting is a Bernina stitch ? But I fear you will say you did it all by hand
I did it by hand… lol 😉
🙇🏼♂️
Hi! I know on the Singer Stylist there is a stitch that resembles hand stitching. I would bet that Bernina has one too:-)
Thanks so much for the tutorial and the free pattern! Your pillow is beautiful.
I love the pillow. Just getting into quilting. Took a class nearly 25 years ago and decided I’d never quilt 🙂 But after doing regular sewing for a very long time, I’m finding I like the change of quilting. I’m doing small projects, quick and easy to finish. At 59 I don’t have the patience for a large project 🙂 I do have a question, did you hand quilt the pillow top or does your machine do the sewing that looks like hand quilting?
I did hand quilt it! And if you’re interested in trying that out too, I have a tutorial – https://suzyquilts.com/how-to-hand-quilt/
Lou Ann I wondered about the same thing. The stitches are so uniform. I think it’s the large stitch hand quilting which is growing on me. Suzy probably has a tutorial somewhere.
Gorgeous pillow! Thanks for the inspiration to get back to hand quilting.
Love, love, love your well written tutorial. Beautiful pillow covers! I’m lazy and don’t like taking the time to turn the binding and hand sewing…will try machine sewing binding on from the back instead of front, then turn to front and use a decorative stitch to secure binding.
That will work just as well!
The binding width doesn’t make sense to me. If you cut your strips 2 3/4″ then fold in half, the binding is 1 3/8″. Sewing the binding on the front with a 1/2″ seam allowance leaves only 7/8″ width to wrap and hand sew the binding on the back. That won’t cover 1″ worth of seam allowance (1/2″ on the front and 1/2″ on the back) plus the thickness of the fabric. Am I missing something here?
Hey Lindsey, when I wrapped my binding for this pillow, I wrapped it tightly so it looked similar to piping. With the 1/2″ seam allowance and that binding width, I found it to work well. However, you can up the binding width to 3″ or change your seam allowance to 3/8″ instead of a wider 1/2″. Both options would work great.
It’s so pretty I want to make a whole quilt out of it! Colors are so summer/sand/beach!
When I stuff the pillow I buy the next size up (18″ pillow cover, 20″ pillow insert) AND I stuff batting in the corners. I really like fluffy! Thanks for sharing this.
j
May I print the pattern?
Of course!
Thank you Suzy, I have added this project to my to-do list. I am really enjoying making quilted cushions & use your zipper tutorial, which is really easy to follow. I’m looking forward to trying the envelope method.
Question: I notice you hand sew around the edge of the sandwich, I assume for stability. Do you do this for every quilt?
Good eye! I actually only did this in certain spots to get me to the next row of stitches. Typically, I’m not one to baste around the edges of a quilt, however a lot of people do for added stability.
Ah! I see that now. Thanks for the reply and for the many services you provide to the community. You, and your support crew are so clever! 🙂
I am loving your website as a new sewer of about a month. I am trying this (Grow Pillow Pattern) as my second project after the DIY quilted checkerboard project that I completed.
I have made my first block, and I am finding that it seems to be coming in small at about 5 ¼” rather than 5 ½” from top to bottom. I have pressed the seams open and used a ¼” seam allowance. I am going to unpick and try again, but is there likely to be anything other than the potential lack of exact measuring of seams to be a problem? I have checked that the strips I have cut are exactly the width in the pattern.
Hey Mark, with this Grow pattern you first cut strips, sew them together, and then trim them down. So to make the center block, cut your strips to be 6″ long. Once your block is pieced, trim it down to 5 1/2″. If you’re finding that once your block is trimmed it is on the narrow side, there are a few things that could be happening: 1. Your seam allowance is just a touch too big. 2. Your cutting is a touch too small. 3. During the pressing you’re not pressing them open enough and losing a little bit of fabric. I doubt #3 is happening, so double check on #1 and 2. God luck!
I just used your envelope technique to make 2 quilted pillows and love it! It really is easy and I will definitely use it again!! Thank you for sharing
Is there a formula to figure out the size of the backing pieces for a different size pillow? My pillow inserts are 12 inch.
Yes! If you want a similar amount of overlap as I have used, which is about 4″, add 6″ to your unfinished pillow size and then cut the pieces so that one is larger than the other. This doesn’t even need to be exact. Basically, you are accounting for 1″ seam allowance once you finish the raw edges of the two backing pieces and then adding enough for one piece to overlap over the other.
For example, a 12″ finished pillow is 13″ unfinished. Cut a 13″ x 19″ piece of backing fabric and then slice that so you have one piece that is about 13″ x 11″ and one that is 13″ x 8″.
I love your tutorial. Do all quilted shams have to have binding? I would like to make a pillow sham using your method and attach piping but no binding.
Oh yes you could substitute piping for binding. You would just include that in Step 3 when you sew around the perimeter of your pillow.
Great tutorial! One question: which of the fabrics for the back goes on top? Is the larger piece on top of the smaller piece or vice versa? And does it matter?
It doesn’t really matter, but in this tutorial I put the smaller piece on top.