Everything You Need To Know About The Rail Fence Quilt Pattern
There are three groups of people that should definitely try out the Rail Fence Quilt Pattern:
- Quilters who are really good at sewing quarter-inch seams. You know who you are. You rock the quarter-inch seam. You own the quarter-inch seam. You, my friends, can take that skill straight to the Rail Fence Quilt bank, and whip out a masterpiece in no time.
- Quilters who struggle with sewing quarter-inch seams. There’s no shame in this. The quarter-inch seam is a really important quilting skill to have under your belt, but guys, we all struggle with seam allowances sometimes. If you want to get really good at that quarter-inch seam, sew a Rail Fence Quilt. By the time you’re done, that quarter-inch seam will have nothing on you.
- Quilters. It’s a great quilt, everyone! The Rail Fence Quilt is a gorgeous, yet forgiving project that anyone can get into. It has variations galore. This pattern has something for everyone, especially when it’s finished, and you get to snuggle up under it.
This pattern is specifically near and dear to my heart because it was the first quilt pattern I ever made. Now that I think about it...it was the first TWO quilts I ever made. Wow...I must really love this pattern.
Now that you’re totally sold on the fact that the Rail Fence is for you (I know, I’m so persuasive.) you have some choices to make before your cozy Rail Fence dream becomes a reality.
Below is a quick list of supplies that will make your life MUCH easier. I'll refer to each of them later, but here they are so you don't miss 'em:
Supplies
- Rotary Cutter
- Self-Healing Mat
- Stripology Ruler (Haven't heard of this? Oh boy are you in for a treat!)
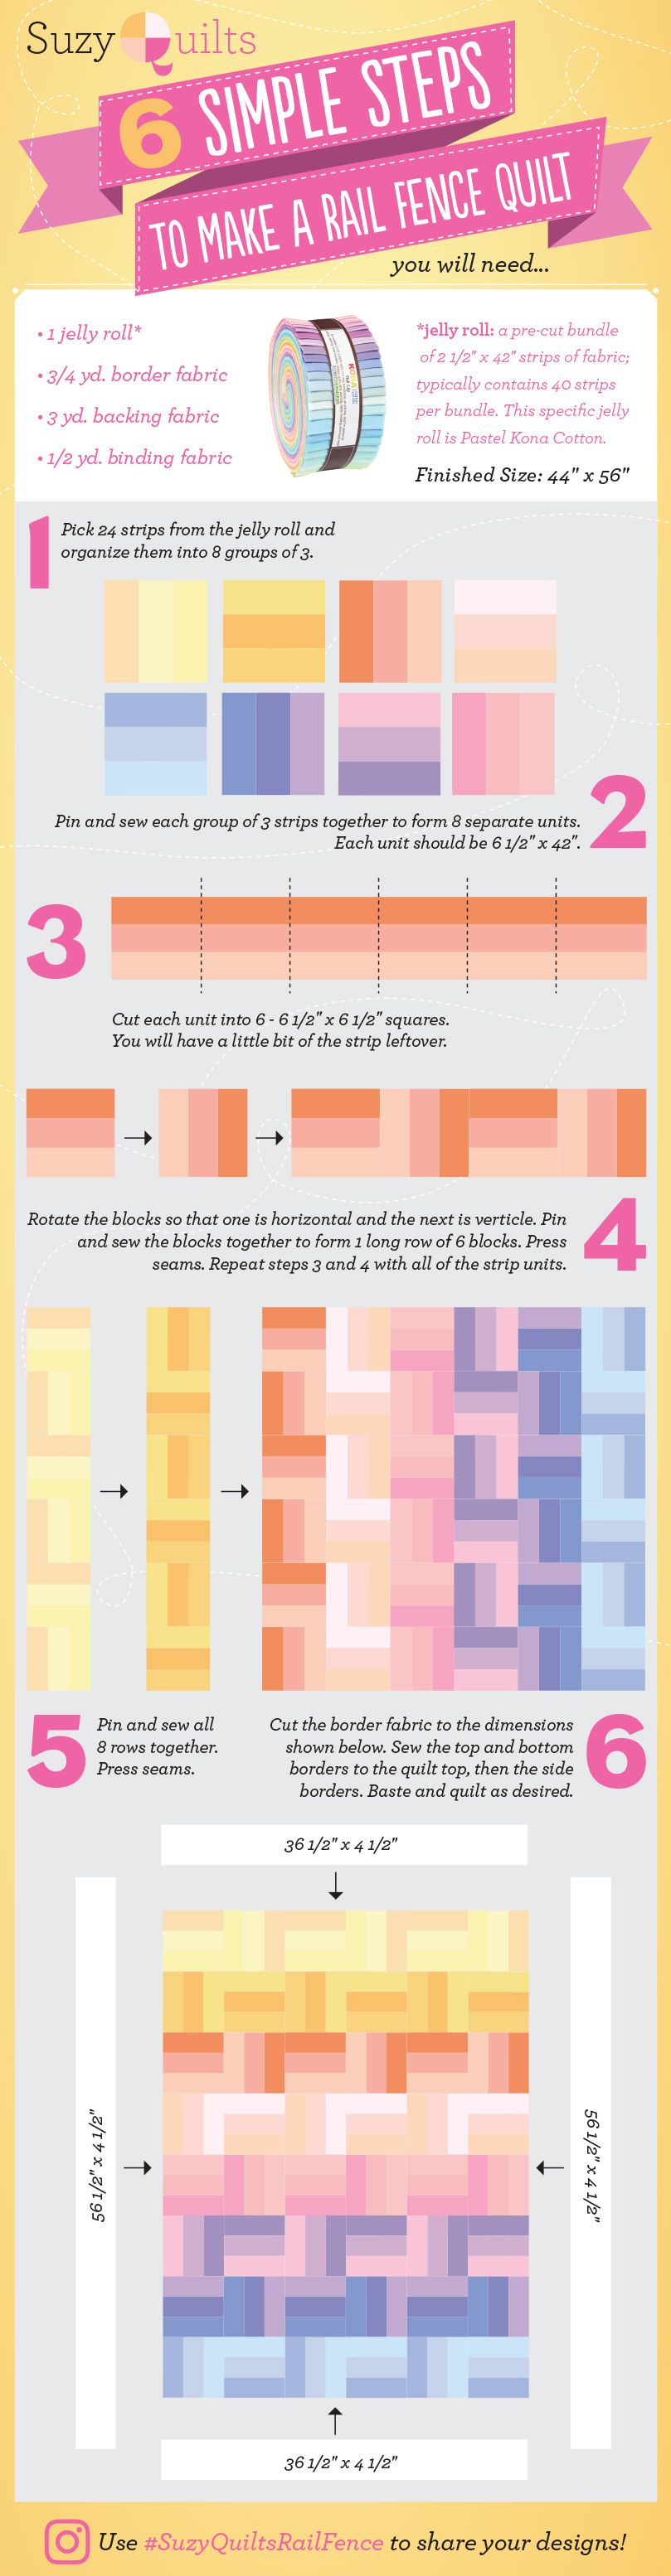
- Jelly Roll (A jelly roll is a pre-cut bundle of 2 1/2" x 42" strips of fabric) - get this, and half of your cutting is already done for you!
Check out a huge assortment of jelly rolls at the Fat Quarter Shop!
Trending patterns!


Quilt Patterns


Quilt Patterns


Quilt Patterns


Quilt Patterns


Quilt Patterns


Quilt Patterns


Quilt Patterns


Quilt Patterns


Quilt Patterns
Rail Fence Quilt Step 1. Choosing a Size
There are two main ways to go about choosing a size. You can either focus on the finished block size of your Rail Fence quilt, or you can choose a finished strip size (more about stripping later. FABRIC stripping, you guys, geez...).
Don’t overthink this decision. Really, the only main guideline is to make it a “rotary-friendly” number. This means that if you did some fancy-shmancy division math to figure out your block or strip size based on your desired finished quilt size, you’ll want to round up or down to the nearest ⅛ of an inch, to make your life, and the life of your trusty rotary cutter, a little bit easier.
(PS don’t have a rotary cutter? Stop everything and check this one out – it's been my fave since my first Rail Fence quilt 16 years ago. Awwwww so cute, right?)
Rail Fence Quilt Step 2. Choosing Fabric
We’ll talk in a sec about how there’s pretty much an infinite number of Rail Fence quilt variations, but there’s one basic guideline that applies to most of them: when choosing fabric, you’re going to want to look for a light, a medium, and a dark colored fabric.
The scientific reason why? Because it looks good. And you can see your pattern better, no matter what pattern variation you choose. Otherwise, your quilt gets a little mushy-looking (also a very scientific term.)
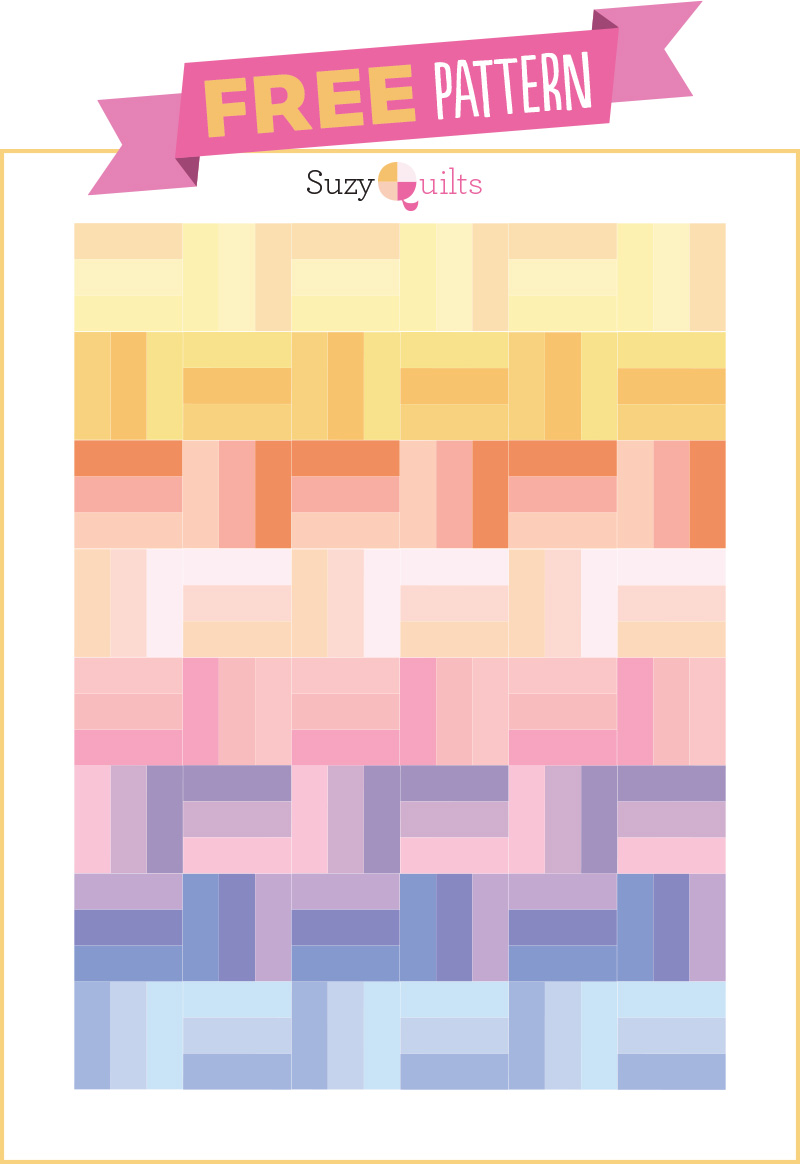
The fabric used in the free pattern is a Pastel Kona Cotton jelly roll and can be purchased here.
Rail Fence Quilt Step 3. Choosing a Pattern Variation
So funny thing about Rail Fence quilts… SO MANY QUILTS ARE RAIL FENCE QUILTS. There are so many variations of this quilt that if you Google it, you’ll find images pop up that look completely different. But they all have one thing in common: they’re made up of blocks that are made up of strips. Yup. That’s what qualifies as a Rail Fence quilt: it’s a repeated (or even sometimes random) pattern of strip-squares. See, I told you you can handle this. If you can cut strips, and then sew, you can make a Rail Fence quilt.
Now, let’s get tricky.
Some straight talk about strip piecing: I say “straight talk” like it’s all serious… when actually, it’s just amazing and fun and easy. The Rail Fence quilt pattern gives you the perrrfect opportunity to use the strip piecing technique. Simply put, some genius created strip piecing because most quilt patterns are made up of squares and rectangles of the same length, from the same set of fabric.
So, instead of cutting out each individual shape, you cut a long strip of cloth at the appropriate measurement (we just talked about that whole size thing, remember?), then sew all of these long strips together into a long, beautiful ribbon of possibility. From there… you guessed it: you whip out that strip and cut out all the shapes (in this case, a whole lot of rectangles) without worrying about wasting fabric, or running out of space next to that pesky fabric edge. Yes, it’s basically magic. You’ll love it. And if you’re prepping a Rail Fence quilt, it’s basically a must.
A different genius...or maybe the same one...it's tough to say, invented this Stripology ruler. Here's the scoop – it's a large piece of plexy with slits at every 1/2" so you don't have to lift up your ruler and adjust every time you want to make a cut. It's amazing. You'll get it and never look back.
Oh, I almost forgot…
Rail Fence Quilt Step 4. The Sewing Part
This is where that quarter-inch seam comes in. You’re going to be sewing a lot of strips. A lot. And your seam measurement? Yeah, I know you know. That 1/4" seam is going to be put into play time after time, as you piece together your strips into blocks, and your blocks into a finished quilt pattern. And as always, press those seams toward the darker-colored fabric every time. Your post-quilt critical mind will thank you.
There are some gorgeous, must-see Rail Fence quilts featured in this post but I know I missed some. Send them at me! And then get to work on a creation of your own, and become the quarter-inch-seam boss I know you can be.


You’re so funny! I’ve never really wanted to make a rail fence quilt before, but suddenly, I sort of want to. I’ll get there. I love it in solids, though. Thanks for the tutorial. (I agree that the Stripology ruler is AWESOME).
To tell you the truth, I haven’t thought much about the Rail Fence since I made my first couple quilts…many MANY years ago. Now that Kona is selling tons of great solid jelly rolls, I’m thinking it’s time to freshen up my Rail Fence game. 😉
Adorei as idéias. Parabéns são lindas
AHhh… you seriously just made me order SOO many things!! lol thanks a lot 😉 But actually, thank you- so nice to get recommendations on tools and things to make the process easier! I love your tutorials!! (And your Insta-stories 😉
Always happy to enable a shopping spree! Life motto: Treat Yo Self! (just don’t tell my husband. hehe)
Thank you Suzy! You make this sound so easy and your version is so so pretty!
Thanks, E!
Thanks so much for the reminder of how great a rail fence quilt can be. My first quilt was also a rail fence. We received the good news last night of a grand baby that is on the way. I think this will make a wonderful quilt for our future grandchild.
Congrats, Gayle!! That’s so exciting! If you’re getting a warm-weather grand baby, this would be a a quick, low cost quilt to make for outside play time. 🙂
Thank you for always inspired me. I wish I can go home and start a new quilt, I guess is going to be a long night tonight after I get home from work. Have a great week!
Evelyn, I think you should treat yourself to a jelly roll. After working so hard, you deserve it! xoxo
great instructions here log cabin I cannot do never looks stratight but find these a bit easier though have not made a full quilt just used the block in sampler quilts, thanks for sharing will be back for another read when I have anothet go at a block, wills ave your link
I have a Kona Blues jelly roll in the drawer. Think I need to pull it out.
Thank you~ Now I am going to try to make this tomorrow.
I love that you are so talented and creative but make everyone feel wonderful about using precut fabric!! 💙
This will be my first attempt at a quilt!! Would it take 2 jelly rolls to make a queen size quilt(doing the Split Rail)?
A queen quilt is typically 90″ x 108 (see https://suzyquilts.com/quilt-sizes-chart/). If you want this exact look, 2 jelly rolls will work, but add a slightly wider boarder.
Thank you!!!
I had free a lot of jelly roll strips left from other projects. I saw a split rail quilt and thought I’d use the strips in this quilt. Your post gave me the info I needed. I do have a stripology ruler (actually 2) and love them. Thanks for your blog.
Hi, If I didn’t want to use a jelly roll how much fabric would I need to buy or take from my stash?
You just need 24 – 2 1/2″ x 39″ strips. If you want to use smaller scraps, divide them up by color and cut them into 2 1/2″ x 6 1/2″ strips. Make sense?
Yes! Thank you!
What if I’m using bright printed fabric. How do I distinguish between light and dark. Will it still work.
It will still work, however it will have a more blended look rather than 3 distinct rows.
Rail Fence has always been my ‘go-to’ baby quilt when I’m in a rush to complete a last minute gift. The simple design blends well with both bright and subdued fabrics. Plus…it’s easy!!
Hey, I have only quilted one and it was a lap quilt called “Hobo Quilt” because I am craxy about trains. I have some beautiful pastel colored fabric called Heather that I want to make a rail quilt out of, but it will be scrappy from the word go, so I hope it will look ok that way. Any advice from you would be appreciated. There will be a nice border of rose print for the edges.. Thanks
A scrappy rail fence is a great idea! You could cut all of your scraps the same size, throw them in a bag, and then pull them out as you sew them together. I recommend chain piecing the blocks and then chain piecing the rows.
I was thinking about making a rail fence quilt with my stash. And all that I can say about it is that it will be a colorful quilt top! Thanks!!!
I have started a fence rail quilt. The strips are 2 1/2″x6 1/2″. Four colored strips. When I lay out the 4 strips, what I sewed together, to make my square, they do not fit as a square. What have I done wrong???? Please help. Thank You.
Jeanette
They will only be square if you have 3 – 2 1/2″ x 6 1/2″ strips. (Subtract the seam allowance and 2 x 3 = 6 – which is the same as the length.)
Thanks Suzy I am new to quilting but not sewing going to have a try at a rail fence quilt .
Can I use 5 strips in each block. I have to have a finished block of 10 inches. First time quilting
You sure can!
Easy directions and very helpful! I think I’m ready to go buy fabric after reading these directions!
I’m new to quilting and am very confused as to using the scant 1/4 inch seam allowance. Is this necessary to get an accurate 1/4 inch seam allowance?
Oooh.. thanks for this tutorial! I recently got a jelly roll with red, white & blue strips & wanted to use it to make something but coldn’t decide what (I’m sick of making Jelly Roll Races… LOL! I made 9 baby quilts from that pattern last summer) & this will be PERFECT! I’ve made Rail Fence before but never with a jelly roll so I’m anxious to try this out! I love your ideas!
Ok, rail fence patterns are great, but I do think an important thing to note is that they are prone to accidental swastikas…so watch out for that.
good point Everet! i agree! i also think that kids should really try this pattern ’cause its really fun!
Hi, I make charity baby quilts , and I am trying out this Rail Fence pattern. I am wondering about doing it as a baby quilt size. Would 5 x 6 blocks work? Or do you have suggestions on size. I am a new quilter so doing baby quilts means I get lots of practice on skills😉😍.
I have suggested quilt sizes here, but really, any size can work for a baby quilt. It’s up to you. This finished size is already pretty small. You could skip the borders and make it even smaller.
Thank you for responding on Holiday weekend! 😍
Hi Suzy! Can this pattern be followed for a JR jelly roll to make a baby quilt? Thanks!
Yes, definitely!
In step 2, using 2 1/2 ” strips, 42 ” long, my finished unit at this beginning point are 7″ x 42″. That is using the 1/4 ” seam allowance. ( 2 1/2 + 2 1/2 + 2 1/2 = 7 1/2″). (7 1/2 – 1/2 ” seam allowance = 7 “)
Does this make sense to you?
So therefore in step 3, my squares should be cut into 7 x7 ” pieces in order for the rail fence pattern to work.
Love the pattern, thanks so much.
The only reason this doesn’t quite work is that every time you sew strips together you lose 1/2″. When you sew the first set of strips together (2 1/2″ + 2 1/2″) instead of getting 5″ you get 4 1/2″. Once you sew another strip to that unit (4 1/2″ + 2 1/2″), instead of getting 7″ you get 6 1/2″.
Thanks for all your videos and tutorials. The details are so helpful!! You set me up for success 🙂 I just finished a Christmas throw quilt using a jelly roll and this rail fence pattern. It was my first quilt that I machine quilted (with simple straight lines diagonally both ways across the quilt) and did binding on. It turned out great! Thanks again!!
I would love to make this quilt for my daughter going to college this year. Her room is white yellow and gray. I was thinking a varigated color …. one end of the quilt starting with white then gradually getting to yellow and then to gray …. would that even look good? How could I figure this out?
I think that would look good! I recommend using Kona solids since that company has the most shades of color, making gradients pretty easy to make. If you want to match colors precisely, you could get a panel like this one that shows all of the different shades next to their names.
Question: I was hoping to make this from one jelly roll that I already have. Unfortunately, when I broke open the jelly roll, I found that I didn’t have 24 unique colors that I liked (I only had 18). Is it possible to repeat a color in more than one strip set? What would you need to take into consideration to do so?
P.S. You are such a wonderful, encouraging quilting teacher and inspirer!
Sure, you can repeat as many colors as you like. The quilt will look slightly different (because you’ll have repeating colors and Suzy’s example doesn’t), but it will still look great. The quilt is easily modified to use as many colors as you like, as long as you have 24 total strips (8 sets of 3 strips).
Thank you!
I’ve always liked this pattern love the simple clean look of it.