Fabric Scrap Rope Bowl Tutorial
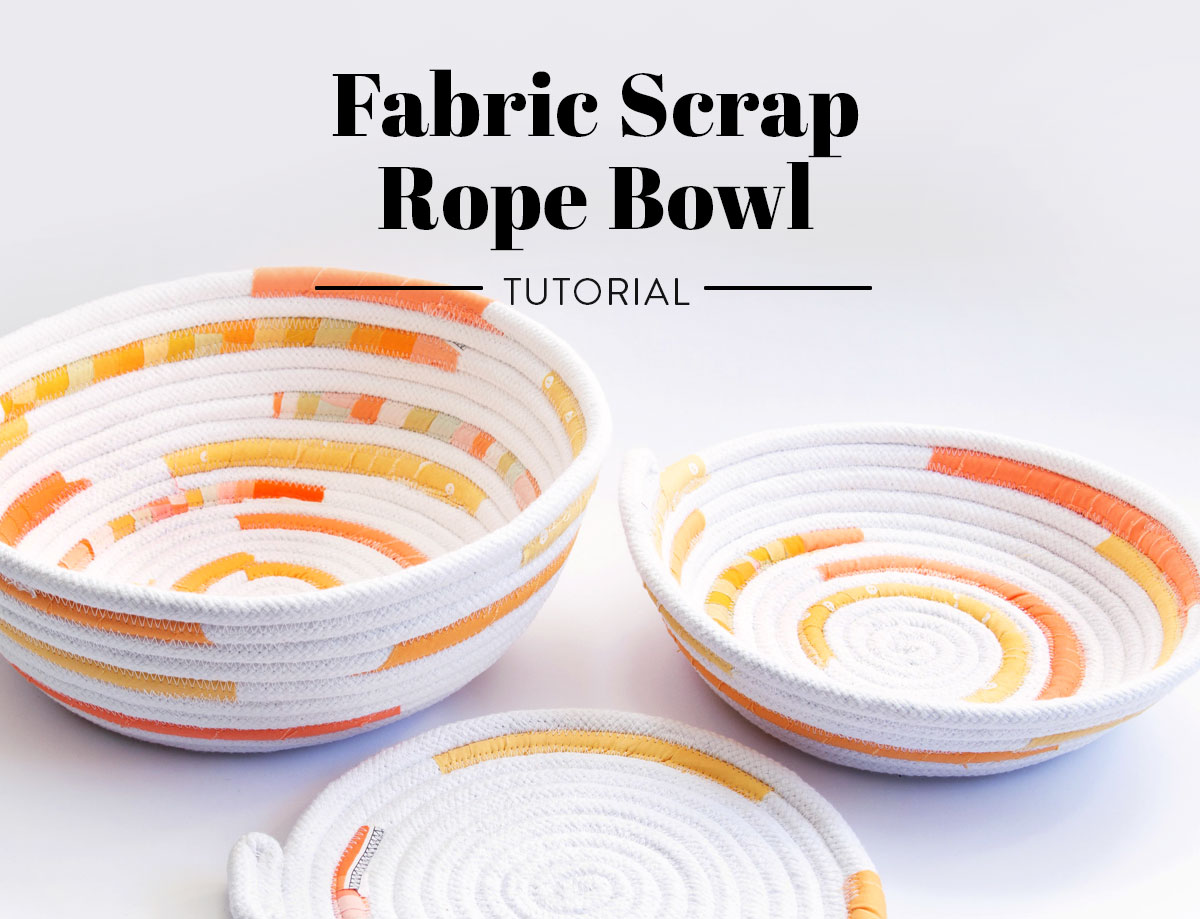
This fabric scrap rope bowl tutorial is simple to follow and will show you how to make a beautiful decoration using leftover fabric! As crafters and sewers, having a stash of scrap fabric is inevitable. Most of us squirrel our fabric away, no matter how big or small.
There are just so many fun prints and beautiful textures out there! Why throw fabric away if it can be used in another project? Having leftover fabric scraps is a sewing rite of passage…but sometimes those bins overflow and it's time to siphon off a few pretty scraps from the top. Follow along with me to learn how to make a decorative fabric scrap rope bowl with pops of vibrant color from your scrap bin!
This easy rope bowl tutorial is a great way to use some scrap fabric and make cute and unique bowls for family, friends, and yourself. Whip one up as a gift basket for the next party or summer BBQ you attend. The host will love your handmade touch!
They are beautiful in any room of the house and immensely practical—what’s not to love? You can even easily adjust these rope bowls to be any size. Depending on your sewing skills, you might even be able to make one in 30 minutes, making them the perfect weekend project.
Recycling fabric into a rope bowl is also a creative way to keep scraps out of a landfill. Using what you have is an important step in sustainable quilting, so keep reading for this creative way to use scraps! You most likely have everything you need for this project already; however, if you don't have some simple rope, read below for my suggestions.
Trending patterns!


Quilt Patterns


Quilt Patterns


Quilt Patterns


Quilt Patterns


Quilt Patterns


Quilt Patterns


Quilt Patterns


Quilt Patterns


Quilt Patterns
You Might Also Like...

Fabric Scrap Rope Bowl Supplies
This tutorial is for a fabric bowl of any size. The amount of rope you use determines how big or small your bowl will be. Once you start making your bowl, you can stop at any time or see how big you take it!
- Rope: 3/8 inch white cotton or polyester rope. You'll need at least 20 yards total to make three bowls like the ones shown in this tutorial.
- Scrap fabric: This project works best with long scraps, preferably the width of fabric (roughly 42"), but that is not required.
- Coordinating thread
- Jean/Denim Needle 100/16
- Binder clips or pins
- Scissors

Step 1: Cut Fabric Scraps
Cut 20 pieces of fabric to 1-1/2 inches by the WOF. Raid your scrap bin for leftover binding strips, the ends of yardage, or unused jelly roll strips!

Step 2: Secure the Bowl Center
Creating a fabric bowl starts with making sure the center is tightly secure. Roll the beginning of the rope into a coil and pin in place. Place the rope under the presser foot and lower the presser foot. Set the machine to a zigzag stitch and increase the stitch width to 5.5 - 6.0. That might seem wide, but it ensures the needle catches both sides of the rope.

Stitch forward and backward at the center, ensuring the entire center is stitched securely together. After making sure the center will not come apart, move on to sewing the bowl bottom. Use your left hand to guide the rope under the presser foot, making sure it doesn't shift under the presser foot. Use your right hand to hold the feeding rope up against the rope under the presser foot.

Step 3: Add Fabric Pieces to the Rope
Now that a good amount of the bottom is stitched, decide when to add the first fabric strip. Cut the top of the fabric strip at a 45-degree angle. Starting with the cut edge, wrap the fabric around the rope tightly.
Add fabric wherever you want to. That is the beauty of this project! You can distribute the material onto the rope for a fun visual that combines fabric and rope, or you can cover the entire cord with fabric. Let your imagination run wild!

Step 4: Shape the Bowl
Once the bowl bottom reaches a 6-7 inch diameter, it's time to start shaping the sides of the bowl. To do this, lift the diameter of the bowl against the sewing machine with your left hand. This will force the bowl to start bending the sides upward.

Continue sewing like this until the bowl is the height and depth you want it to be or until you run out of rope.

Step 5: Finish the Bowl
As you get closer to the rope's end, be mindful of how you want to finish the bowl. These bowls sew up quickly, so the possibility of you reaching the end before you realize it can happen.
To not be surprised at the end of your length of rope, fold the end in 4 inches and pin it. Continuing sew until you get to the folded rope. This portion of the basket needs to have the same reinforcement as the bottom. Continue sewing the rope to the edge of the bowl until you get to the bend. Reverse and sew backward to reinforce the stitches. Then sew forward again, closing the folded pieces of the rope.
Reverse the stitch again for added reinforcement. This little handle is going to be touched very often!

Step 6: Enjoy Your New Fabric Bowl(s)
Hooray!! You made a sustainable cute fabric bowl. How fun was that?!
Are you ready to make another? Yes, it's pretty addictive. Once you see how easy it is to make one, you will have the urge to make more. You can make them in any size and shape you like. Experiment and make flat pieces as well. They make excellent coasters! Who are you going to make a fabric scrap rope bowl for?


What size needle is best for this project?
Hi Nancy! A jeans/denim needle is best for this project. You can find a link to where to buy one in the supply list of this tutorial!
If you want a finished edge to the fabric – turn it under 1/4″ and press before using it.
A video of this one would be helpful if possible. I’d love to try it but not sure about it without seeing the action of it.
LOVE THIS! I will be making them for some friends who don’t sew…at all… I can’t imagine NOT sewing/quilting!!!
Same! I’m constantly sewing/mending things for my Bros.
These are beautiful! Thank you for this tutorial. I think when I am ready to make the sides of the bowl, the bottom is lifted with my LEFT hand. … Right?
Yes! We’ve updated that typo, thanks 🙂
Another little tip. The coils have to be sewn in a certain direction (counter-clockwise if I remember right), keeping the cord tail toward the left of the coil as it builds so that when you begin to curve the sides, the bowl can be built on the outside of your sewing machine, rather than getting stuck in the throat space. I hope this makes sense 🤪!!
i’d think that should be reversed – and go clockwise so the curved bowl would be on the left.
I love the bowl. I already have suitable rope and heaps of fabric. I can’t wait to get sewing to make several of these bowls.
Thanks Suzy for sharing this great design.
Do you have a PDF of this tutorial?
Hey Lola! We do not create separate PDFs of our blog posts, only the quilt patterns we sell in our shop. But you’re welcome to print the tutorial out if you’d rather have a paper copy!
The rope shown in the photos is not the rope linked under materials. The rope off is the link is 3 strand rope. Could you tell me the type of rope in the photos? I can not think of the name of it.
Here’s a link to braided rope! https://amzn.to/3FNt3Ap
Thank you!!
Love this! So easy, beautiful and useful.
How much rope does each bowl take? The post says 20 yards total for the 3 bowls, but it would be helpful to have an idea of how much rope makes how big a bowl.
The bowls were made using 4 yards, 6 yards, and 10 yards, but our contributor (Kymona) encourages you to experiment and find a size you like too!
I’m co fused at how it takes 20 yards of fabric. That is a lot for scraps. It seems like most.of the bowl is rope with a few color pieces of fabric on there. What am I missing? Is all the rope wrapped in fabric?
You’ll use a total of 20 yards of rope if you want to make the three bowls in the tutorial. You can use scraps of fabric cut to approximately the dimensions listed in step 1 of the tutorial 🙂
I think this means 20 yards in length, cut at 1.5”, not 20 yards of 36” per yard!
Hey Rita! As noted in my other comment above, the tutorial calls for 20 yards of rope, not 20 yards of fabric. 🙂 The fabric is used is scraps cut at approximately 1.5″ x WOF, as noted in Step 1.
Should I use my dual feed ( walking foot) or just regular zigzag foot
The photos in the tutorial show just a regular foot.
The foot looks very wide – this is not a regular foot? I can’t imagine getting rope under an ordinary foot?
You can certainly use a regular foot, I’ve made many bowls in the past, not from this tutorial but these are remarkably easy to make, just go for it . They’re really not complicated, you can’t go wrong.
So – if I’ve been emotionally scarred by failed attempts at macrame – you’re saying that this might be the solution for my thicker strings/ropes?
Does it need to be 3/8″? Could I use a 3/16″poly rope?
Any sewing machine can do this? I don’t want to break my machine.
Yep! You don’t need a special machine to make a rope bowl. Have fun!
Love this pattern. After make 4 jelly roll rugs, this looks do-able for sure!
Questions: How do you keep the side edges of the fabric from fraying?
I see the directions for starting g a fabric strip which would bury the beginning cut
edges, but how do you end the strip? Fold under?
Thanks so much!
Found this pattern and love it. I’ve made a number of bowls and trivets with 1/4 ” braided clothesline rope, as that was the only thing I could find at my hardware store. Finally ordered the 3/8 braided sash cord from Amazon and tried it today. Despite having a Janome heavy duty machine, and a denim needle, I almost broke my machine with the thickness of the 3/8 rope. I guess I’ll be going back to the quarter inch. Thank you for the pattern.
The rope linked in the supplies and in the “Thoughts” should be replaced. I just received this rope today and it is not solid natural in color. The center of the rope is red and the color shows through. Just a thought so no one else orders it unless they’re ok with a speckled rope.
Thank you for the tutorial.
Is a Wide zig zag stitch used here?
Yep! Here’s what the tutorial’s author says in Step 2 of the instructions: “Set the machine to a zigzag stitch and increase the stitch width to 5.5 – 6.0. That might seem wide, but it ensures the needle catches both sides of the rope.” Enjoy making your own rope bowl!
Potentially silly question: do you know of a way to make a square bowl? Insert something into corners to shape maybe? I ask because I want to make a liner for my cargo bike front tray so my little ones’ toys I get to haul don’t keep scratching all the paint off, ha ha! Cheers from a TSU alum.
That’s a good question! I’ve never seen one that is square, but if you find a way, definitely come back and let us know how you did it! You might have good luck making a liner using fabric and a hefty interfacing like Soft and Stable.
Here’s a link for square rope bowls -HOW TO – MAKE A SQUARE ROPE BASKET – raw edges
Crafty Patti
https://www.youtube.com/watch?v=wFkILZkIkb0
It was more difficult than the round but doable. I have gone a little nuts with the round, trivets bowls, bags. Love making them, fast & sturdy. There are a few books out there with all kinds of ideas. I love your Fabric scrap bowl tutorial ! The plain robe with fabric here & there is a nice decorative touch. Also the 2 different size bowls with a trivet would make a nice gift & the way you bent the cord over at the end & makes a handle is cool. Just in case anyone is wondering, trivets can need a good wash & bowls also. I have washed them on a delicate cycle & spin dry but usually air dry the bowls. trivets do ok in dryer.
Great Tute – what does WOF mean?? width of fabric?
Also Wal-MArt has a great clothesline rope – a little thinner than the braided – and I just use a regular needle with my Janome sewing machine.
than you for sharing. (another nice tute on You TUbe by Martha)
Yes, WOF means width of fabric.
Thanks for sharing this great tutorial. I ordered the rope thru your link and it is not white, it is tan. Very disappointing. Do you have a link to the white rope?
Oh goodness, so sorry! That link must have changed since this was originally posted. You can get great rope from Mountain Thread Company, they specialize in rope for thread bowls! https://www.themountainthreadcompany.com/rope