How to Cut Templates for Quilting: The Perfect Guide for Beginner Sewers
My Quilting 101 series is all about learning survival techniques for the quilting journey. I want to make sure you know everything you need to know to start your first quilt. Even though most beginner quilt patterns won't have you cutting templates, eventually you may want to know. So I'm tacking How to Cut Templates into the Quilting 101 course. Check out the tab above to read more Quilting 101 blog posts!
Can I just say something? (That was a rhetorical question. I’m saying it.) CUTTING TEMPLATES IS NOT HARD. I you know how to use scissors or rotary cutter, so you have all the prerequisites under your belt. You’re going to read this post and be like, “Um, Suzy? Really? That’s so easy.”
And you’ll be right. But hopefully I have a few tips and tricks that will make your life even easier, because that’s what I’m here for. That, and ice cream. I’m also here for ice cream. (I just posted the free Waffle Cone quilt pattern and still have sweets on the brain. yummmm!)
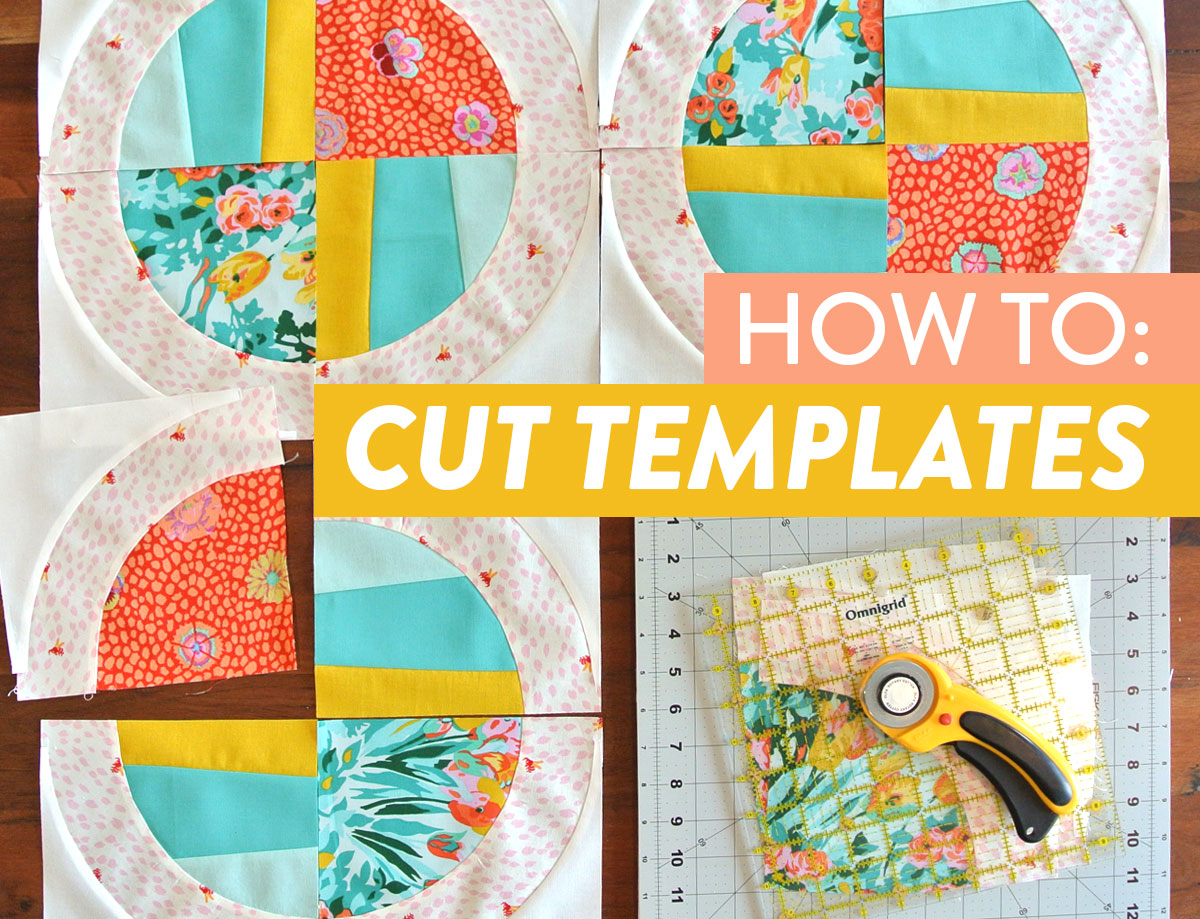
Check out this tutorial video on how to cut templates! The instructions are specifically for the Bayside quilt pattern.
Some Patterns That Use Templates (Some are Free!)
- Ahoy Sailor Quilt Pattern
- Aria Quilt Pattern
- Bayside Quilt Pattern
- Bird Watching Quilt Pattern
- Hidden Garden Quilt Pattern
- Liberty & Flowers Quilt Pattern - lavender and mustard quilt shown below
- Little Houses Quilt Pattern
- Mosaic Quilt Pattern
- Minimal Triangles Quilt Pattern
- Mod Melons Quilt Pattern
- Propeller Quilt Pattern
- Through the Looking Glass Quilt Pattern
If you're like, I don't got time to watch a video on how to cut templates! I need to know NOW! No prob, baby. Chilllll. Let’s break this into steps.
Trending patterns!


Quilt Patterns


Quilt Patterns


Quilt Patterns


Quilt Patterns


Quilt Patterns


Quilt Patterns


Quilt Patterns


Quilt Patterns


Quilt Patterns

How to Cut Templates:
Step 1 - Print the Template
Some Suzy Quilts patterns, as well as many others in the quilting world, come with printable templates for you to use. There is ONE KEY THING to keep in mind when printing these — print them to-scale.
- Make sure your printer does not scale down your templates. Some printers automatically “scale to fit” when they print, and it will make your template slightly smaller than it should be. Not cool, printer!
- You can double-check that your template is printed to the correct scale by measuring the “test square” included with many printable templates. It’s usually a square inch, and you can use a ruler to make sure you’re right on target before you start snipping your fabric.
Step 2 - Cut the Template (Hint: Use Template Sheets)
It’s go time. After you know for sure that you have printed your templates correctly, it’s time to cut them out! Feel free to use scissors or a ruler and rotary cutter to set those babies free. But make sure to…
- Use paper scissors and NOT your fabric scissors if you’re going the scissor route! Nothing is worse than dulling-up your fabric scissors with simple stuff like paper templates! They have an important job to do. Keep ‘em fresh and sharp.
- Cut precisely! Start your project right by making sure your templates are cut carefully. You know that game called “telephone” where a message is passed from person to person and then at the end it’s all different and doesn’t make sense? Template cutting is a little like that — if the original template isn’t cut clearly, all the subsequent pieces will be different and not make sense. Get it? Maybe that was just confusing...just cut carefully!
Note! If you will be using the same templates many times, I recommend getting vinyl template sheets. Simply trace your printed template onto the sheets and cut the shape out with NON-fabric scissors. I really like these non-stick vinyal sheets because the printed grid helps me stay accurate.

Step 3 - Use the Template to Cut Fabric
Don’t overthink this. If you do your best to cut the fabric as closely to the template as possible, you’re doing it right. That said, here are a few things you should know:
- Whenever possible, cut with the grain of the fabric. Cutting “on grain” means cutting edges so that they line up with the weft and warp of the fabric (or, length and width.) This will make sure your fabric has the minimal amount of stretch to it. When you cut a bias edge (or, diagonally across the fabric), you are making your pieces more susceptible to stretch.
- Cut smart! To minimize the amount of cuts you have to make, cut strips the width or height of your template so that you don’t have to re-cut the same edges over and over. If you have a number of pieces with the same width (which you likely will!) set yourself up by cutting out strips first and then sub-cut the templates from that. Check out the video below for an example of how to do this.
- Unless your template is equilateral (equal on all sides) it most likely has a direction. Unless the pattern specifically tells you to flip or reverse the template, keep your template right-side up! Most patterns need your pieces to be facing a certain way. If cutting one at a time is too slow for you, you can stack fabric right side up and then cut with your template. The directional template will get messed up if you cut doubled up fabric and part of the fabric is facing down while the other is facing up. Make sense?
- Templates are made extra easy if using batiks or solid fabric because they are completely reversible. They're the same on both sides, baby! So if you use a reversible fabric, not only can you ignore my last point, you can also cut double time! Since the templates no longer need to be directional, you can fold the fabric in half before cutting, so you are essentially cutting two at a time. This ONLY works if your fabric is reversible, though!
The quilt pattern used in the video is the Mosaic quilt pattern.
Another Note! This is probably obvious, but the way you cut your fabric is the way it will be when you quilt it together. This means, if you’re using fabric with images or a pattern, cut it to frame (also known as fussy cutting) the images the way you want them!
I fussy cut all of the Charley Harper birdies with my Bird Watching quilt pattern (It's a free one!). I didn’t want to cut all those cute little birdies’ heads off!

And that’s it! It’s as easy as 1, 2, 3 (plus a few extra notes!) Hopefully these three steps will help you cut with confidence while using templates! Do you have a favorite pattern, tool or technique? Let me know in the comments!


I am so very glad I watched this! I bought your Bayside pattern although I’m not ready to make it yet, but it sure makes cutting and using templates much easier. I wish there would have been such a clear tutorial available back when I was struggling with some quilts I was making. Thanks Suzy.
Thanks Susie! I love your perky, informative, humorous blog. Another suggestion especially for cutting curved templates might be to use something on the bottom of the template to keep it from slipping. Possibly another good tip would be to use a rotating cutting mat.
Very helpful! I would love to see a drunkards path cutting/squaring up tutorial:) I tried this a few times and I was able to sew the pieces together but the blocks were different sizes!
I got you covered! Check out this video for me Propeller quilt pattern – https://www.youtube.com/watch?v=SR_ywxilZe0
Wow, I thought that cutting was so easy. Boy did I learn a lot watching your class. I am so glad I watched this class. Thank you so much!
I have a pattern that says rotate template for each cut.. there are 2 templates the same size but different direction, so can I assume this is for wasting less fabric?
That’s what I’d assume.
I have a “non-fabric” rotary cutter too. It’s a cheapy old cutter and I put a used blade in it. I use it for all sorts of things like paper (as in these templates), vinyl and zippers. I plan on trying it with those plastic sheets too. Keep those good blades as long as possible!
Looking for templates to make pinwheel out of neckties 24 to. 30 long one place. Thanks.
Hello Suzy,
I have been hunting for a HOW TO on how to CHOOSE the best template plastic sheets for creating my own templates. There are so many mils, sizes, etc. Is there a H2 on your website that I am just missing? Thanks in advance! GGCastillo
I’ve had a lot of luck with these vinyl template sheets – https://amzn.to/3eqfhIr
Suzie, Maybe I missed it in the video, but why did you cut the paper template down, after using it?
Thanks!
Love all your posts and videos. Been quilting a long time, but it’s always refreshing to see new ways of doing things.
When making the Bayside pattern you cut the template down to make different blocks.
I have used templates a few times and like using the plastic version traced from the paper. A thing to note that one should label these templates with a sharpie for future use so one would know what this template is for and size.
Suzy,
Thank you, This will help me with cutting my pieces. I’m still learning so far I haven’t
followed a pattern I’ve only sewed four quilt tops together
1 sports quilt which I quilted on my machine for my grandson.
1 T-Shirt quilt for my son ( which I took it to a quilting store, I had to use their backing and batting, They did a excellent job but the backing was white and the batting made the quilt very lite weight )
2 quilt tops where the center is a English paper piece 35×32 1 I did all of the block and the second one I completed the center blocks and sewed them all together. I made one to go on an extra long twin bed and for a queen.
I need to go upstairs to sew more often than I do, Its very relaxing.
Thank you
Nancy
I love the circles in squares pictured in this article- but cannot find that pattern. Does anyone know the name???
I’m so glad you like the pattern! That’s the Modern Fans pattern and you can get it in the shop.
I just found you. I just got a sewing box from Mrs. Quilty, and it has templates. I had no idea how to begin. You made it easy to understand. My templates include dotted lines for the 1/4-inch SA. Do I trim next to that line when cutting out the templates and would I need to trim again as you did once I have cut the templates out?
Thank you for this tutorial.
Hi Cynthia! That would likely be a question for the maker of the templates that you are working with as they might have different instructions. This tutorial was specifically for the Bayside quilt that involves trimming the template down a couple of time. We’re so glad that you found it helpful though! Cheering you on!