How to Make a Patchwork Bandana with Adventureland Scraps
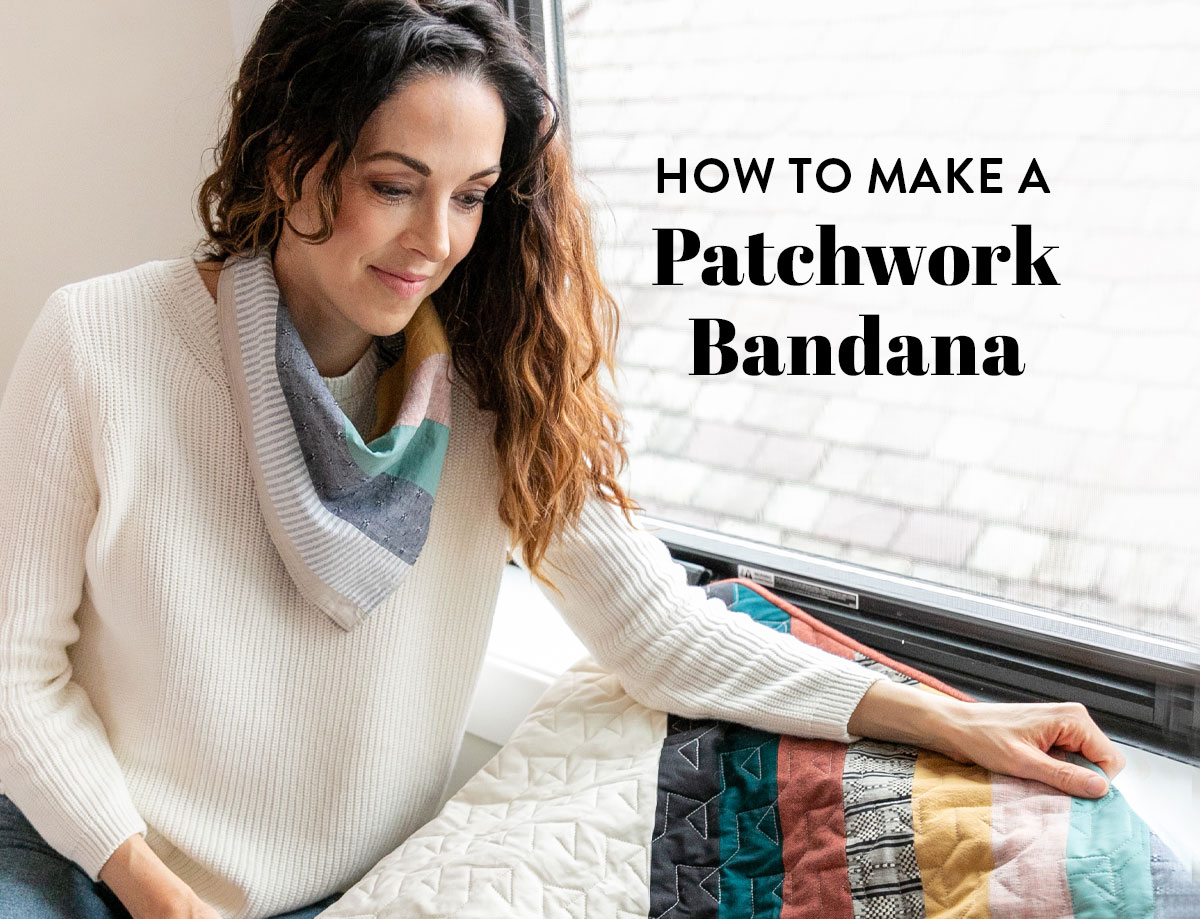
Can you think of anything better than finishing a new quilt? I’ll wait. Got nothing? How about matching your brand new quilt with a stylish bandana! If you’ve just made an Adventureland quilt and aren’t quite sure what to do with those big, beautiful scraps, then let me show you how to make a patchwork bandana two different ways.
One of the most exciting things about the Adventureland pattern is that when you trim and square up your quilt top, you’re left with four large triangle offcuts for a future project. The creative possibilities are endless! So far we’ve blogged about making mini quilts and scrappy quilt binding. In this post, I will show you how to turn those scraps into a fashionable accessory—a bandana you can wear all year long.
An added benefit of this tutorial is that it’s eco-friendly. We’re using scraps, which you know we love. And, even better, if you’ve made an Adventureland quilt top then you’re already most of the way through this tutorial. The remaining steps to finish this project are quick, easy, and use materials you likely already have in your quilting stash. So, let’s get stitching!
You Might Also Like...
Patchwork Bandana Supplies
- Adventureland quilt pattern
- Two throw-sized Adventureland scrap triangles. I am using scraps from this Pastel Rainbow Adventureland quilt. Use four scrap triangles to make a larger bandana.
- Seam gauge
- Tailor's chalk or water-soluble pen
- Straight pins or binding clips
- General sewing tools
- (For the square bandana only) Backing fabric, about 24" x 24". I’m using Little Rain Cloud in White from Robert Kaufman.
How to Make a Square Patchwork Bandana
As I mentioned before, I'll show you two different ways to make a patchwork bandana. The first way will end up as a square like this. To make it larger, simply sew all four of your triangle scraps together like we did in this mini quilt tutorial. You can trim the mini quilt to size it down to fit your neck as needed.

The benefit of this design is that you can fold it different ways for different looks. It also uses more layers of fabric so it's warmer.


Step 1: Sew Adventureland Triangles Together to Make A Square
First things first, sew two Adventureland triangle scraps together to create a square. Matching seams of diagonal strips can be tricky, so I am excited to share my favorite method with you!

All you need to achieve perfectly matching diagonal seams is a seam gauge (or quilting ruler if you don’t have a gauge) and a water-soluble marking pen. I’m using a black pen here for visibility in photos.
Trending patterns!


Quilt Patterns


Quilt Patterns


Quilt Patterns


Quilt Patterns


Quilt Patterns


Quilt Patterns


Quilt Patterns


Quilt Patterns


Quilt Patterns
On the wrong side of one of the triangles, use your seam gauge to measure 1/4″ along the edge you will be stitching. At each seam, leave a small mark with your pen to indicate the 1/4″ seam allowance you just measured. Repeat with the second triangle, but make sure to mark on the right side of this one.


Lay your two marked triangles on top of one another, right sides together. Use a straight pin to poke directly through the mark on the wrong side of the first triangle, straight through to the matching mark on the right side of the second triangle.
Secure your pin in the two pieces of fabric, and repeat with the remaining seams. Sew along this edge with a 1/4″ seam allowance, and press open. Voila! Perfectly matching diagonal seams.

Step 2: Trim and Square Up
Good news friend, that was the hardest part of this tutorial! Your square patchwork bandana is really starting to take shape now, right? The next step is to trim the bandana top into a perfect square.
Use a rotary cutter and quilting ruler to trim your bandana into a square. After trimming and squaring up your bandana top, cut your backing fabric to the same size. But before trimming, be sure to try your bandana on to see how it fits around your neck!
When trimmed, your patchwork bandana should be about 20” square, give or take an inch, if using only two triangle scraps. A couple of factors could come into play here affecting the size of your banana, including if you prewashed your fabric or the width of the fabric strips.
In order to get the biggest bandana possible, trim as little as you can. Be sure not to go smaller than about 19″ because it will start to get hard to tie around your neck.
Remember—if you use all four triangle scraps, you’ll have a larger bandana to start with that you can trim down to fit you perfectly. Trim as needed.
If you’d like to add a buttonhole to one corner of your bandana instead of tying it when you wear it, keep reading for some video tutorials!

Step 3: Sew Square Bandana Front and Back Together
Next, sew the bandana front and back together. Lay your bandana top and backing fabric on top of one another, right sides together. Pin or clip as needed, and sew along each edge with a 1/4″ seam allowance. Make sure to leave a small hole of about 3-4″ on one side of your bandana so you can turn it right side out.

Step 4: Trim Corners and Turn Patchwork Bandana Right Side Out
To reduce bulk in the finished patchwork bandana, trim the corners. Using a quilting ruler and rotary cutter, measure 1/4″ from the corner seams at a 45-degree angle and trim.

Next, turn your bandana scarf right side out through that small hole you left in the side. Use a point-turner (or pen with a cap on it, or a chopstick, if you don’t have one!) to pop the corners the rest of the way out.

Step 5: Topstitch
Last step, y’all! Time to put the finishing touch on our bandana scarf and topstitch.
Grab ahold of your bandana on either side of the hole you left and give it a light tug. This should cause the raw edges of the hole to turn inside of the bandana. Pin closed.
Topstitch around your bandana scarf using a 1/8″ seam allowance. This is a great opportunity to add some extra pizazz to your scarf by playing with thread weight, color, stitch length, or maybe even using some decorative stitches!

When you reach a corner while topstitching, stop a quarter inch away from the edge, and, with your needle down, pivot 90 degrees to continue sewing along the next side. Sew along the entire edge of your bandana scarf, closing the hole up, and backstitching to secure your stitches.

Here's Suzy showing off her bandana made with scraps from this Adventureland quilt.


How to Make a Triangle Patchwork Bandana
This triangle bandana is simple, lightweight, and can even be used as a baby bib. As mentioned before, instead of tying the ends, you can add a snap or a buttonhole so one end can slip through the other for a more of secure closure.
These instructions are very similar to the ones above, so I'll be brief.

Step 1: Trim Your Triangles
Lay two of your scrap triangles on top of each, lining up the trimmed side. Trim the other two sides so that your triangles are exactly the same.


Step 2: Line Up Your Seams
This isn't totally necessary because you probably won't see this seam when it's around your neck, but if you want to line up your seams you will do it as I mentioned above. Draw a couple of guide marks at a 1/4" then join them with a pin.

Step 3: Sew, Flip and Poke
Sew a 1/4" around the perimeter leaving about 4" or enough room for your hand. Flip the fabric so that the right sides are facing out. You will then poke out the corners just like the square bandana.


Step 4: Press and Topstitch
Press the sides of the bandana, pin, and topstitch all around the edges. It took me longer to type up this tutorial than to actually make the bandana. Huzzah!

Optional: Add a Buttonhole
You can add a snap or buttonhole if you would prefer to not tie your bandana. If you add a button hole you don't necessarily need to add a button. You could just pull the other end through. It's up to you.
Here are video tutorials on adding a buttonhole by machine and by hand. If you use your machine, you will need to look up how to do it specifically with your machine type. I sew on a BERNINA, so here is a video using that kind of machine.
Wear Your Patchwork Bandana Everywhere!
That’s it! You did it! You now have a fabulous bandana scarf to match your already fabulous Adventureland quilt. Whether you’re twinning with your quilt while picnicking at the park or showing your love for patchwork at the office, your Adventureland patchwork bandana is the perfect companion.
Let us know in the comments where you would wear an Adventureland patchwork bandana, and if you make one be sure to share it with us on social media using #AdventurelandQuilt, #SuzyQuiltsPatterns, and #SuzyQuiltsBlog!
Below is little Joanna Quilts sporting her pastel rainbow bib bandana. She's been fighting a cold all week, but she rallied for a photo. That's how much she likes her bandana! 😉


Thanks so much for the tutorial. I look forward to Suzy’s tutorials and often use them for gifts. I have to ask, is there a listing of the fabric showcased in the Adventureland Quilt in this article. I need to know! I love the color scheme. Thanks!
Thank you! There is if you check out this post – https://suzyquilts.com/adventureland-pastel-rainbow/
Loved your sherbet-looking bandana, especially on the adorable baby! I made something similar for my niece’s baby shower. The hostesses & special guests wore them. Used left over fabric from the baby quilt I made for the arrival of my great nephew. It was Beatrix Potter fabric focusing on Peter Rabbit. We decorated with fresh vegetables from “Mr. McGregor’s” garden & used garden tools out of the shed. The vegetables were used as favors. Had lots of orders for the bandanas too. Your photos took me down memory (Blackberry) lane of that special day. Thank you! I enjoy opening your site on Saturday mornings!!
If you do a diagonal stitch at the the corner—that is, stitch stitch stitch diagonal stitch stitch stitch etc—you will get a much sharper corner. It defies all logic but it works far better than sewing at right angles.
These are sooooo cute. I am going to make one. Love the baby “model” So sweet.