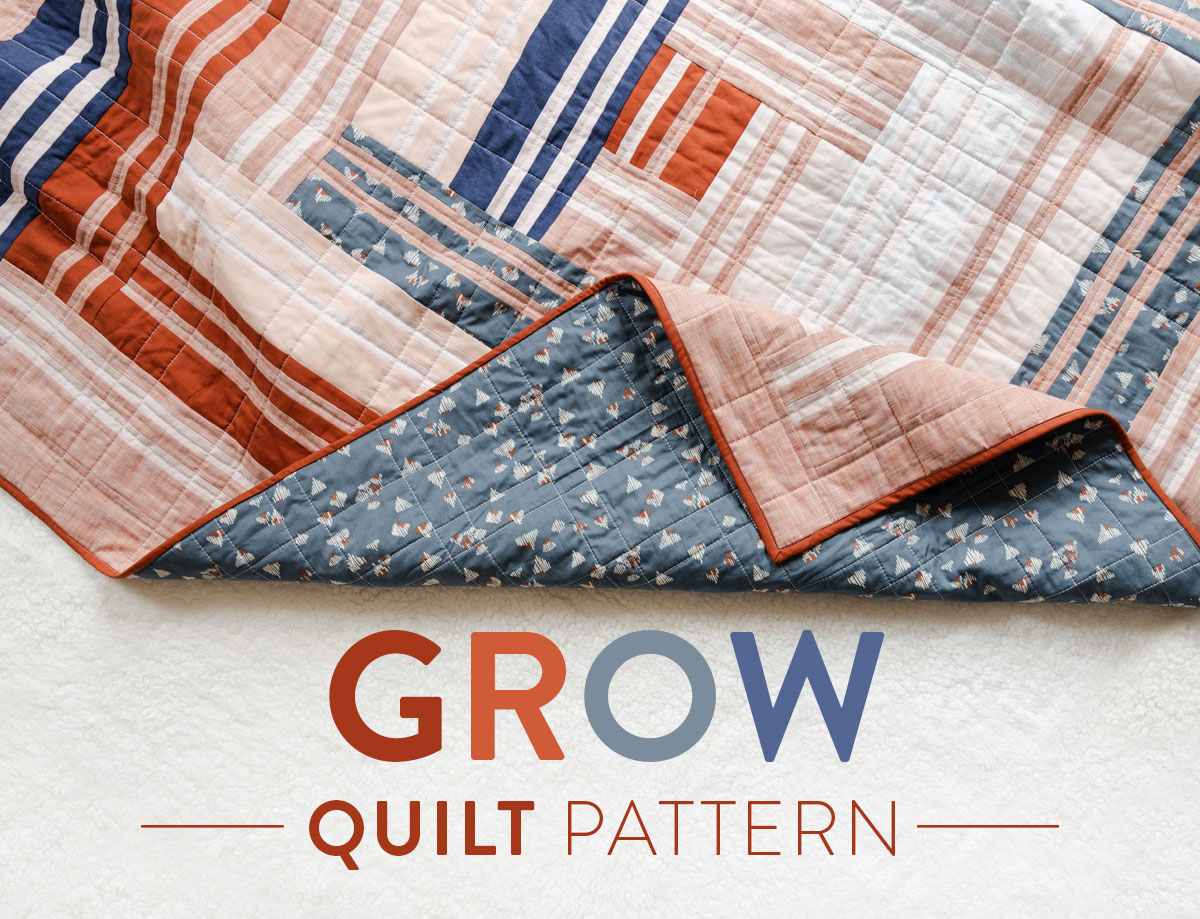
The Grow Quilt Pattern: Sewing Tips & Color Variations
The Grow quilt pattern is now available for digital download! Click here!
This modern medallion quilt pattern looks vastly different based on the colors and fabrics you pick. One fun way to test out color combinations is the free Recolor app. Join the Suzy Quilts Patterns Facebook Group to see a video on how to use this app on your phone or tablet to color in the line mock-up included in all SQ patterns.
Grow is the first design in a series of four quilts that represent the four seasons in a year, as well as seasons in our lives. Each pattern focuses on a sewing skill along with a general life meditation. Since quilting can naturally be meditative and restorative, these meditations will be an added thing to consider as you walk through the quilt-making process.
Grow Quilt Pattern Specs
The Grow pattern includes instructions and fabric requirements for the following sizes:
- King - 116" X 116"
- Queen/Full - 86" x 100"
- Twin - 79" x 92"
- Throw - 61" x 61"
- Baby - 40" x 40"


Grow Quilt: Building Your Strip Piecing Skills
The Grow pattern is listed as moderate in skill level, not because it is exceptionally tricky, but because sewing long strips utilizes different sewing techniques than classic patchwork blocks.
Trending patterns!


Quilt Patterns


Quilt Patterns


Quilt Patterns


Quilt Patterns


Quilt Patterns


Quilt Patterns


Quilt Patterns


Quilt Patterns


Quilt Patterns
The primary skill involved in making the Grow quilt is strip piecing and pressing. I enjoy setting up a pressing mat and iron by my sewing machine so that I can sew some strips together, press them, then continue sewing without even standing up. My Fitbit isn't happy with me, but the convenience is wonderful!
I use:
While we're on the subject of the tailor's clapper, I highly recommend getting one or making your own. The beauty of these wooden clappers is that no matter how much shifting or folding your seams go through, they remain perfectly flat through it all.
Is steam and a hot iron enough? Yeah, technically it will do the job, but those seams won't remain flat through multiple passes through the sewing machine if using steam alone.


2 Strip Piecing Tips
Now that we've talked about pressing, let's take a step back and review the two steps that have to happen before your iron comes into play – cutting and sewing.

How to Cut Straight Strips
The key to cutting straight strips is to cut them on the grain of the fabric. Here are three steps to get the absolute straightest of straight strips.
- Pre-wash your fabric. Woven fabric is made by weaving threads together both vertically and horizontally. (For a detailed description on how fabric is made, see this post How is Fabric Made?) Those threads can be stretched and distorted after living life on a bolt. Pre-washing your fabric will help those threads figure themselves out and settle into their proper vertical and horizontal weave.
- Rip your fabric vertically from selvage to selvage. Start by making a small snip through the selvage an inch away from the edge of your fabric. Then rip. Rip that strip all the way off. If the strip didn't make it to the other selvage, snip through your selvage again a little further in. Since fabric rips on grain, the point of this is to get the edge of your fabric to be on grain.
- Fold your fabric in half by lining up the selvages. Now that the edge of your fabric is on grain, you can line up your ruler with the edge of your fabric and know that your strips will be straight – so no warping at the fold! Every 1/2 yd. or so you can re-rip your fabric to make sure things are still on grain.
Here's a visual of basic cutting with a cutting mat, ruler and rotary cutter.

How to Sew Straight Strips
There's really not a lot to it and the worst thing you can do is over think it. Here are my two tips:
- Don't pin. Just don't. Even if your Type-A brain is screaming at you to do it, it's not worth it. Any distortion will press out. And it if doesn't completely press out, the way this quilt is sewn together it will all even out throughout the quilt top.
- Sew slow-ish and keep your 1/4" seam. You don't need to sew as slowly as you would if machine quilting, but sew slower than you would if chaining together a bunch of half square triangles. Know what I mean?
No?
I tell people to sew at half speed when machine quilting. When strip piecing I recommend sewing at 75% speed.

This fabric is called Weft and Warp by Ruby Star Society and this quilt was sewn by Sarah of @sarah_made.

Isn't that big-stitch binding pretty? I filmed a quick and dirty big-stitch binding tutorial in my Instagram stories that you can see here. Desi was only a few weeks old and the three of us (including Scrap) were living life in bed. It was awesome.
Grow Quilts in the Wild
Earthy Grow Quilt Kit - Purchase Now!

This earthy Grow quilt was made by Nuria of Fabric Stork. For a limited time you can purchase this quilt kit. This is a limited edition quilt kit contains everything you need to make this quilt including backing and binding.


Modern Rainbow Quilt Kit - Purchase Now!
This modern rainbow Grow quilt slightly deviates from the original layout, but Fabric Stork takes that into account in curating this kit. This bundle contains all of the fabric you need to make a quilt top and the binding.

Spring Flowers Grow Quilt by Lydia of Arve Handmade – Purchase the Kit!
This kit, curated by Lydia in collaboration with Lamb and Loom Fabric includes all of the fabric you need to make this quilt top and binding fabric.

The kit includes:
- Ivory | Moda Bella Solids
- Lemon Tart | Art Gallery Fabrics Pure Solids
- Chelsea | Mayfair by Amy Sinibaldi
- Migration North | Earthen By Katarina Roccella
- Serein Branchlet | Earthern By Katarina Roccella
- Serein Branchlet | Earthern By Katarina Roccella
- Night Sea | Art Gallery Fabrics Pure Solids
- Binding: Serein Branchlet | Earthern By Katarina Roccella

Blue Skies Over Summer Meadows Baby Grow Quilt by Taslim Sidi


Aqua Seaweed Baby Grow Quilt by Jessica Schunk

Terracotta Grow Quilt by Woven and Woolly

There are a few kits left at Cottoneer if you act quickly! Terracotta Grow Throw Fabric:
- 2 yd – Manchester Yarn-Dyed in Sienna
- 1/4 yd – Elevation in Lingerie
- 1 yd – Kona Spice (includes 1/2 yard for binding)
- 1/2 yd – Peppered Cotton in Midnight
- 1/2 yd – Kona Ice Peach
- 1/2 yd – Lore and Legend | Spirited by Sharon Holland
- 1 yd – Kona Shell


Orange Grove Grow Quilt by Claire of The Stitch Saloon

Rose Garden Grow Quilt by Isabel of Lamb and Wolfie

Rainbow Baby Grow Quilt by Catalina of Working Hands Studio


Hydrangeas and Lilies Grow Quilt by Jennifer of Penelope Handmade

Hawthorne Supply Baby Grow Quilt by Emily of Handmade by Emily Jane


Hi Suzy! Would you recommend to starch the fabric prior to cutting? Is it doable without it? Haha I’ve never starched any fabric in my life so I’m just not sure what to do. Thank you!
Because these pieces are cut on grain, starch isn’t really necessary. If you want to give it a try, though, I do have an article on using it if you’re interested – https://suzyquilts.com/starch-quilt-fabric/
I think the definition of an “influencer” should be “anyone who can convince you to buy a clapper”
hahaha! 🙂
I have a stripe in my fabric pull and now I’m wondering could I cut it where the stripes go horizontal instead of vertical…but that’s not “on grain” is it? I just don’t want to see wavy wonky lines when I sew my fabric strips together.
How can I purchase this fabric without using PayPal as I have had issues with them?
That depends on the fabric shop. A lot of shops let you may with credit cards or Amazon Pay.
Thank you so very much for providing the Terra-cotta Grow Quilt pattern and fabric list!!! I have loved that quilt since I first saw it, but was to late to purchase the kit at Cottoneer.
Love your quilt patterns!