Twisted Ribbons Free Quilt Pattern
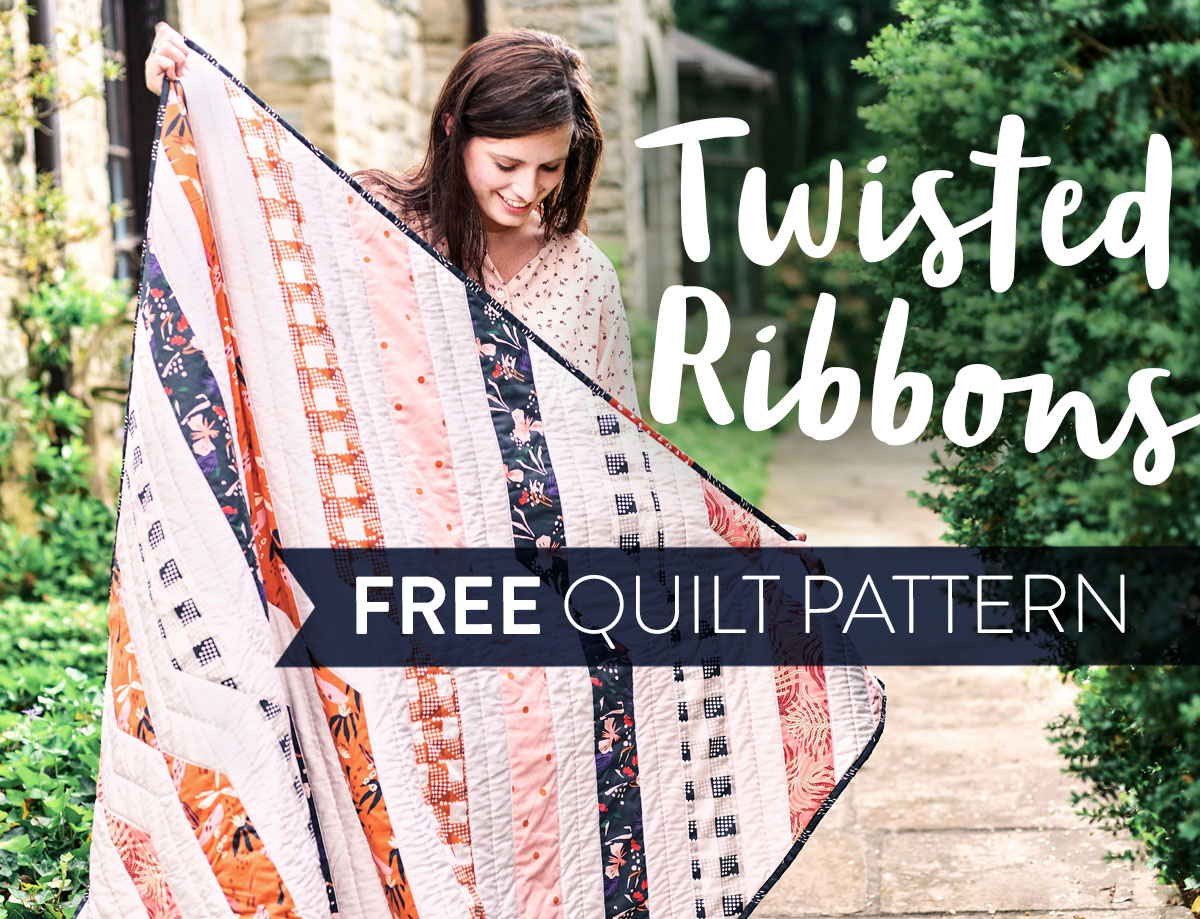
The long awaited day is here! The Free Twisted Ribbons quilt pattern collaboration with Spoonflower is now available for digital download. Scroll to the bottom of this post to get the link!
This minimal, modern pattern is fun and groovy and allows you to use a really unique feature through Spoonflower – Fill-A-Yard™. This one of a kind feature lets you print different fabric designs onto the same piece of fabric. Twisted Ribbons highlights what’s great about Fill-A-Yard™ by incorporating long strips of multiple fabrics into the design.
You can see in my I’m-Not-A-Tech-Person picture tutorial below, Fill-A-Yard™ can print 6 different fabric designs onto one large piece of fabric. Ya’ll know how much I hate excess seams. Fill-A-Yard™ prints a piece of fabric that is 72” wide. How amazing is that! Hasta la vista, unsightly seams!

You can see above that through much perseverance on my part, I decided to teach Scrappy how to baste a quilt. Progress is slow, but it's going to be worth it.

FYI, this post is sponsored by Spoonflower, but I assure you that I only partner with companies I like and trust.
Trending patterns!


Quilt Patterns


Quilt Patterns


Quilt Patterns


Quilt Patterns


Quilt Patterns


Quilt Patterns


Quilt Patterns


Quilt Patterns


Quilt Patterns
How to Use Fill-A-Yard™ to Make the Twisted Ribbons Quilt:
Step 1. Make a collection of at least 6 fabrics.
If you are feeling stuck on where to start, take a look at my guest blog on the Spoonflower website. I offer 3 simple tips to help you pick fabrics you love, without getting bogged down by the thousands of options. I go over color ideas and mixing prints of various scale and value. You can find my Twisted Ribbons collection here!

Step 2. Once you have a collection, start designing.
You can see here that I picked more than 6 fabrics. I found this helpful because I could change my mind last minute based on what fabrics jived well with each other.

Step 3. Pick the 2 Yard Cheater Quilt template.
Even though it looks like a bunch of squares, this template will let you make the long strips you want for Twisted Ribbons.

Step 4. Pick your fabric.
You can see below that I picked the Organic Cotton Sateen Ultra. It's really soft and prints beautifully.

Step 5. Now it's time to Fill that Yard...a.k.a. Fill-A-Yard™
Drag and drop your fabric swatches so that you get 6 vertical strips like in Step 6.

Step 6. Fill 6 rows.
If you fill squares next to each other with the same fabric, the pattern continues to repeat. Once you're finished, click the Add to Cart button.

I chose to print all of the fabric in my quilt, including the light background and backing, but if you want to use a solid fabric for the background, you could print a single Fill-A-Yard™ and purchase the other fabric elsewhere. That's the great thing about this – it's flexible and totally based on what you want!

Twisted Ribbon Assembly Tips
One thing that makes this design look its best is when the "twisted" part of the ribbon meets at exact points. Now, you may not get it perfectly every time, but here are some steps to make sure that you're really really close.
Twisted Ribbons starts from one corner and builds diagonally, so getting the first few strips sewn and trimmed correctly are important – kinda like laying the foundation of a house.
Pic 1: Line up the "twisted" tip a ¼” away from the edge.
Pic 2: Pin, sew, and trim the excess. (Notice that I am using my ruler or mat to always keep things squared up.)

Pic 3: This picture will make more sense once you open the pattern, but at this point you have sewn both sides of the ribbon and it's time to connect them at the "twist." On one strip, measure a ¼” away from the edge, and place a pin through the fabric where the seam meets. Keep in mind that these will be sewn with right sides facing each other.
Pic 4: Measure a ¼” away from the edge on the other strip and place that same pin right at the intersection. Hold that pin in place and pin the rest of the strip set together.

Pic 5: And that's how you get a perfectly matching seam! Oh and if you want those perfectly matching seams to be perfectly flat, use a Tailor's Clapper. I can't quilt without one!

Pic 6: To connect the twisted ribbons, use a ruler to line up all of the "twisted" seams. With a marking tool, draw tick marks as a guide so you know where to pin. Place right sides together, lining up the marks.

Pic 7: Ta daaaaa! Your Twisted Ribbons quilt is perfectly twisted up!

Get the free Twisted Ribbons quilt pattern digital download here! And don't forget to use #TwistedRibbonsQuilt on social media so we can all see what you make!


What a great idea. I haven’t checked out Spoonflower in a long time, guess it’s time. Thanks for sharing Suzy!
This is such a cool idea! I am going to check it out on spoonflower! Thanks for the free pattern.
Thank you for giving tips simplifying how to make this gorgeous quilt.
You always have great ideas and tips! Hope Scraps is coming along with her basting 🐾
Hello Suzy: Thank you for sharing your tutorial & pattern for this amazing quilt. What I love about it is the versatility of fabrics you can coordinate with a solid or negative colour. I can’t wait to try out your pattern.
Ok, THIS is fantastic!! I loved this quilt, when i sw it in the Spoonflwer magazine, but had no idea itwas going to be a FREE download!! This is going on my ever growing list of quilts to make – LOVE THE DESIGN! There were SO MANY gorgeous prints shwcased in the magazine, also! I xan see what you mean about gettng bogged down with so many beautiful choices!! Love the pretty prints you chose! I have so many favorites clicked on Spoonflower from over the years, and I aded a whole bunch more that I saw in the magazine!! THANKS FOR THIS AWESOME PATTERN, SUZI!!
This is such a cool idea!
Yes! It’s a lot of fun 🙂
Hi Suzy! I love this pattern so much, I’m going to use it to make a wedding present. Is there a simple metric for making a king size out of this pattern? Would 4x everything work? Otherwise I’d be more than happy to buy a scaled-up version if that’s something you are able to calculate?
Patterns like this and Maypole that rely on side-setting strips can be tricky to scale. I think if you double everything proportionally you will get the size you’re looking for. Unfortunately, I don’t have a different size available.
Thank you!! I will try it! 😊
What type/brand of batting do you use? And what thickness? I love this quilt!
I’m not sure I remember what type of batting I used for this quilt exactly. Maybe a cotton/poly blend? I have a lot more information on choosing quilt batting if you’re interested – https://suzyquilts.com/how-to-choose-the-right-quilt-batting/
I love this pattern for its beauty and simplicity of design. Starting to plan it in my head, I am a bit confused about the dimensions though. I am a math nerd (who has not had breakfast yet, so I may be way way off here!) but if these strips are cut 3″ wide, they end up 2 1/2″ wide…that means a little over 3 1/2 on the diagonal (3.5355″ something to be exact). Multiply that by 13 strips you get 46″. I am not getting how the quilt ends up 55 square. Is it possible the math was done with the 3″ strips pre seam allowance? Thanks Suzy!
Well, my dear, as much as I hate to admit it this late in the game, you seem to be absolutely correct. I’m going to run through some more numbers with my pattern testers before making any changes to the final pattern, but after another initial read through, it looks like 3.5″ strips will yield a 55″ finished quilt. Now that I know you’re so good at quilt math, fancy being one of my pattern testers? 😉
Boy oh boy, I’d love to! Yeah I’ve always been the rare artist that had math down pat. I’m always looking at patterns and tutorials, plotting things in my head, like if I need to make it a different size, or if I would make it a different way etc…I have often found mistakes in published books and online, and I always think of the unfortunate quilter who might ruin lots of expensive fabric and get frustrated. I worked a short stint as a proofreader too a while back, a rather dry job of poring over boring legislative bills. It would be way more fun to look over quilt patterns and try them out. I’ve been following your quiltyness online and I really like the freshness of your patterns. Your quilts always have uniquely pleasing colors and an unmistakable air about them. Throw me some patterns and I’ll get testing! (:
I’m not a math nerd but I am about to make this quilt. Is there going to be a change to it?
I made the change right after Cathy’s comment and uploaded a new PDF. The old pattern had strips cut to 3″ wide. This new version uses 3 1/2″ wide strips.
hi,
First CONGRATULATIONS!!!
Second, I where abouts do I download the pattern from?
If you click on the link at the bottom of this post, you’ll get the PDF. And thanks!!
Great! Thanks!
Perfect quilt to make from my late moms clothing. Will showcase each one beautifully. Thank you so much for the free pattern and tut!
#memoryquiltforallherkids
#onedownsixtogo
How can I get the free pattern? I see no link at the bottom.
It’s at the very bottom of the page highlighted in green. Here’s a direct link – https://suzyquilts.com/wp-content/uploads/2018/08/TwistedRibbons-Pattern.pdf
Hi Suzy, You are awesome and Spoonflower is the bomb! Your Twisted Ribbons is pretty cool, too. I love the fabric choices in it. What do you use to create your quilt mock-ups?
I use Adobe Illustrator 🙂
Suzy HELLLLPPPP! Where can I get instructions on how to do the twisted ribbons quilt? I’ve got my six fabrics, but don’t understand the written pattern….I’d say I’m an intermediate quilter….please! Ive checked Spoonflower, but no videos or clear instructions…..
Hey Jayme, did you see the pattern here?
Just wondering if you pre-washed your Spoonflower fabric as they suggest. I want the vintage wrinkly look but not sure what to do as this will only be my second quilt.
.
Yes, I would go ahead and prewash. Your quilt will still crinkle a little even with pre-washed fabric.
I was so pleased to stumble on this pattern to attempt my first quilt! I, like a previous commenter, am math-minded. In step 7 on the pdf, Fig. 6 shows the cut dimension of the first triangle to be 2 3/4 inch. However, when I do the math based on the 17 inch piece, I come to 3.18 inches for that trimmed measurement. Am I off? What am I missing? Thanks in advance for the help!
I love the quilted coat instructions and always wanted to make one for myself. However, instead of buttons and/or clasp, I want a quilt coat with hood, but with a zipper closing. What suggestions to do have? I do thank you in advance for any suggestions. Sharon
I think this post on making a quilted coat will help – https://suzyquilts.com/how-to-sew-a-quilted-coat-tips-and-tools/
I am having a hard time trying to figure the amount of fabric needed. Do I need 2 full yards of Colors 1-6?
No. Using 42″ WOF, you’ll need 3/8 yd. each for Colors 1-2 and 5, a 1/4 yard each for Colors 3 and 6, and a 1/2 yard for Color 4. You also need 2 yards for background. For Colors 4-6 (which include strip lengths that are longer than a WOF), you’ll need to sew the WOF strips together along the short ends into one long strip first and then sub-cut them to the listed lengths.