Quilted Shams Tutorial with the Starling Pattern
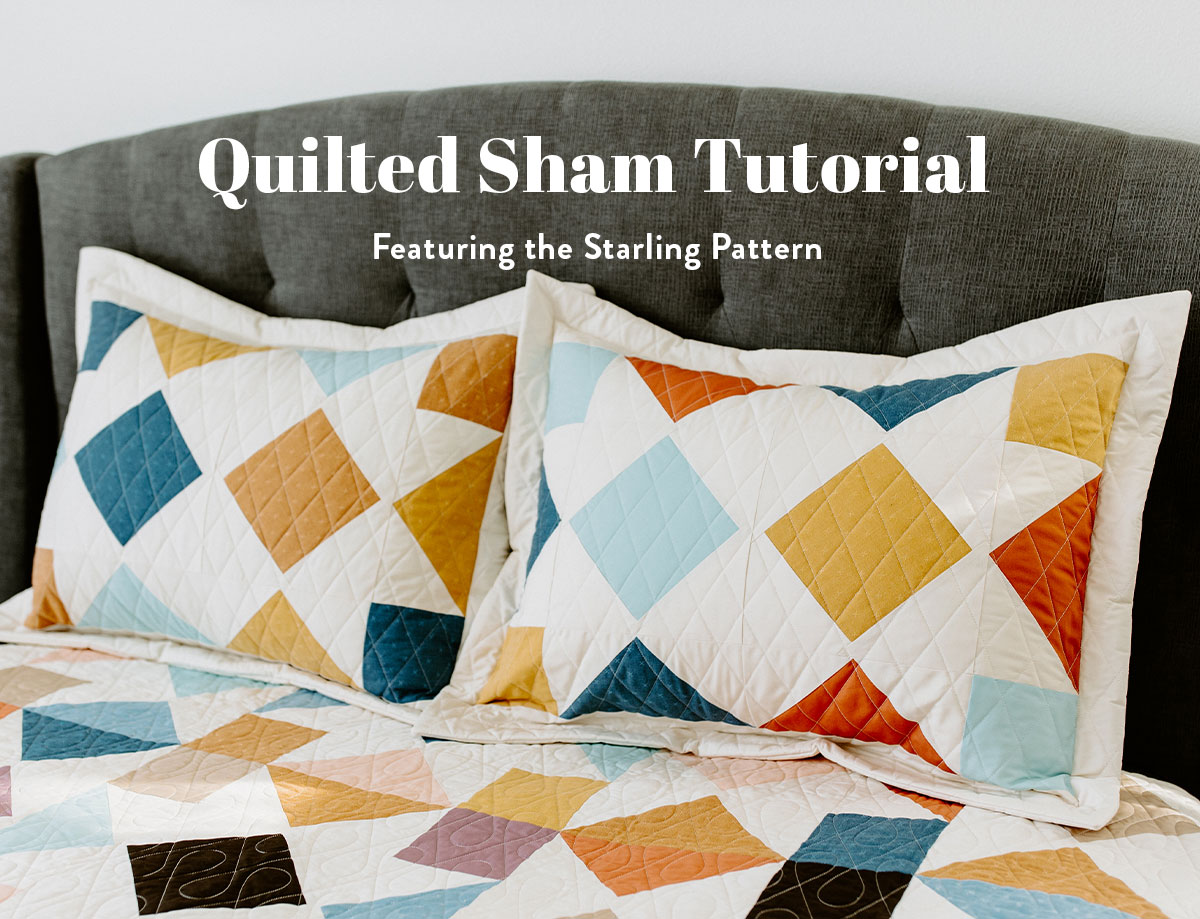
Picture this: you've just completed a gorgeous Starling quilt. You lay it across your bed and breathe out a sigh of satisfaction. But wait — it seems like something is missing. What could it be? The answer is simple: coordinating quilted shams!
The classic star motif of the Starling pattern lends itself perfectly to a quilted shams tutorial. I mean, this basically wrote itself. (JK I did a lot of work too) Because when I saw Suzy's gorgeous Starling quilt pattern, I immediately wanted one for my bed, and since I'm a girl who can be a little extra when it comes to quilting, I wanted to make coordinating Starling shams to go with it!
The original fabric in this Starling quilt is a mix of Sprout Wovens from Fableism Supply Co. and Art Gallery Fabrics Pure Solids. The look and feel of this texture is simply dreamy!


Quilted Sham Tutorial Supplies (One Sham):
- Starling Pattern
- 2+ FQs (I used 4 for more variety.)
- Thread
- Cutting mat
- Ruler
- Scissors
- Rotary cutter
- Straight pins
- Disappearing ink pen
- Iron & ironing board
- Wonder Clips
- For a standard-size pillow sham:
- 1 1/2 yd. of background/border fabric
- 2 1/8 yd. of lining fabric (This will be on the inside of the pillow and will not show; I used muslin. If your WOF is 44" or wider, you'll only need 1 5/8 yd.)
- 7/8 yd. batting (90" WOF)
- One standard-size pillow insert (20" x 26")
- For a king-size pillow sham:
- 1 7/8 yd. of background/border fabric
- 2 3/4 yd. of lining fabric (This will be on the inside of the pillow and will not show; I used muslin. If your WOF is 44" or wider, you'll only need 2 3/8 yd.)
- 1 1/4 yd. batting (90" WOF)
- One king-size pillow insert (20" x 36")
Optional Supplies (they'll make things easier)
- Best Press starch
- Walking foot for sewing machine
- Tailor's clapper

Step 1: Cutting the Fabric
To begin, cut the following for pillow assembly based on the size sham you're making (standard or king):
For a standard-size sham:
Trending patterns!


Quilt Patterns


Quilt Patterns


Quilt Patterns


Quilt Patterns


Quilt Patterns


Quilt Patterns


Quilt Patterns


Quilt Patterns


Quilt Patterns
- (2) 3" x 18" of background fabric for side borders
- (2) 4 1/2" x 31 3/4" of background fabric for top and bottom borders
- (2) 19" x 25" of background fabric for back panels
- (2) 22" x 28" of batting and lining fabric for back panels
- (1) 28" x 34" of batting and lining fabric for front panel
For a king-size sham:
- (2) 3 1/2" x 18" of background fabric for side borders
- (2) 4 1/2" x 41 1/2" of background fabric for top and bottom borders
- (2) 24" x 25" of background fabric for back panels
- (2) 27" x 28" of batting and lining fabric for back panels
- (1) 28" x 44" of batting and lining fabric for front panel
For the remainder of the cutting for this quilted sham tutorial, you'll need to refer to your copy of the Starling pattern. Referring to page 6, for the standard-size sham, we're going to make two Block B units exactly how they are shown in the diagram so that they mirror each other. For the king-size sham (not pictured in the tutorial), you'll make two Block As instead.
For the Starling blocks, cut the following (refer to page 3 of the pattern for dimensions). The quantities are the same for both sham sizes except for the c squares:
- (2) a squares (I cut 1 each from 2 FQs.)
- (2) b squares (I cut 1 each from 2 FQs.)
- (4) c squares (I cut 2 each from 2 FQs.) for a standard-size sham OR (8) c squares for a king-size sham
- (4) d squares of background fabric
- (8) e squares of background fabric


Step 2: Assembling the Sham Pillow Top
After you've cut your pieces out, it's time for the fun part: piecing!
- For the standard-size sham, follow the pattern instructions to assemble two mirrored Block Bs using pieces a-e, then sew the blocks together as shown above on the left. (You'll have two extra flying-geese units, which you can discard.) Press the seam open.
- For the king-size sham, follow the pattern instructions to assemble two Block As (not pictured) using pieces a-e, then sew the blocks together. Press the seam open.
The remaining instructions apply to both sham sizes.
Next, sew one short background border strip to the left side of the completed block unit and press toward the border. Repeat on the right side.
Sew one long background border strip to the top of the block unit and press toward the border. Repeat on the bottom.
Trim your pillow top so it measures 25" tall x 31" wide for a standard-size sham or 25" tall x 41" wide for a king-size sham.

Step 3: Basting the Sham
Now it's time to baste! Using the basting method of your choice, baste one quilt sandwich for your sham front using your Starling pillow top and 28" x 34" (standard) or 28" x 44" (king) pieces of batting and lining fabric.

Then, baste two more quilt sandwiches for the back envelope panels using (1) 19" x 25" piece of background fabric and (1) 22" x 28" piece each of batting and lining fabric for each sandwich for the standard size and (1) 24" x 25" piece of background fabric and (1) 27" x 28" piece each of batting and lining fabric for each sandwich for the king size.
When basting your back background panels to the batting and lining fabric, leave a 1/2" overhang along one of the 25" sides on each background panel. This will allow us to create a finished edge for the envelope closure after quilting.

Step 4: Quilt!
After your layers are securely basted together, it's time to quilt it up (this might be my favorite step in the whole tutorial!). Pillows are some of the best projects for experimenting with some fun quilting because they're smaller commitments than an entire quilt.
For this quilted sham tutorial, I chose to mark 1 1/2" intersecting lines at 60 degree angles with my hera marker to form diamonds that echoed the curved diamonds in the Starling quilt (longarm quilted by Shasta of Favorite Day Quilting).

Quilt your back panels as well.
Trim the excess batting and lining fabric from the front and back panels. Be sure not to trim off the extra 1/2" overhang of background fabric on the back panels.


Step 5: Finishing the Raw Edges of the Envelope Closure
Lay out one of the back panels with the lining facing up and the background fabric facing down.
Press the background fabric overhang 1/4" wrong sides together so it lines up with the straight edge of the lining and batting (first photo). Then, press the folded background onto the lining fabric so that it fits snugly against the straight edge.
Pin or clip in place, then carefully topstitch to finish the edge.
Repeat this step to finish the other back panel.


Step 6: Joining the Front and Back Panels
We're nearing the end! Lay the sham front right side up, then place the two back panels on top, right sides down, aligning the outside raw edges of the front and back panels. Be sure the finished edges of the back panels are facing toward the center (they'll overlap in the middle to form the envelope closure). Pin or use Wonder Clips to hold the layers together, then sew around the entire perimeter using a 1/2" seam allowance.
Since there are quite a few layers for your machine to go through, I recommend using a walking foot for this step.

After you've sewn around the perimeter, I find it helpful to clip the corners and a little extra of the seam allowance around the corners to reduce the bulk when you turn the sham right side out.

Step 7: Creating the Bump-Out Border
A sham wouldn't be a sham without the bump-out border that it's known for! Turn your sham right side out through the envelope closure, then take some time to neatly push your corners and seams out and flat. Use your iron to give the sham a nice, flat press all around.

Using a disappearing ink pen or hera marker, mark a line 1 3/4" from the top and bottom edges of the Starling block unit, inside the borders. On the sides, mark an extended line from the seam between the block and side border to meet the top and bottom drawn lines. This will give you a marked border around the entire sham (on the sides, just follow the ditch between the block and side borders).

Sew along the marked border, and your quilted sham is complete!
If your pillow game is lacking, this quilted shams tutorial will help you create the perfect addition to any bedroom. And if you've already made a Starling quilt, you almost HAVE to make a coordinating set to match!
If you try out this tutorial, let us know in the comments! Also post your pics on Instagram, tagging @suzyquilts and #SuzyQuiltsBlog or #SuzyQuiltsPatterns.


Thank you! they look fabulous and I can’t wait to make this! Its a great pattern and quite colorful with just solids.
I look forward to making these shams. Your pattern adding the “flange” border is what has been missing from the ones I have made. Thank you!
Thanks for the tutorial, love the shams.
Thx for the tutorial. This beautiful pattern works great with the rectangular shape of a sham. I enjoy your enthusiastic lessons