Free Bohemian Garden Shrug Tutorial
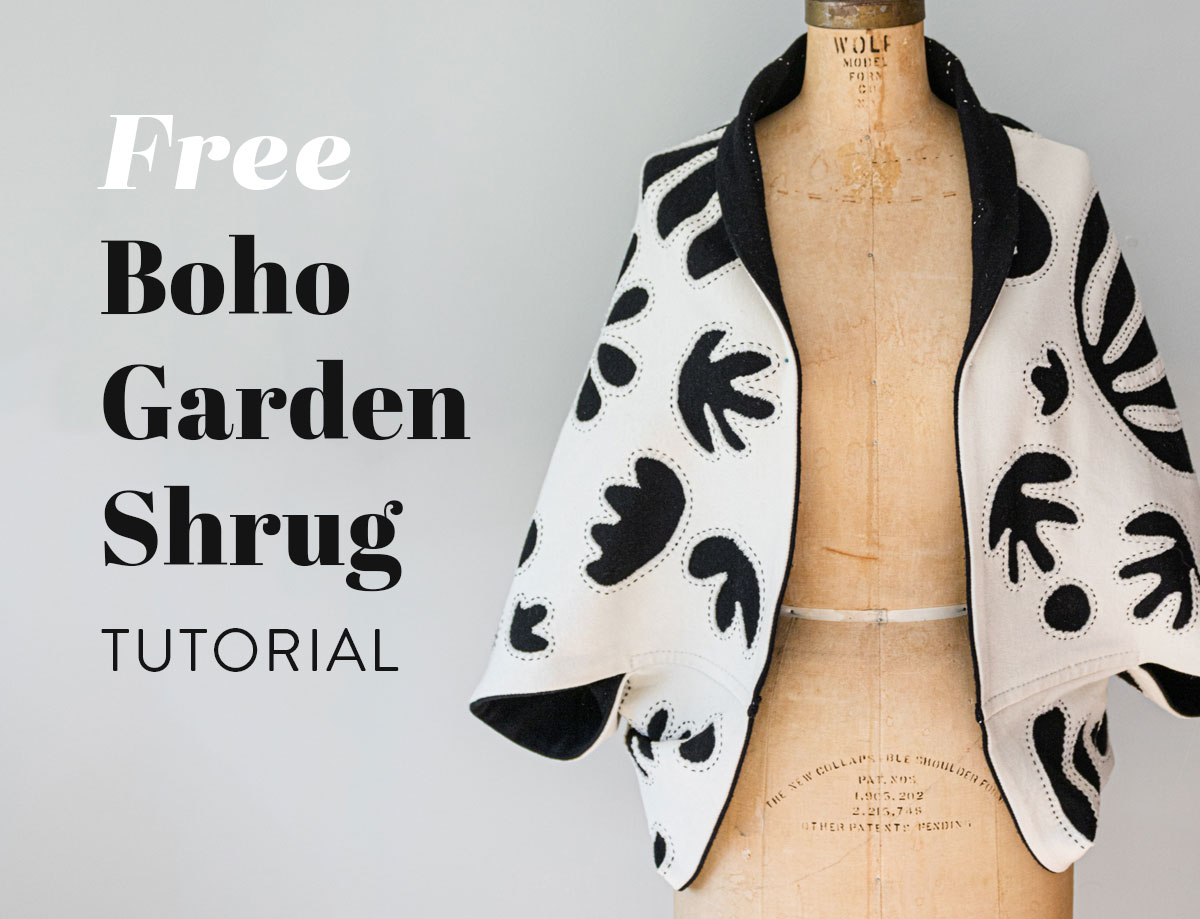
Using knits for the first time is intimidating, but this tutorial will guide you through all of the steps to make your own elegant and simple Bohemian Garden shrug using a combination of machine and hand sewing.
We've talked about knits previously on the blog, so this first section will link to other posts that cover basic knit knowledge and answer any questions you have about purchasing and sewing with knits. After that we'll dive into making this unique piece that is sure to become your favorite cool-weather garment for years to come!


Knitty Gritty: Learn All About Knits Before Making Your Bohemian Garden Shrug
Since knits might be new to you, I suggest you browse through some past blog posts. It's not totally necessary, but will give you an idea of the basic differences between knit and woven fabric. My suggested reading list includes:
- Is Knit a 4-Letter Word? How to Sew with Knits! – This post covers the difference between knits and woven fabrics. It also uses a Q&A interview style to quickly dissect the different types of knits, their varying weights, and how to set up your sewing machine to sew with them.
- The Bohemian Garden Quilt Pattern: Choose Your Own Adventure! – This post includes video tutorials on sewing a whole-cloth appliqué knit blanket with the Bohemian Garden pattern.
- A Quilty Adventure Part IV: How to Sew with Jersey
If you read those and are salivating for more knit projects and ideas, check these out!


If you are short on time, here's a key takeaway – unlike woven fabric, knits do not fray on the cut edge, making them a wonderful material choice for the appliqué you’ll do for your Bohemian Garden shrug.
Trending patterns!


Quilt Patterns


Quilt Patterns


Quilt Patterns


Quilt Patterns


Quilt Patterns


Quilt Patterns


Quilt Patterns


Quilt Patterns


Quilt Patterns
In the photo below you can see the cut edges of a woven fabric next to a knit fabric. You can tell the difference because the knit isn't fraying!

Bohemian Garden Shrug Materials
- Bohemian Garden quilt pattern (For some free added templates, check out this tutorial!)
- Measuring tape
- Water soluble pen
- Safety Pins
- Ball point sewing machine needle (If you choose to use one. See this post for more details.)
- 50 wt. sewing machine thread
- Hand quilting thread (I used 8 wt. cotton thread.)
- Hand sewing needle (I like these embroidery needles.)
- Thimble (These leather thimbles are nice and come in different sizes. You may want to size down because leather stretches after a while.)
- 2 yards of contrasting knit interlock (You can also use jersey, but it will curl on the ends.)* I used one yard of this white, and one yard of this black.
*Depending on how tall you are and the width of your material, you may need more fabric. See step 2 for more info on this.
In the Bohemian Garden shrug I made for this tutorial, I used a 220 GSM black 100% merino wool interlock, and a 225 GSM cream 97% merino wool, 3% spandex mix interlock. These fabrics are in the lightweight to medium category. (GSM and knit weights are covered in the knit post above.)
Because wool is naturally a lighter weight fiber than cotton, these knits actually appear thicker than a cotton interlock of the same weight. And while not heavy like a hooded sweatshirt, the two layers of wool will combine when quilted to be a medium to heavy weight fabric, with the wool and the dense knitting of the interlock providing added warmth.

Step 1: Pre-wash Fabric
Pre-wash material before you begin sewing. I use organic wool interlock in this tutorial. This particular wool will draw up substantially when washed. It begins as 59" wide and after pre-washing I used the entire width.
Step 2: Determine Size
This design uses two rectangles of fabric that are identical in length and width. You can easily make this with two 1-yard lengths of interlock material. However, if you are on the shorter or taller size you may want to make some adjustments.
Using a measuring tape, measure the distance from the center back of your neck to your wrist. Multiply this number by two. That measurement will be the width of your shrug.
Next, measure the distance from the center back of your neck to where you would like the garment to end. This will be the length of your shrug. I suggest not going past the knee.
Add 1" to both the length and the width for 1/2" seam allowances.

Step 3: Cut Fabric and Pin
Cutting large rectangles can be a bit tricky – even trickier with knit! The most important thing is to not move your fabric once you start cutting.
With right sides together, lay one fabric one top of the other and cut two identical rectangles according to the measurements above. Not sure how to do this? Read on! Otherwise, skip to the last paragraph of this step.
You will need a flat surface the size of your fabric. If you have a cutting mat the size of your desired rectangles, then lay your fabric out on it and use a rotary cutter. Otherwise, use scissors.
Lay both fabrics out on top of each other with the right sides together. Align the left hand selvage edges as best as possible. If the edge of your knits line up nicely, and the selvages are not distorted, then leave them as they are, otherwise, use a ruler and fabric pen to mark a new straight edge. Cut.


Place a few straight pins throughout the fabric to hold everything together.
From the aligned left side, measure the width of your garment and mark along the right hand side. Do this several more times along the length of the fabric.

Line your ruler up along the marks and draw a straight line. Cut along this line.

Use your longest ruler and a marking pen to mark a straight edge across the top of your knit sandwich. Cut along your marked line.
TIP: If you don’t have a long ruler, you can use a broom handle to approximate a straight line, line your ruler up with the handle, mark, then move your ruler further along the handle.

Mark the length of the rectangle by measuring down from the top edge. Mark on both sides, then line your ruler (or broom stick) up with each mark, draw a straight line and cut.


Keeping right sides together, use straight pins to pin all the way around the rectangles.

Step 3: Sew Hems
Machine sewing in this step uses a 1.5 zig zag stitch and 1/2" seam allowances.
Fold the pinned rectangle in half long ways. From the fold, measure 8" towards the open edge. Clip into the fabric 1/4" (clipping through 4 layers of fabric). Repeat on the other side.


Unfold rectangles. Sew the 16" seam in the middle of the clips you made in the side seam. Back stitch at start and finish. Repeat on the other side.

On the side seams, carefully clip into the seam where it starts and finishes. Clip right up to, but not through, the machine stitching.

Sew across the top edge. Backstitch start and finish. Repeat on the bottom edge.

Step 4: Transfer Designs and Hand Quilt
Remove all pins. Turn the garment right side out. Iron flat. Lay the shrug out on a flat surface.


These next steps are covered in the second video of this three-part video series on how to make a whole-cloth Bohemian Garden blanket.
Gather the templates from your Bohemian Gardens quilt pattern and a water soluble pen. Transfer designs to the outside layer of your shrug.

After transferring all designs, use safety pins to baste the two layers together.

Grab a thimble and your favorite hand quilting thread. Hand quilt around each motif. I did this twice using black and white thread, so that the hand stitching would also be visible from the inside of the shrug.


TIP: Popping the knot through knit fabrics can be difficult. Instead of popping your knot through the knit, use your scissors to cut into the center of the motif you are quilting around. Be very careful to only cut through the layer that you are planning on removing.
Slip your needle through the hole you cut and over to where you will begin your quilting. You will still have to pop your thread through when you knot at the end. See the photo below for reference.

Depending on how you have spaced out your designs, you may choose to add additional quilting throughout.
Be bold! This is a great time to get creative with your stitches. A blanket stitch and French knots would be wonderful textural additions.

Step 5: Cut Out Shapes
Once all hand quilting is finished, cut out the motifs following the instructions in the Bohemian Garden quilt pattern.
To avoid cutting through both layers, grab the top layer of fabric in the middle of each motif and make sure that the bottom layer of fabric is free from your fingers. Make a little snip into the middle of the motif and then carefully cut over to the edge of the motif. I like to leave approximately 1/4" of fabric on the cut side of the knit.
Step 6: Sew Faux Flat-Felled Seams
A flat-felled seam is similar to the French seam and is commonly seen in men’s button up shirts. In a flat-felled seam, the seam allowance is folded under and sewn to the garment creating a single row of top stitching on the right side of the garment.
Did your brain just go lalalalala? 😉 How about some pictures to help me explain.
With the right sides together, fold the garment in half long ways. Pin the raw edges together on the left side. Using a zig-zag stitch and 1/2” seam allowance, sew the approximately 10” long seam. Back stitch at the start and finish. Repeat on the right side.


With a hand sewing needle, use a running stitch to reinforce the seam, sewing beside the zigzag on the garment side.

Press each seam open.

Cut the seam allowance in half on one side of each seam. The two cut seams should be on the same side of the garment.
Fold the uncut seam allowance over the cut seam allowance. Iron.

Using a ruler and marking pen, mark a line 3/8” from the seam line, and square the line across the top. Start at the bottom and use a running stitch to sew on this marked line. At the sleeve opening, make a bar tack by sewing over the same place three times. Knot. Trim threads. Repeat on the other seam.


Congratulations! You did it! Your Bohemian Garden Shrug is finished, and it’s time to show off everything you learned in this knit garment tutorial.
Wear your Bohemian Garden Shrug on the next crisp fall day, take a selfie and use the hashtags #SuzyQuiltsPatterns and #BohemianGardenShrug! This elegant and simple shrug is a great stepping stone to making even more knit garments.


Is there any way to minimize the pop ups and the cart that appears in the middle of the page?? I have difficulty reading things with this RIGHT IN THE MIDDLE!!!>>> I realize advertising is a necessary thing… but I am less likely to shop when I leave the page due to aggravation!
Hi Karen! Suzy works hard not to have advertising on the Suzy Quilts site—we also find it distracting! The one newsletter pop on the site up can be removed by clicking the x in the upper right corner, then it will be gone the rest of the time you’re reading the site. The banner, which includes the Suzy Quilts logo, navigation, and cart, is usually locked at the top. But right now, it is following readers and staying on the page slightly below the top as you read. This is a malfunction of the website we have been working on with our web developer to fix and hopefully it will return to normal soon. In the meantime, we hope you keep enjoying the Suzy Quilts blog and all the great tips, tricks, and tutorials we bring you every week! 🙂 -Laura
It is quite annoying when the side bars start wavering and jiggling. I hope this can be worked out. Thank you for your attention to this!
Are there any online resources for purchasing the fabrics you used in the project? Maybe I missed that link.
“In the Bohemian Garden shrug I made for this tutorial, I used a 220 GSM black 100% merino wool interlock, and a 225 GSM cream 97% merino wool, 3% spandex mix interlock. These fabrics are in the lightweight to medium category. (GSM and knit weights are covered in the knit post above.)”
Yep! The links to the black and white fabric used are in the last bullet point under “Bohemian Garden Shrug Materials.” Have fun making it!
Hi! I get a 404 error with the link to black fabric.
Looks like they moved their listing here! https://naturesfabrics.com/products/black-100-organic-merino-wool-interlock-220-gsm-feltable?_pos=1&_sid=4e49b98dc&_ss=r&variant=39908884480071
It notes that there are only two yards left, so if they sell out, you can google “220 GSM black 100% merino wool interlock” to find some in a different shop 🙂
Enjoy!
Thanks so much for this. I’m currently working on a reverse applique t-shirt item and I think this will be my next project. I always enjoy reading the blog.
Oh, I hope you will! Looking forward to seeing it, putting in those hand stitches is so rewarding <3
Nice tutorial! thank you for the pics along with each step! love it!
I would like to try to make it with fleece. Do you think it would work? I really love the look
I think it would! You could try it with fleece as just one of the layers.
This is beautiful as someone who taught garment making form 38 years I loved seeing this process. We normally refer to this process as “reverse” appliqué not appliqué.
This shrug is lovely and is a perfect showcase for the Boho Garden motifs. Thanks for this very inspiring tutorial! The appliqué technique is reminds me a bit of the Alabama Chanin method except she uses stencils with fabric paint, usually on organic cotton jersey. I can imagine how perfect merino jersey would be in this case.
The shrug is beautiful and so unique! I’m wondering if you have any more pictures of someone wearing it so I can get a better feel of what it looks like on someone?
Thank you,
Teri
How did you wash the wool fabric for the Bohemian shrug?
For wool, the author of this tutorial said she prewashes in cold water with Woolite, then dries the fabric by laying it flat. Enjoy making your shrug!