Easy DIY Scrunchie Tutorial
I'll admit it: I'm a 90's kid. I had scrunchies before scrunchies were considered cool. Now, as a mom, I find my hair up in a messy mom bun 98% of the time. I'm not saying I'm overqualified to write an easy DIY scrunchie tutorial... but yeah, I'm totally overqualified.
If you haven't heard, scrunchies have made a comeback in a big way. And they're not the weird "function over fashion" ones we had growing up; this time around, they're actually really cute! Plus, it's just as popular to wear a scrunchie around your wrist as your hair - which means it's a bracelet and hair accessory all in one!

You May Also Like...

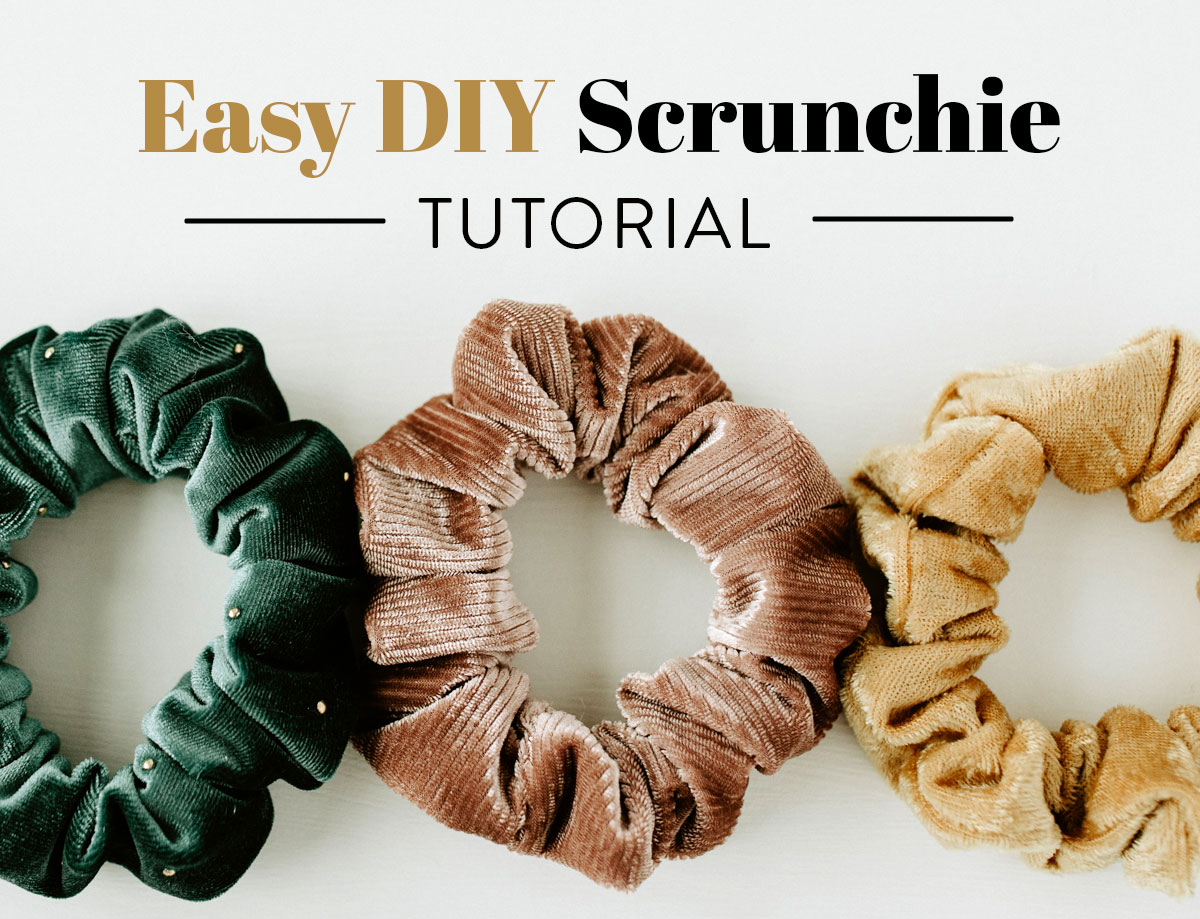
When it comes to these DIY scrunchies, the possibilities are endless. I had such a fun time picking out some fun non-cotton fabrics, and also making some out of old quilting scraps. Don't spoil the surprise, but these come together so fast that I'm planning on gifting them to friends and family for Christmas this year because they are just SO quick and easy!

As you can see some of the fabrics I picked are velvety and shiny – perfect for holiday parties! A Christmas scrunchie? Yes, please!

Supplies for Easy DIY Scrunchies:
- One piece of fabric cut to 3 1/2" x 24" (there are some really fun velvet fabrics on Etsy)
- 9" of 3/8" elastic (I prefer braided elastic over knitted elastic, but knitted will work just fine. More on that below in the post.)
- Simple Sewing Machine
- Thread
- Cutting mat
- Rotary cutter
- Ruler
- Straight pins
- One safety pin
- Iron & ironing board or pressing mat
- Needle for hand sewing
- Scissors

Tips for Selecting Elastic:
There are two main types of elastic: braided (above left) and knitted (above right.) This is a very close up photo, but you can see the difference in appearance between the two. There are several other types, but these are the two that are most commonly used in basic sewing and crafting. Either type will work for following this easy DIY scrunchie tutorial, but I found that braided works best. Why, you may ask?
Trending patterns!


Quilt Patterns


Quilt Patterns


Quilt Patterns


Quilt Patterns


Quilt Patterns


Quilt Patterns


Quilt Patterns


Quilt Patterns


Quilt Patterns


These two images show the difference between braided and woven elastic while they're being stretched. The braided elastic (upper left) becomes thinner, but is a tighter and stronger weave than the knitted (upper right), and you can see the gaps in knitted elastic. I prefer to use the braided elastic because it's a tighter hold in my hair, whereas the knitted doesn't hold my hair in place as tightly.

Step 1: Sew the scrunchie tube.
Once you've gathered your DIY scrunchie supplies, take the 3 1/2" x 24" piece of fabric and fold it in half lengthwise, right sides together (RST). If you are using a fabric with some stretch, you may want to pin it in place for a bit of added stability while sewing. This tube will form the casing for the elastic.

Next, sew along the length of the raw edges, leaving the ends open and backstitching at the beginning and end. This material was somewhat slippery and stretchy, and my machine wanted to "eat" the end of the fabric when I was starting and ending, so I used a leader and ender to prevent the fabric from getting sucked into my machine.

Step 2: Turn the tube right side out.
Now that you've sewn your scrunchie tube, it's time to turn it right side out! Take your safety pin, and attach it to the edge of the fabric on one of the ends. Feed the safety pin into the tube, and slowly work it through the casing and out the other end, pulling the end of the fabric through with it. This will turn your tube right side out.


Step 3: Feed the elastic through the tube.
Unhook the safety pin from the tube, and attach it to one end of the elastic. While holding one end of the elastic, feed the end with the safety pin through the tube, being sure that it doesn't pull the other end all the way through.
I found the best way to do this was to hold the non-safety pin end in my mouth (maybe not ideal for Covid circumstances, but you could surely use a second safety pin to pin it to the end of the tube too.)

Step 4: Join the elastic ends.
Overlap the ends of the elastic 1/2" or so, and pin in place. You may want to adjust the elastic to be sure it is all laying flat within the scrunchie casing so that there aren't any twists.

Sew through the overlapping elastic several times in different directions to secure. It doesn't need to be pretty; it just needs to hold!

Step 5: Close the ends of the scrunchie.
Last but not least, let's close up the raw ends of the tube! Adjust your fabric so there are no twists, then match up the seam. Turn each edge 1/4" under, and sew together using an invisible ladder stitch. When you get all away around, tie a small but secure knot, and voila, you're done!!

So whether you're throwing your "I-haven't-had-time-to-shower-in-5-days" hair up into a messy bun for the hundredth time, looking for a fun gift for those special ladies in your life, or just want a fresh new accessory for yourself, you'll LOVE making this easy DIY scrunchie tutorial again and again!


I am hoping to make a matching mommy-baby set for Christmas presents! Do you have any ideas about a baby accessory to match these scrunchies?
I think a sweet little bow in the same fabric would be really cute! Or you could even hem a strip of the fabric into a wide ribbon for a headband.
So I have this massive spool of 1/4 inch elastic from being overly ambitious with masks. Wondering if I could use that for scrunchies?
Yes, you can. That’s the size I use.
Do you have a Christmas stocking pattern using prequilted reversible fabric?
I do not, but I’m sure you could find one online if you search.
Great tutorial! Can’t wait to try it! Sorry if I missed this, but what seam allowance do you use for the fabric tube in step one? Thanks again for a fun project 😀
A 1/4″ to 1/2″ works great. It doesn’t need to be exact.
Thank you
Lovely documenten. I will try it at once! Thanks so much!
Thank you so much for this tutorial.. it’s easy to understand !
I love your quilts and DIY projects. I had cataract surgery recently and can’t wait to get back to my sewing. I have an unfinished quilt and another project I’m turning into a hanging quilt. I need to know how to make a block quilt from the squares I hand embroidered. I believe they are about 18” x 18” in size. I have 6 in total on white fabric. I need to know how to back them. I love the way you added ties to the baby quilt. I am going to do this on my Christmas tree skirt and my king size block quilt. Thank you for your tips and help. Oh, I ordered the batting you suggested and I love it. Wish I would have used it for my king quilt. I can’t sew it with the machine because the batting bunches up and too thick.
We lived in Illinois for 10 years. Our oldest son lives in Chicago. We are Cub fans!! Take care!
Love the scrunchies ♥️
Can you use fabric that isn’t stretchy, like cotton quilting scraps, for the scrunchy? Also, I was thinking if you sew the ends of the tube under 1/4” before you sew the RST along the long side, it might be easier when you are doing the hand sewing to close the scrunchy.
You sure can! Lydia notes that she used both stretch material and some quilting scraps. So have fun with them!
Thank You!!!
Your tutorial came in the nick of time. I was wondering what to get my daughter for her birthday, which is on Friday. She’s an adult but has very long hair and wears up or in a pony tail all the timer. This is a fun gift and she’ll love it.
Perfect timing, Barb!!
Wonderful! I’d like to make some for my daughter-in-law. Her favorite type of scrunchie has a dangling tie attached. Have you tried that?
We haven’t, but it sounds so cute!
I would like to make scrunchies for my 3 yo grandaughter who has very thing hair. I am wondering if you have a smaller version with measurements for a smaller scrunchie? Or suggestions of how to measure to reduce the size according to her ponytail size when her hair is up.
Thank you for your wonderful contribution to the sewing/quilting world.
That’s a cute idea, Sheryl! We only have measurements for a standard sized scrunchie, but feel free to use the tutorial as a guide and experiment with different sizes to see if something works for your granddaughter! My three year old still uses the tiny clear rubber bands for her hair because it’s also still very thin — I get it!