A Simple and Elegant Quilted Table Runner Tutorial
The beauty of a quilted table runner is that it adds warmth, texture and layers of interest to any room. Traditionally you may think of runners as added decoration for only dinning room tables and maybe the occasional kitchen island. But actually, you could make one in any size and for any surface. I've seen runners on beds, over pianos, under plants, hanging on walls, worn as dog scarves AND human scarves – sky's the limit, people!
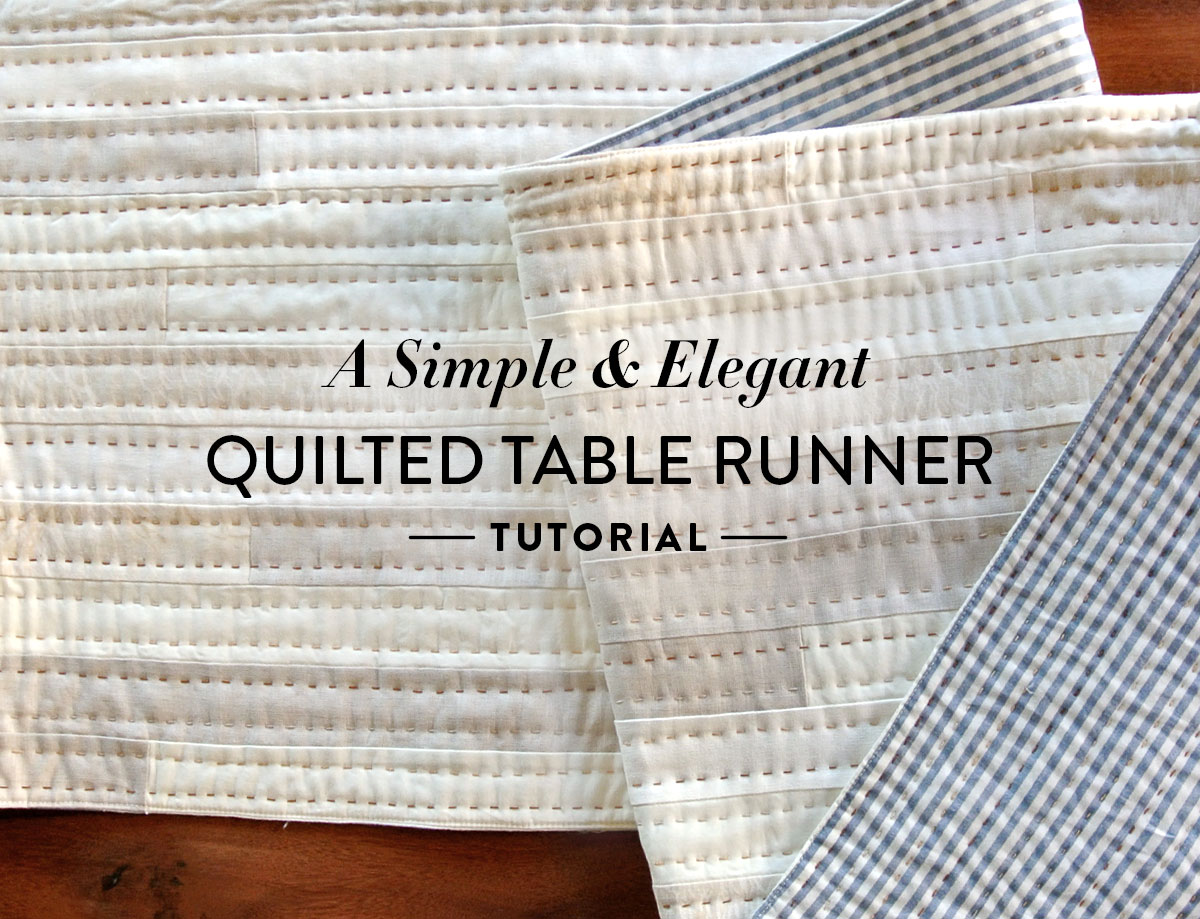
In this tutorial I will show you step by step, through pictures (because who doesn't like looking at pictures when trying to learn?), how to make a simple and elegant quilted table runner. When I originally made this low-volume linen table runner below...

...I did not consider that you might want to make one too. But of course you do! So in this picture tutorial I make a new table runner using some light-weight denim and an IKEA duvet (more on that later).
Depending on how intricate you piece the top, a table runner can take you about an hour or two to whip up. This Christmas season, who doesn't need a few of those projects?
How to Make a Quilted Table Runner
Supplies:
- Basic Sewing Machine
- Thread to match your fabric (unless you really want that finishing seem to show...which I'm assuming you don't.)
- Fabric (the amount will depend on how large your quilted table runner will be) – I used this IKEA duvet cover for both of my runner backings because it's large enough so that I did not have to piece it.
- Batting – you probably want to pick a low-loft batting. Low-loft is relatively flat and will lay well. I used scraps of Quilter's Dream bamboo batting for my first runner and Pellon 100% cotton for the second.
- Cutting Mat
- Ruler
- Rotary Cutter
- Straight Pins
- Iron and Ironing board
- Hand Quilting Supplies (If you choose to go that route.): Pearl Cotton Thread No.8, Needles, Needle Threader, Leather Thimble, Snips
1. Measure the surface you wish to cover with your quilted table runner.
In this step, decide how wide and long you would like your table runner to be. When I made my original table runner, I wanted it to be at least 16" wide and hang off both edges of my dining room table. My table is a standard size (I think), so that runner ended up being about 16" x 100".
Trending patterns!


Quilt Patterns


Quilt Patterns


Quilt Patterns


Quilt Patterns


Quilt Patterns


Quilt Patterns


Quilt Patterns


Quilt Patterns


Quilt Patterns

2. If you would like your table runner to be pieced, decide on a pattern and piece it together.
My original quilt uses 2 1/2" linen, double gauze and poplin strips of various lengths. You could make a similar one with whatever scraps you have on hand. Challenge! Set design parameters on yourself based on the decor of the room you wish to accent.
You May Also Like...
3. Trim a piece of backing fabric to be the same size as the front.

4. Fuse small pieces of batting if needed. Trim a piece of batting to be the same size as both the front and the backing fabric.
If you do not have scrap batting large enough, do what I did and fuse some together! Take your two pieces of batting and overlap them a couple inches. With a pair of sharp fabric scissors, cut in a waving motion. Once you clear away the excess batting, take both pieces to your ironing board.*
Cut a piece of fusible batting tape (any kind will work. I just got this roll from Craftsy and I really like how wide it is.) Keep the pieces together with your fingers, place the tape onto the batting, rough side down, and hit it with your iron.
I like to use my cut fabric as a guide to trim the final piece of batting by stacking it on top and then trimming away the excess batting. Once all three of your layers are trimmed, stack them in this order from top to bottom: backing fabric right side down, top fabric right side up, then batting on the bottom.
*With large quilts I have actually done this on the floor. Just make sure you aren't messing up your floors with heat from your iron. After many years of doing this, I've yet to have a problem, but don't say I didn't warn you if you do. Be safe and test first.


5. Pin around the edges, leaving a hole large enough for your hand on one side of the table runner.
For me, that's about 5-6". If you are wondering why, it's because after sewing, you will flip this inside out like a pillow.

6. Sew a 1/2-inch around the perimeter of the table runner, pivoting at the corners, and backstitching where you start and stop.
This doesn't have to be totally exact, just make sure that you sew through all three layers.


Before moving onto the next step, trim the corners like this to alleviate excess bulk...

7. Put your hand through the hole and pull your runner inside out – like a sock!


Now your table runner should look something like this...

Push out the corners with your finger or a pencil.

8. Iron the seam flat and pin along the edges.
I like to pin extra well over the hole. And don't forget to fold that fabric in before pinning.


9. Using a top thread that blends well with the quilted table runner top, sew an 1/8-inch finishing seam completely around the edge. End with backstitching.
I pieced my table runner with cream thread, however, when sewing my finishing seam, I switched my top thread to a light gray. I kept my bobbin thread the same because 1. I'm a little lazy and 2. I thought the cream actually blended well with the stripe.


10. Ta-daaaa!
Stick a few straight pins in there for simple basting and quilt as desired. Or don't! It's completely up to you. I think I might actually like the look of this "quilted table runner" not quilted. 🙂


Thank you Suzy! Merry Christmas! -Jean
Good instructions!
What thread did you use to hand quilt the table runner? I really love it! Thanks tor the tutorial!
I like to use Pearl Cotton #8 thread when hand quilting – https://suzyquilts.com/how-to-hand-quilt/
This is an awesome tutorial and I can’t wait to start my second sewing project ever using it! But, for this total newbie, when you say “quilt as desired” at the end… any tips or links for me towards the easiest quilting pattern I could use to finish off this table runner? Thank you so much!
What about simple straight lines? That always looks good and I have a tutorial for you – https://suzyquilts.com/6-tips-for-straight-line-machine-quilting-a-k-a-matchstick-quilting/
I might suggest checking out some of the decorative stitches built in your machine. Often I quilt with the “serpentine” stitch (the curvy zig zag). It is very forgiving when I stray from the straight line!
Happy sewing
What colors of thread did you use on the hand quilted table runner? So many to choose from, but I think yours looks perfect! Thank you!
Thank you! I believe I used a few shades of light tan, brown and mahogany DMC pearl cotton thread.
Thanks for the inspiration 😀 Am making a table runner using 4 inch paper pieced blocks that follow rainbow colors and I was struggling with how to quilt it. The blocks are pieced into a dark navy background. After reading this I have been inspired to do straight line big stitch quilting in the navy fabric using pearlized cotton in colors of the rainbow. First project using big stitch quilting.
One of my favorite online shops for fabric, knitting, and quilting is Purl Soho. They sell French General Toweling fabric by the yard in several colors; I think this fabric would make a beautiful table runner!
OMG, Scrappy looks so young!!!!!
So excited for your new addition to the family! Thanks for sharing and sharing your great quilt patterns 🙂
Thank you!
I love the look of the hand quilting on your linen pieced runner! I have a LONG list of projects, but this looks so easy! I have several people that would love this a gift.
Thanks so much Suzy. I love your designs and ideas. Have a happy Fall season and safe remainder of 2020.
I like the table runner !
Plus pratique à laver, repasser et ranger qu’une grande nappe !
j’ai fait des chemins de table avec des draps en lin brodé en gardant le côté brodé ! et les serviettes dans le reste du drap !
Hi Suzy,
Thanks so much for the tutorial. Is there instructions somewhere how to make the one in your first image with strips in neutrals and hand stitching. It’s beyond stunning!!! I will learn how to quilt just so that I can also have one 🙂
To make that one I just measured how large I wanted the runner and then sewed different strips of neutral linen together. All of the strips finish at about 2″ wide, so I cut them 2 1/2″ wide.
Thank you! You are always so generous with free patterns and excellent tutorials! I’m working on mod mountains now (great pattern with detailed instructions!). This holiday table runner will make wonderful gifts. Happy holidays to you and your family!
How wonderful! I’ve always thought Mod Mountains would make a nice Christmas table runner too. Maybe one of these days I’ll try out the idea. Hope you have fun making gifts this season!
Love your designs. Did you add a seam allowance to your measurements in the first step?
I did! I added about a 1/4″ on all sides, so a 1/2″ to the width and also the length. The seam allowance on this doesn’t matter too much. Somewhere between a 1/4″ and a 1/2″.
Thanks for your excellent tutorial. I’m making some runners like you’ve made for Christmas gifts this year and was wondering about leaving the runner unquilted… Do you think the batting would bunch up when it’s washed if it’s not quilted?
I suggest little bit of quilting because you’re right in thinking the batting will shift once you wash it once or twice.
Thank you for this tutorial! I’ve made a Christmas table runner. Am I suppose to hand sew the hole on the side closed and then “sew an 1/8-inch finishing seam completely around the edge”? Or is the finishing seam good enough? Sorry if this is a dumb question lol
Not a dumb question at all! If you fold the raw edges in, the finished seam around the perimeter is good enough. 🙂
I was wondering about the strips you used. I like to tear old sheets that are no longer useful and tea dye them to get variation. Tearing along the grain is so much faster than cutting. Tea dying gives variety by leaving fabric in solution for various lengths of time.
using some light-weight denim and an IKEA duvet (more on that later).
Would you explain more about the fabrics you used in “A Simple and Elegant Quilted Table Runner Tutorial”
Love your web site!
Hi Carole! Suzy used scrap pieces of linen fabric for the top and an IKEA duvet cover for the back. So glad you love our website!