Free Beach Bag Pattern Featuring the Fronds Quilt
There may be snow outside my window as I write this, but believe it or not, summer is right around the corner. And (as my kids love to remind me) that will mean trips to the pool! But as soon as I saw the Fronds quilt, I knew it would make a fabulous beach bag pattern. So join me as we prep for sunnier days ahead!

Now, before you totally dismiss this beach bag pattern because you see CURVES, let me just say that curves are actually a LOT easier to sew than you think, and this beach bag is the perfect project for trying them out!! I fell in love with curves wayyyyy back when Modern Fans was released (raise your hand if you were here back in 2018!) and haven’t stopped sewing them since.

A Free Beach Bag Pattern You Have to Make!
I wanted to write this free beach bag pattern because I’m a mom of three, and I get it — you need something big. You need something that can hold 10 oversized beach towels, 40 water toys, 95 snacks, and bottles of all shapes and sizes for liquids ranging from water to sunscreen.
And then you need something you can bring them all home in after they’re wet. You also need something cute because sometimes you just need little things to spark joy in the midst of a chaotic day at the pool, and there’s nothing better than replying "thanks, I made it!" when someone compliments you on your bag.
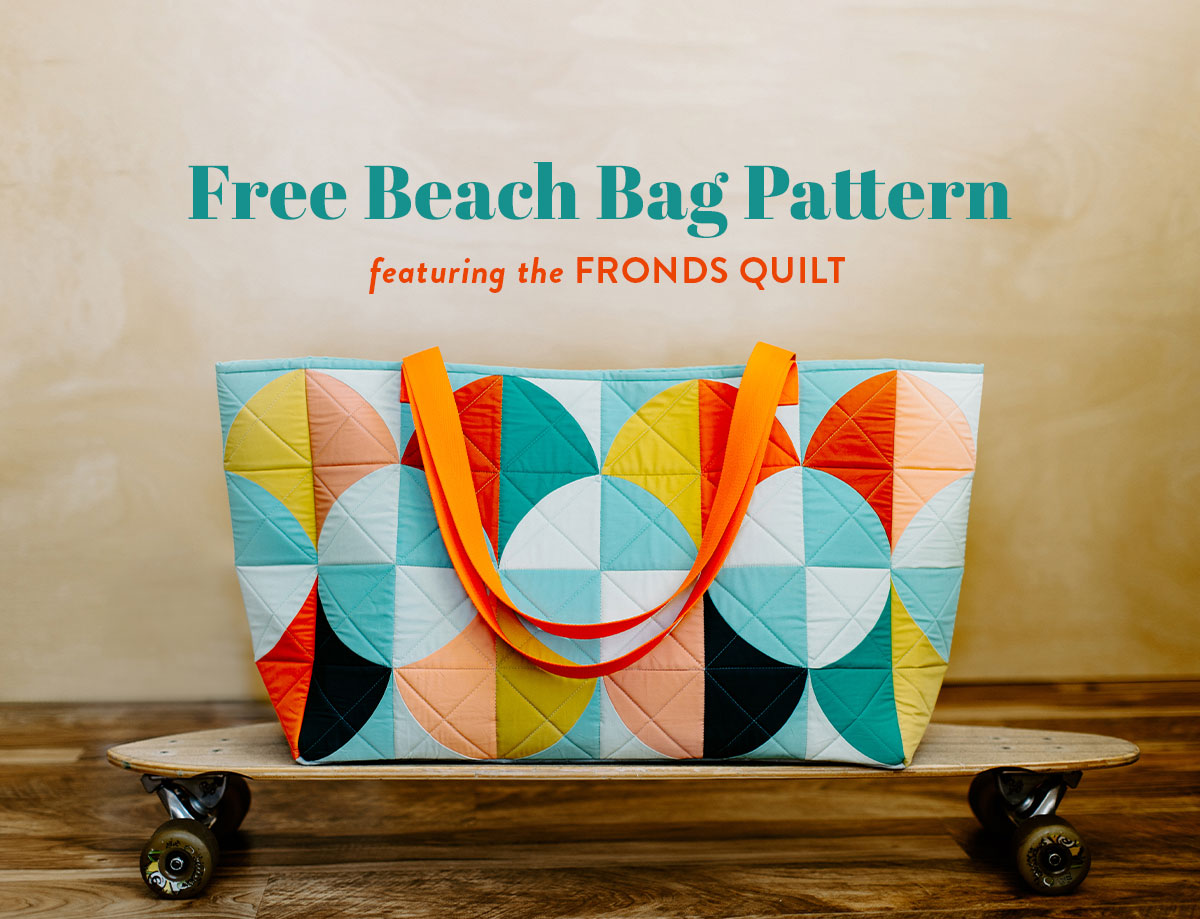
Enter: the Fronds quilted beach bag, here to check all the boxes and solve all the problems. The completed beach bag measures about 24" x 16" x 8" (or a bit smaller from the thick seams). When the top is closed with the velcro closure flat as shown above, the top measures about 30" wide.
Trending patterns!


Quilt Patterns


Quilt Patterns


Quilt Patterns


Quilt Patterns


Quilt Patterns


Quilt Patterns


Quilt Patterns


Quilt Patterns


Quilt Patterns

Know Your (Machine’s) Limits:
Before we get started, I do want to put a little disclaimer out there: because of the materials used in this project, some of our seams are going to get pretty big and bulky. You’ll be sewing through quite a few layers, and it’s important to know how much your machine can handle.
If you have previous experiences with broken needles, a jammed machine, or bad noises as your machine has tried to sew through thick layers, I’d recommend first fully cleaning your machine and starting this project with a brand-new needle.
Beach Bag Materials
- Fabric (see below for details)
- Fronds Pattern (This comes as both a stand-alone pattern and as part of a baby bundle! Either works for this tutorial.)
- Rotary cutter
- Ruler
- Cutting mat
- Rotating cutting mat (optional)
- Iron and ironing board
- Basic quilting supplies
- Heavy-duty or denim needle
- Tailor’s clapper (optional)
- Basting spray or pins (For this project, I recommend using basting spray because it is not advisable to use pins when basting the waxed canvas.)
- Wonder Clips
- Printer to print templates
- Template plastic (optional)
- Temporary marking tool, such as a water-soluble marker
Beach Bag Fabric Requirements
- Fabrics 1-7 as listed for the Fronds baby-size quilt (since we will be sizing the template down, you can get away with slightly less fabric than listed in the pattern if it looks like you'll be cutting it close)
- Interior fabric: 1 2/3 yd.
- Binding fabric: 1/2 yd.
- Waxed canvas: One piece measuring 9" x 25"
- (1) 36" x 54" By Annie's Soft & Stable Foam
- HeatnBond Iron-On Vinyl (Gloss): 24" x 2 yd. continuous cut (The only place I could find a continuous cut of 2 yd. was on their website.)
- 1 1/2"-wide webbing: 2 yd.
- One package 3/4"-wide sticky-back Velcro for fabric

I used a few more fabrics than the pattern calls for to give my beach bag a little more of a scrappy vibe. I basically just chose some AGF solids that screamed pool time to me:
- Pistachio
- Warm Wave
- Olive Oil
- Dried Carrot
- Evergreen
- Emerald
- Apricot Crepe
- Poppy
- Tigerlily
- Snapdragon
I knew I needed a fun print for the interior, so I chose Suzy’s Evolve Pistachio!
Please Note: In most bags and totes, a 1/2" seam allowance is used. However, for this one, a 1/4" seam allowance will be used to preserve the entirety of the blocks. Please piece carefully and accurately!
Step 1: Print the Template
Let’s dive in! First, print Templates A and B from the Fronds pattern at 75% for size. To do this, change the scale to 75 when the printing prompt pops up, and be sure "fill entire paper" is not checked. Then, cut your templates out or trace onto template plastic if you’d like.
Trace the templates onto your fabrics as stated for the baby-size quilt in the Fronds pattern. Cut out all pieces.

Step 2: Sew and Trim the Fronds Blocks
Next, sew each Template A piece to the coordinating Template B piece as stated in the Fronds pattern (baby size). If this is your first time sewing curves (or if you just need a refresher!), here’s a great post with a video from Suzy on how to do just that.
After you have pieced each block, trim to 4 1/2" square. I cannot recommend this rotating cutting mat enough for trimming blocks! Definitely a game changer!

Step 3: Piece the Panels
Now that our blocks are pieced, it’s time to sew them into 4 panels — 2 main panels and 2 side panels. Lay out all of your pieces as shown above. Be sure you are happy with the placement of your blocks – you can swap pieces around, but be sure that the center "beach balls" are continuous throughout.
Once you have the blocks where you’d like them, sew them into the 2 main panels and 2 side panels.


Each main panel will measure 24 1/2" x 16 1/2". Each side panel will measure 16 1/2" x 8 1/2".
Step 4: Create the Bottom Panel
Now it’s time to get out your waxed canvas! Cut a piece of waxed canvas to 8 1/2" x 24 1/2". This will form the bottom of the beach bag.

A Quick Note on Waxed Canvas:
Waxed canvas is a great option for the bottom of the beach bag for a few reasons: first of all, it’s a very durable material, making it ideal for the bottoms of bags that might get set down (or dragged around by children) frequently. Secondly, the waxed coating makes it water repellent.
If this is your first time sewing with waxed canvas, there are a few things you need to know about working with it. First, and most importantly, NEVER iron or expose the waxed canvas to high heat. This will cause the waxed coating to detach from the canvas and can cause it to get on your iron or ironing board.
Secondly, do not use pins with waxed canvas; use clips to avoid pinholes in the material.
Third, use a heavy-duty needle — this may test the limits of some machines, so take your time and don’t force the canvas through.
And last, it does crease (as shown in the photo below). I find it to be part of the charm, but if you prefer to get the creases out, you can very slowly heat it with a hairdryer to redistribute the wax coating.


After you have cut your piece of waxed canvas for the bottom of the beach bag, sew each side panel to the ends of the waxed canvas piece, using a 1/4" seam allowance, to form a gusset. Finger press your seams toward the side panels. Your gusset should look like the photo above.
Step 5: Cut the Soft & Stable and Interior Fabric
Starting with the gusset, cut a piece of Soft & Stable slightly larger than each piece of your bag (gusset and 2 main panels). Then, cut a piece from your interior fabric the same size as the Soft & Stable for each piece of the bag.
Step 6: Baste and Quilt
The next step is basting! Baste the 3 layers of your gusset (interior fabric, Soft & Stable, and pieced panel) together.
Baste each main panel with its Soft & Stable and interior fabric as well.

Quilt each main panel and the gusset using a walking foot. After you have quilted each piece, run a basting stitch 1/8" from the edge around the perimeter to secure the edges in place.


Trim the excess Soft & Stable and interior fabric.

Step 7: Adhere the Vinyl
Now it’s time to add the vinyl onto the interior fabric! This will make our bag’s interior waterproof, so you can toss in the wet swimsuits and damp towels.

Carefully cut a piece of vinyl the same size as your gusset and two main panels, starting with the gusset. Then, adhere the vinyl to the interior fabric using the directions included (or as this video instructs).
When you get to the waxed canvas part of the gusset, be sure your heat is not too high and press ONLY from the interior fabric side. DO NOT iron on the side of the waxed canvas at all.

Just look at that shiny sheen!

Step 8: Make the Binding
Time to cut some binding! We will be binding 3 seams on our beach bag: the two interior seams where the main panels and gusset meet and the circumference of the top of the bag. I opted to use lining fabric to bind my interior seams and the Fabric A color to bind the top of the bag.
Cut (4) 2 1/2" x WOF strips to bind the interior seams and (2) 2 1/2" x WOF strips to bind the top.

NOTE: If you would like the interior of your beach bag to be truly waterproof, you will also need to fuse a piece of vinyl to each interior binding piece before pressing it in half (be sure to use the pressing paper when pressing in half if you opt to do so). I knew I was going to run into issues if I added any more bulk to my seams, so I chose not to fuse mine.
Attach the interior binding strips together, then press in half to prepare it for attaching in Step 10.
Also, attach the top binding strips together and press in half to prepare it for attaching in Step 10.
Step 9: Assemble the Beach Bag
This is the step where your machine miiiiight put up a fight. It is MUCH better to stop before things get bad, so if things are not going very well, I would highly suggest stopping and using a stronger machine if possible.
Using clips, clip one main panel onto the gusset, pieced sides together. The main panel will overhang 1/4" on either side of the waxed canvas piece.
Starting 1/4" in from the end of the end of the main panel, sew the main panel to the gusset, stopping 1/4" from the end and backstitching well at the beginning and end to secure.

Clip a small relief cut into the corner of the main panel, then fold the gusset so the side of the main panel and gusset align. Match up the blocks along the edges and clip in place.


Starting 1/4" from the corner, sew from the corner up the side you just clipped together, backstitching well at the beginning and end. If you need to go back and make sure the corner is secure after sewing the seam, do so for a little added reinforcement.
You’ll find that you have to smoosh the waxed canvas piece flat and away to get it under your needle so you can start sewing in the corner.
Repeat this step for the opposite side of the main panel.

Step 10: Bind the Interior Seams
Leaving a 1/2" overhang, pin the binding down the side of the main panel. The folded edge of the binding should be the side touching the main panel.


Flip the bag over, and attach the binding by sewing on the opposite side, following the seam from when you sewed the main panel to the gusset. This way you won’t accidentally sew further than the seam allowance. Stop 1/4" from the corner and backstitch to secure.


Turning the corner is actually just like you’d turn a corner when binding a quilt. Be sure the bottom of the gusset is folded flat and out of the way, then fold your binding up at a 90-degree angle, then fold it back down and pin in place. Finish attaching the binding on the remaining two sides.

Once the binding is attached on one side, fold it over and clip in place. Then, stitch in the ditch of the side you attached it to (I found it helpful to use a zipper foot with my needle aligned all the way to the side) to secure the binding.
Be sure your binding is folded over far enough so that it catches the edge of it while stitching in the ditch.

After you’ve finished attaching and binding the first main panel, repeat steps 9 and 10 to attach and bind the second main panel.


At this point, your bag should look like this! Clip the overhang on the bindings so they are flush with the top of the bag.
Step 11: Bind the Top of the Bag
Turn your bag right sides out and push the corners out. Then, attach the top binding using the same method as we used to bind the interior seams (sew the binding to the right side of the beach bag first, then fold over and stitch in the ditch on the front side to finish). When you get to where the binding goes over the bound side seams, push them flat and go slowly over them with your machine.

I found that taking the removable accessory storage box off my machine made it a lot easier to feed the tote around my machine while binding.
Step 12: Attach the Handles
We’re nearing the end! Cut your webbing into two equal 36"-long pieces. Finish each end (if using cotton, use a zigzag stitch; if using a poly/synthetic material, carefully melt the ends to seal). Fold the finished end under approximately 1" and pin onto the front of the bag (I aligned mine with the outside edge of the block 2 blocks from the center of the front of the bag). Repeat for the opposite side of the bag, then repeat to pin the other strap to the back of the bag.


Sew a square with an X through it to securely attach each end of the handle. I’d recommend sewing over each a couple times for added reinforcement.

Step 13: Attach the Velcro
Lastly, we’re going to add the velcro! Take your velcro tape and velcro it to itself, then cut a 6" piece. Carefully peel away one of the sticky sides and adhere it on the interior about 1/4" down from the bottom of the binding, centered between the handles. Peel off the other side, and press it against the opposite side of the bag, centered between its handle.

Since the interior of the beach bag is lined in vinyl, I wasn’t sure if the peel-and-stick velcro would attach, but it worked perfectly and doesn’t budge.

Will you be making this free beach bag pattern?
After all that work, you definitely deserve a break! Grab your bag, fill it with allllll the things you need for the pool, and go enjoy! Now that you know how to sew this beach bag pattern, we’d love to see your beautiful make poolside — tag us at @suzyquilts on Instagram to show it off!


Is there a kit I can order for the beach bag?
We are not aware of any shops carrying a kit for this tote, but you can find links to supplies and fabric under the headings Beach Bag Pattern Supplies and Beach Bag Fabric Requirements — have fun making and using it!
Hi! I’m looking for the quilt pattern to make this bag. Is that available by purchase only?
Hi Liliana! Yes, the pattern can be found and purchased here: https://suzyquilts.com/shop/fronds-quilt-pattern-download/
Will there be a printable version of these steps? Excluding the Fronds pattern part, as I know thats already available.
Hi! The tutorial is not currently available to download as a PDF. You can always print to PDF from your browser if you prefer to have a PDF. It will have the headers and footers, and would be very long because of all of the pictures. But that’s an option! 🙂