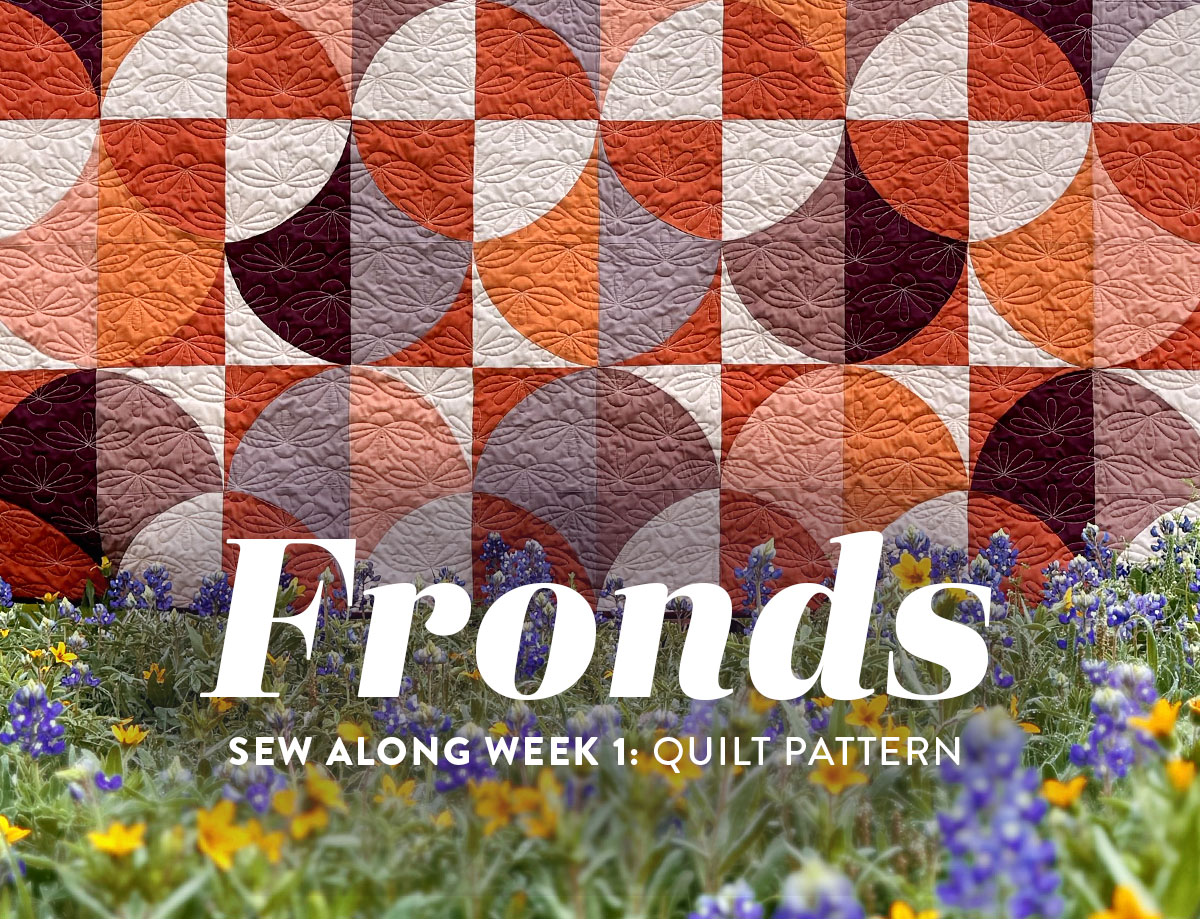
Fronds Sew Along Week 1: Quilt Tips
Hello, quilty friends! I am so happy to be joining you for the Fronds sew along! This sew along will be a little different than others in the past for a couple reasons. The first one is that instead of Suzy writing to you each week, this will be a team effort from some of the creative contributors here at Suzy Quilts!
For the next three weeks, one of us will lead that week’s sew along and cover one of the patterns in the Fronds Pattern Baby Bundle. In our first week, I will focus on the Fronds quilt, which includes instructions for queen, twin, throw, and baby sizes. To win one of our prizes for this week, you definitely don’t need to show a finished quilt. In fact, all you need to do is post a fabric pull for any size Fronds quilt, but we’ll get to those details at the bottom of this post.
The design of Fronds allows for so much color play, and I am excited to show you lots of different color combinations and fabric examples. Choosing colors for a quilt is one of my favorite parts of the making process. While I am drawn to bright colors, I also like to try out designs using soft colors and neutrals. That’s part of the fun!
In addition to picking fabric, we’ll also cover the basics of cutting templates and sewing curves, and we’ll end with pinning and pressing so your seams stay tidy.
First, let’s go over the schedule and great prizes you can win along the way!
Trending patterns!


Quilt Patterns


Quilt Patterns


Quilt Patterns


Quilt Patterns


Quilt Patterns


Quilt Patterns


Quilt Patterns


Quilt Patterns


Quilt Patterns

What’s a Sew Along?
Here at Suzy Quilts, we like to follow up a pattern release with a multi-week community sew along to give you an opportunity to make a quilt along with old and new quilt friends!
We’ll go over extra color examples, break down the steps even further, and give you a chance to ask questions that come up along the way. These sew alongs are supplementary to the pattern, so even though we cover a lot, we don’t cover everything. You do still need the pattern.
We know that life can get busy, and you can’t follow along with every sew along we offer, so these sew alongs stay on the blog forever and are easy to find, so you can follow along at your own pace. Just pop over to the Sew Along tab, where you can find past sew alongs.
Some Quick Points:
- NO sign-up: You do not need to sign up for Suzy Quilts sew alongs. You simply sew along with us!
- Sewing questions: You’ve got questions, we’ve got answers! The best place to ask your technical sewing questions is in the Suzy Quilts Patterns Facebook group. The main purpose of sew alongs is to answer questions that pop up during the quilt-making process, so don’t ever worry about asking a “stupid” question. They don’t exist!
- Prizes: Aside from having a beautiful finished quilt top (or in this case, maybe a finished quilt top, burp cloth, and petal ball set!), you also can win weekly prizes by using #FrondsQuiltSA in the comments of your posts on Instagram. More details on that are at the bottom of this post. For this sew along, we are offering prizes both on Instagram and in the Suzy Quilts Facebook group!

Fronds Sew Along Schedule and Discounts
As a reminder, the Fronds sew along will have a different structure than previous Suzy Quilts sew alongs. While Suzy is on maternity leave with her new baby, the SQ team will lead this sew along! For long-time SQ fans, this won’t be too new — both Laura and Sarah have led sew alongs for SQ patterns before.
This sew along will also follow the Fronds Pattern Baby Bundle structure instead of focusing only on tips for making the quilt. That means that you can participate if you’re making any (or all) of the Fronds projects!
For the Fronds sew along, we will offer prizes both on Instagram AND in the Suzy Quilts Patterns Facebook group! Instructions for how to enter each giveaway are included at the bottom of this post.
- Week 1, April 12: Quilt tips led by Sarah Holst
Instagram Sponsor: Crimson Tate - Ruby + Bee FQ solids bundle (Cordial colorway)
Facebook Sponsor: Sewing Arts - $75 gift card - Week 2, April 19: Burp cloth tips by Jessica Schunke
Instagram Sponsor: Aurifil - Suzy Quilts Evolve thread collection
Facebook Sponsor: Aurifil - Suzy Quilts Evolve thread collection - Week 3, April 26: Petal ball tips by Laura Hopper
Instagram Sponsor: Trace Creek Quilting - Free throw quilt edge-to-edge longarm quilting
Facebook Sponsor: Thai Charm Quilting & More - Free throw quilt edge-to-edge longarm quilting
On top of all of those incredible prizes, Fronds sew-along participants can get deep discounts from some of our favorite longarmers to help you get your quilt finished! Get 25% off edge-to-edge longarm quilting on Fronds quilts from Trace Creek Quilting, Thai Charm Quilting & More, Jenn B Quilts, and Favorite Day Quilting through the end of June. You must mention this deal when filling out their info forms.
Fronds Fabric Requirements

Fronds Quilt: Picking a Layout

Throw Fronds Quilt
If you compare the layout of the Throw quilt above and the Baby quilt below, you will notice that you have the option of making the “fronds” convex or concave at the top and bottom of the layout. Depending on what you prefer, you can move one of the rows to the top or bottom of the quilt. (The pattern provides specific options for this on the Throw size.)

Baby Fronds Quilt
Fronds Quilt: Picking Your Fabric
If I ever get stuck for ideas when picking fabric, seeing lots of different color combinations is the best thing to get my creative juices flowing. Pinterest is my top source for color inspo images. I found several images that I loved and then used my Art Gallery Fabrics PURE solids color card to make mock-ups of six different Fronds quilts below.
In the pattern, Colors 1 and 2 require a light and a darker fabric to create the checkerboard effect, while Colors 3-7 create the fronds. You can make the fronds or the checkerboard stand out more depending on your choice of colors and fabrics.
Strawberry Daiquiri Fronds
- Fronds shapes - foreground because they are highly saturated and bright. Even though some of the colors are lighter (like the pink), overall they still are what pop out in the design.
- Beach balls - background because not only do cool colors like blue recede more into the background than warm colors like red, but the shade of this blue and its cream companion are lighter in value and saturation than the fronds shapes.
- Color 1: lightest (cream)
- Color 2: light medium (light blue)
- Colors 3-7: mixed mediums

Beach Sunset Fronds
This mockup is much more blended in value than the previous one, but there are still clear light and dark patterns, giving it structure.
- Fronds shapes - middleground because even though these shapes are the brighter colors, the dark brown in the checkerboard is still what draws the most attention.
- Beach balls - foreground and background because the Teak brown is clearly the darkest fabric, especially when paired with Sugar Plum, which is quite light.
- Color 1: darkest (brown)
- Color 2: lightest (lilac)
- Colors 3-7: mixed mediums

Coastal Fronds
- Color 1: lightest (gray-green)
- Color 2: darkest (stone)
- Colors 3-7: mixed mediums

Beach House Fronds
This mockup is very blended by not pulling a truly dark fabric and sticking with mostly light and medium fabrics. In general, quilts that are more blended in color tend to feel more relaxed.
- Color 1: lightest (mint)
- Color 2: medium (blue)
- Colors 3-7: mixed bright mediums

Floral Fronds
This is a beautifully blended Fronds that focuses on highly saturated light and medium fabrics throughout.

Moody Christmas Fronds
The only value contrast in this quilt is in the checkered beach-ball shapes, which as you can see, is still enough to give this quilt structure.
- Color 1: lightest
- Color 2: warm medium (which means it will pop to the foreground)
- Colors 3-7: mix of mediums and darks

Sometimes it’s easier to pick fabrics when you give yourself clear parameters. One thing you could think about is balancing light, medium, and dark fabrics. With the Fronds quilt pattern, there are two elements — the “fronds” and the “checkered beach balls.”Ask yourself which one of those elements you want to stand out more. Or would you prefer for them to appear more blended?
In the quilt below, the fronds are the foreground and the checkered beach balls recede into the background. The color breakdown would look like this:
- Color 1: lightest
- Color 2: second lightest
- Colors 3-7: mixed medium and dark

In this next mockup, I flipped it using highly contrasting black and white to make the checkered beach-ball shapes pop and the pastel fronds shapes recede.
- Color 1: darkest
- Color 2: lightest
- Colors 3-7: mixed mediums

Once you get into a groove, it’s hard to stop making color mockups! I used Adobe Illustrator and Photoshop to make these, but with a program like PreQuilt, you can do the same thing! New to PreQuilt? This helpful app allows you to easily swap out fabric in any Suzy Quilts pattern, including Fronds!
Check out all of the Suzy Quilts pattern mockups here. You can find the mockup for Fronds here.
Read more about PreQuilt and how it works in this post: The Best Way To Pick Fabric For Your Quilt: Suzy Quilts Patterns On PreQuilt.

Fronds Quilt: Fabric Prep
Now that you’ve chosen your fabric, it's time to start making! Let’s start from the very beginning with your first potential question...
Should I prewash my fabric?
If you are making the Throw, your smallest cut of fabric is 3/4 yd. My rule of thumb with prewashing fabric is not to wash precuts or fabric that is smaller than a 1/2 yd. (you can’t afford to lose inches to fraying with cuts that small).
So in the case of making a Throw Fronds quilt, yes, you can in fact safely prewash your fabric. If you are making the Baby size, you’re right on the cusp, so I would probably skip it just to be safe.
For more information on prewashing, check out Should You Prewash Fabric Before Quilting?
Should I use starch?
I personally only use starch if I have prewashed my fabric. When you buy fabric off the bolt, it comes with starch already on it from the manufacturing process. I have found that alone makes the fabric stiff enough to cut and sew easily. Of course, you can always add more starch to your fabric if you like it VERY stiff. The time to do that is before you cut it.
If you do want to add more starch to your fabric, use it on ALL of the fabric when ironing it out to cut. Once you use the starch in the beginning, there is no need to continue using it. Just switch to water and steam when pressing your seams.
For more information on starching, check out Fabric Starch: Get It or Forget It?

Fronds Quilt: Cutting
To make the Fronds pattern, you will be cutting shapes from templates. For more details on cutting with templates, check out this blog post, How To Cut Templates For Quilting: The Perfect Guide For Beginner Sewers.
Cutting Tip #1: Iron your fabric.
Cutting with templates is a little different than cutting squares and rectangles with a ruler. For accuracy, it is really helpful if all of your fabric is laying flat with no fiddly creases or wrinkles, so take the time to iron it first.
Cutting Tip #2: Lay your fabric right side up.
The thing to remember about using templates is that what you see is what you get. So if you are seeing the wrong side of your fabric, that is what you will see in your quilt. Before cutting, double check that your prints are all facing right side up so your template pieces sew together correctly.
Cutting Tip #3: Print your templates to scale.
See that 1" square at the top of your template pages? Take a minute and measure that square after you have printed your templates to make sure that it is exactly 1" so you end up with a quilt that’s the correct size. Granted, because this pattern only uses two templates, if you scaled both templates down or up the same way, your quilt would still sew together beautifully, it would just be a different size, and you’d be left scratching your head. 😉
Cutting Tip #4: Use a water-soluble marker to trace your templates.
There are cutting diagrams on page 4 of the pattern showing you exactly how to lay out your templates. If you have never done this before, the first step is to cut your strip along the width of fabric, then lay your template on top of the strip. After tracing your template shape onto the fabric with a water-soluble marker, you can either use scissors or a ruler and rotary cutter to cut out your shapes.
Jump to the one-minute mark of this video to see one way to cut out curves.
Cutting Tip #5: Stack your fabric.
Colors 1-2 and Colors 3-7 use a lot of the same shapes and quantities, so as much as you feel comfortable, stack your strips on top of each other before cutting out your templates.
Stack your fabric ONLY if you can say YES to these things:
- You feel confident cutting through more than one layer of fabric at a time.
- You have a sharp rotary-cutter blade.
- You KNOW that all of your fabric is facing right side up. (There typically is not a right or wrong side to solid fabrics, but there is a right side to prints. PRINTS FACE UP.)
These are photos from the Planetarium sew along, but the same principles apply.

Cutting Tip #6: Use vinyl sheets for your templates.
Even if you plan on making this pattern just once, cutting out your templates from vinyl template sheets will help you stay accurate throughout the whole cutting process. Sometimes paper can rip or get sliced off a bit, and nobody’s got time for that.
Fronds Quilt: Sewing and Trimming Curves
The video below is partially taken from the Planetarium sew along because we will be sewing and trimming our curves the exact same way. Just like the pattern says on page 5, you can use pins or just wing it! Either way, there is plenty of wiggle room for trimming.
Trimming Tip: Trim all of your blocks at the same time.
I find it extremely helpful to piece all my blocks and then trim them all at the same time because it helps to ensure I trim them all the same way. There is a lot of wiggle room in trimming these blocks, and based on how you trim them, they could turn out pretty different from each other, making it difficult to line up the seams once you assemble your quilt top.
Not only can you stack a couple of these blocks on top of each other, like I do in the video tutorial above, but you can also get into a rhythm, speeding up the process.
NOTE: A 6 1/2" square ruler is highly recommended.
A 6 1/2" square ruler will make trimming way easier and waaaaay faster. Bonus: you will also be all set to make a Kris Kross quilt because that’s the same ruler needed to trim those blocks. 🙂
Fronds Quilt: Assembly
Once you are finished sewing your Fronds quilt blocks, you have some decisions to make. This is the time to lay them all out and move them around so the fabrics look well-balanced. It’s also the time to make sure you still love all of your fabric choices.
One thing that happened with our Fronds sample makers is that, on a few occasions, people laid out their blocks and realized they didn’t particularly like one fabric. If that happens to you, it’s actually not that hard to replace a fabric.
You would need to do a little seam ripping and some fresh cutting, but I’m telling you, if it’s just ONE fabric that is making your eye twitch, might as well change it out. No shame in that.
Anyway, this leads me to my number one tip...
Assembly Tip #1: Lay out your blocks.
Lay them out on a design wall or push furniture around and lay them out on the floor. It’s important to see ALL of them together before you start sewing them into a quilt top.
Assembly Tip #2: Follow the pressing directions in the pattern.
On pages 6 and 7 of the pattern, there are specific instructions for how to press your seams so they will nest really well together, and who doesn’t love that?
Assembly Tip #3: Fork pins!
Nested seams are such a great segue into fork pins, don’t you think? 😉 We’re all about matching up those seams around here. If you’re new to fork pins, check out this post, Fork Pins: The Best Way To Match Seams Perfectly.

Week 1 Sponsors & Prizes
Our week-one sponsors are two of our favorite fabric shops. Crimson Tate is giving away a Ruby + Bee FQ solids bundle on Instagram and Sewing Arts is giving away a $75 gift card for your own personal shopping spree on Facebook.
Here’s how to win one of these great prizes!
How to Win on Instagram
- Post a pic to Instagram. The photo prompt for Instagram during the abbreviated sew along is the same each week: post a picture of the fabric you are using to make your Fronds pattern project (quilt, burp cloth, or petal ball) or any Fronds sew-along progress picture. Use #FrondsQuiltSA in the caption.
- You must have a public Instagram profile to participate.
- Each photo posted is an entry, and you can enter as many times as you want in a single week. Once the week is over, those posts do not count in the next week’s giveaway. Every week, we start fresh.
- For the week-one drawing, your photo must be posted between Friday, April 12, and Friday, April 19. The winner will be picked randomly from all qualifying posts and announced at approximately 3:00 p.m. Central on the 19th. Good luck!
How to Win on Facebook
- Post a pic in the Suzy Quilts Patterns Facebook group. The photo prompt for Facebook during the abbreviated sew along is the same each week: post a picture of the fabric you are using to make your Fronds pattern project (quilt, burp cloth, or petal ball) or any Fronds sew-along progress picture. IMPORTANT: We use hashtags less frequently on Facebook, but in order for us to see each post and randomly select a winner, be sure to use #FrondsQuiltSA in the caption of your picture.
- You must be a member of the Suzy Quilts Patterns Facebook group to participate. You do not need to have a public Facebook profile.
- Each photo posted is an entry, and you can enter as many times as you want in a single week. Once the week is over, those posts do not count in the next week’s giveaway. Every week, we start fresh.
- For the week-one drawing, your photo must be posted between Friday, April 12, and Friday, April 19. The winner will be picked randomly from all qualifying posts and announced at approximately 3:00 p.m. Central on the 19th. Good luck!


Dank je wel, wat een lief gebaar. I Love the quilt.
creatieve groet
Jenny