Free DIY Quilted Checkerboard Tutorial
This DIY quilted checkerboard is a perfect project for beginner sewers and children learning to sew. You only need small scraps of fabric and the most basic tools. Let's get started!
I'm so excited about this sewing tutorial because I have fond memories of playing checkers with my dad – first me getting mad and crying because he beat me and then, after the next game, getting mad and crying because he let me win.
Life as an overly competitive 5-year-old was tough, man. So whether it's in the backyard, on the sofa, or even snuggled up in bed, there's nothing more fun than unrolling your handmade quilted checkerboard for a game with someone you love.

This DIY quilted checkerboard is a perfect project for any beginner and would be a fun project if you want to teach someone how to sew or quilt! Why? I walk you through EVERY single step of making an actual quilt on an adorable and practical mini-sized quilt.
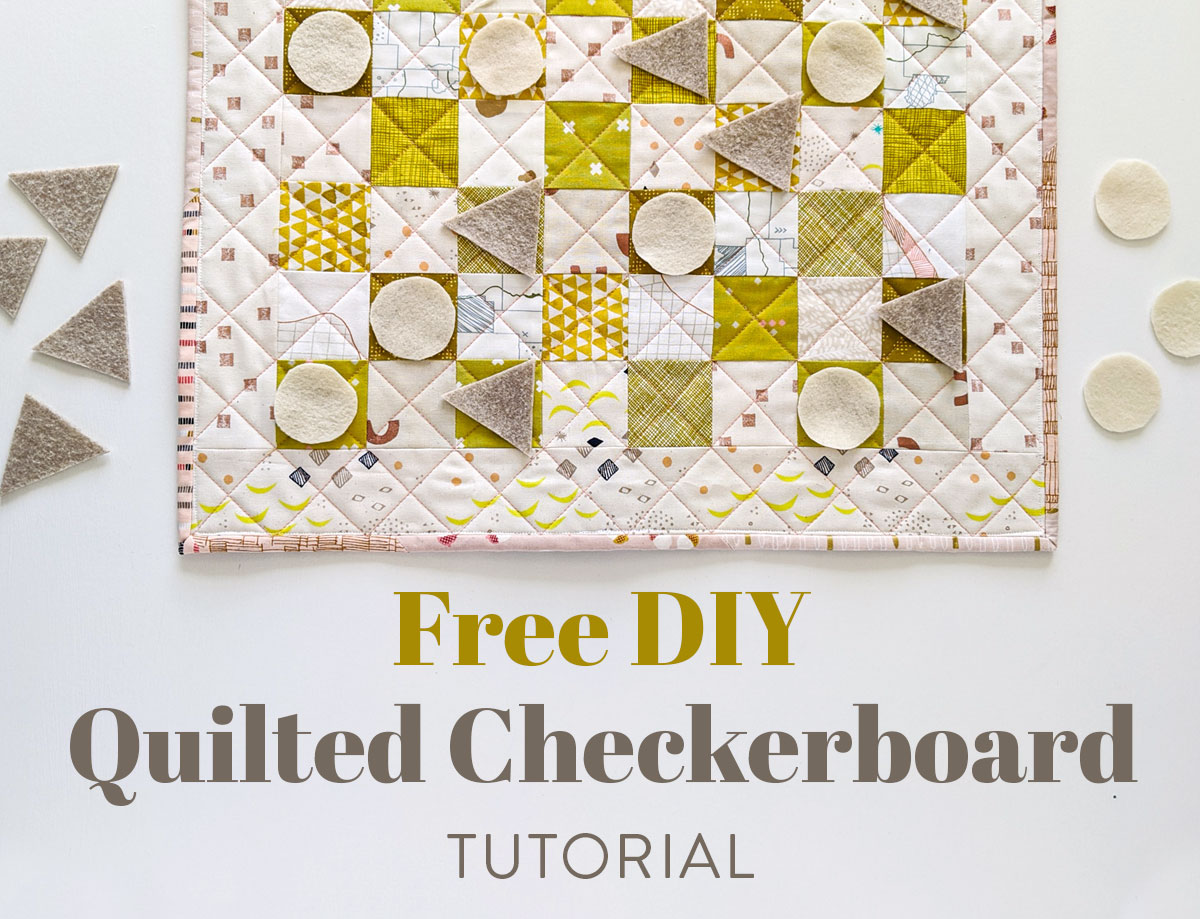
That’s right, people, look closely, and you’ll see that this quilted checkerboard is actually an entire, teensy-tiny quilt!
Trending patterns!


Quilt Patterns


Quilt Patterns


Quilt Patterns


Quilt Patterns


Quilt Patterns


Quilt Patterns


Quilt Patterns


Quilt Patterns


Quilt Patterns

DIY Checkerboard Supplies
- Two contrasting fabrics - a fat quarter of each is plenty, or use scraps in two different color families to mix it up, like I did!
- Border fabric: 1/4 yd. or additional scraps to coordinate with one of your color families
- Fabric for binding and ties: 1/4 yd. (If you don't want to make your own ties, you can use ribbon.)
- Backing fabric: 24" square or larger
- Batting: 24" square
- Two different colored pieces of felt for the markers
- Basting pins or spray baste
- Simple sewing machine
- Thread
- Cutting mat
- Ruler
- Rotary cutter
- Straight pins
- Iron & ironing board or pressing mat
- Scissors
Step 1: Gather Your Fabric
If you're anything like me, you have bins upon bins of scraps that I tell myself I'll use up in some random project. Well, this DIY quilted checkerboard is the perfect project to actually use them!
All you really need for this project is two contrasting fabrics. This could be two different fabrics or a bunch of little random pieces in two color families! I even pieced together scraps for the border, binding, and backing, which adds to the fun, scrappy look.

Step 2: Cut Your Fabric
For your DIY quilted checkerboard, you will need to cut the following:
- Contrasting Fabric A: (32) 2 1/2" squares
- Contrasting Fabric B: (32) 2 1/2" squares
- Border fabric: (2) 2 1/2" x 16 1/2" strips and (2) 2 1/2" x 20 1/2" strips
- Backing: 24" square
- Binding: (1) 2 1/4" x 87" strip
- Ties: (2) 2" x 21" strips
- Batting: 24" square

Step 3: Lay Out the Checkerboard
Once you have all your fabric cut for your checkerboard, lay out the squares in 8 rows of 8, alternating Fabrics A and B. Start the first row with your darker fabric and the second row with your lighter fabric. The photo below gives you an idea of what your finished product will look like. If you're going with a scrappy version, move the squares around until you have a layout you're happy with.

Step 4: Chain Piece the Rows
If you've never chain pieced quilt rows before, you're going to want to hold onto your hats! This tutorial is so simple and makes a HUGE difference in the time it takes to piece a quilt top. It keeps all your rows in perfect order, too!
This sewing method can be applied to a small project like this as well as large quilts!
Following the tutorial, chain piece your squares into rows.


Step 5: Nest Your Seams and Sew the Rows Together
Once your checkerboard rows are chain pieced, snip the threads between each row. Being careful not to mix up the order of the rows, press the seams of each row to the side in alternating directions. So, press row 1 to the right, row 2 to the left, and so on. This will allow you to nest your seams when you sew the rows together and will reduce bulk!
Sew the rows together in order, nesting the seams as you go.
You May Also Like...

Step 6: Press Your Seams Open
Press the seams open.
Alright. So at this point in my checkerboard journey, I made a little Amazon purchase. I had heard Suzy preach about a tailor's clapper for... well.. ever?? But despite her glowing reviews, I secretly thought they were mayyyybe a little hyped up.
So I bought one to see if this was true, AND BOY, WAS I WRONG. Where has this handy thing been all my life?! My seams are now the flattest of flat, and I'm never going back! If you don't have one of these already, I would HIGHLY suggest picking one up. They aren't a huge investment and make a big difference!

Would ya look at that? This DIY quilted checkerboard is coming right along!

Step 7: Add Your Borders
Next, sew the (2) 2 1/2" x 16 1/2" border pieces to the left and right sides of the checkerboard. Press the seams open or toward the borders. Then, sew the (2) 2 1/2" x 20 1/2" border pieces to the top and bottom. As before, press open or toward the borders.

Step 8: Square Up The Checkerboard
If you are the most precise of precise quilters, your DIY checkerboard is already square, and you can skip this step! If you are in the other 98% of quilters (like myself), you might need to square up your checkerboard with your ruler to be sure your sides are straight.

Step 9: Baste Your Checkerboard Quilt Top
Now it's time to baste! It makes no difference whether you prefer pin basting or spray basting. I used spray this time since it was a small project and I wanted to get it basted quickly. Lay out your backing wrong side up, then your batting, then your top. Baste together, and you're ready for Step 10!
If you do use spray baste, don't forget to spray the backing to the batting as well as the top to the batting.

Step 10: Quilt!
Now that you have your checkerboard basted, it's time to quilt it all together. I marked out diagonal lines with my hera marker (another life-changing tool!) then quilted them with my walking foot.
If you've ever wanted to try your hand at hand quilting (pun intended), this is the perfect bite-sized project for practicing! Once you are finished quilting, trim the excess batting and backing.


Step 11: Make the Ties
Next, let's get the ties ready to go. The ties allow the quilted checkerboard to be rolled up and tied shut to keep the pieces and board in easy travel mode. If you are opting to use ribbon instead of handmade ties, you can skip this step.
Take each 2" x 21" strip and press it in half, wrong sides together, along the length of the strip. Unfold the strip, then press each outer edge toward the center crease and press again. On one end of each strip, fold the corners in and the top down, as shown in the photo below. Then, fold in half again, enclosing all the raw edges.
Topstitch along the open edge, making sure to catch both sides of the fabric.


Step 12: Bind Your Checkerboard
Prep your binding by pressing the 2 1/4" x 87" strip in half, wrong sides together, along the length of the strip.
Attach your binding to the front side of the checkerboard, just like you would if you were binding a regular quilt. Before attaching the binding to the back, find the center of one of the sides, and tuck the raw end of the ties underneath the binding, as shown in the second photo below.
Sew the binding to the back. Be sure to sew through all layers when you get to the ties; I backstitched over them once for reinforcement.


Step 13: Cut Out Your Markers
This step can be pretty fun! Cut out your favorite shape(s) from the two colors of felt. You will need 12 markers for each player.


Step 14: PLAY!
After all that hard work, you really deserve to play a game on your brand new DIY quilted checkerboard! So grab your kiddo, your husband, or your cat (hey, quarantined times are pretty desperate) and challenge them to a game. Who knows, maybe since you know this checkerboard better than anybody, it'll give you a leg up!


Check Out More Great Sewing Tutorials!
- DIY Fabric Painting: Safe for Your Quilts
- Free Quilted Tote Bag Tutorial
- A Complete Guide to Glue Basting Seams
- 6 Tips for Straight Line Machine Quilting
- Make a Quilted Zipper Pillow: Photo Tutorial
- A Simple and Elegant Quilted Table Runner Tutorial
- How to Sew Binding on a Quilt (VIDEO!)
- How To Make A Minky Baby Blanket In 30 Minutes!


What a clever project! Perfect for gift giving too.
Yes! A wonderful gift!
I love this SOOOO much! I’ve been wondering if it was possible to make a game board quilt for awhile and I didn’t even think of making a mini one. This is so very cute and I think I have to try it!
What fun! Gotta love a quick mini project now and then. And checkers! I love to play checkers with the grandkiddos. This would be great to stuff Christmas stockings or keep in the camper or I might even make one for the screen porch for summer fun. Thanks for the great idea. Happy Mother’s Day, Suzy.
So glad to hear it! Happy Mother’s Day to you too!
Thank you
Great idea. My daughter is teaching my granddaughter, Claire, shapes. This is perfect project for teaching shapes. Plus, Claire will be learning how to play checkers too. Thanks
Thanks for this checkers quilt pattern. Happy Mother’s Day!
Thank you so mush.. Happy mother’s day. I love it so so so much💕💕
The checkerboard game is darling!! My grandkids love checkers!! You are sooo creative!! Thanks for the free pattern!! 🌸😍
I was finally able to give my husband his Father’s Day gift. He loved it he taught both our kids how to play chess last year, so I added chess pieces too! And I added a pouch on the back to store the extras. This was so fun to make.
That’s wonderful!
Awesome idea. I’ve been wanting to do something like this. Thanks so much!
These are great for putting into Operation Christmas Child shoe boxes. I make 12 or so each year. Not hard and these instructions are very good.
I’m in the process of making a backgammon quilt for my mother-in-law right now! I attached a simple zippered pouch to the back using the binding, so there was somewhere to hold the pieces. Since I couldn’t get good felt in time for Christmas, I made my playing pieces out of fabric yo-yos with buttons in the middle!
Great idea!
Hi, I am making the Checker Board …
I cut the border 16 inches. I think they should be 16.5. I checked my my squares they are all 2 inches except the perimeter … these are 2.25 inches. Have I done something wrong?
Hi Alice! We’re so sorry. No, you’re not wrong. The border sizes were listed incorrectly in the tutorial. The two side borders should be 2 1/2″ x 16 1/2″. The top and bottom borders should be 2 1/2″ x 20 1/2″. The post has been corrected (you may need to refresh your browser). Hope you enjoy the checkerboard!
Yep I read the pattern wrong!!!