Chain Piecing Quilt Rows – Video Tutorial!
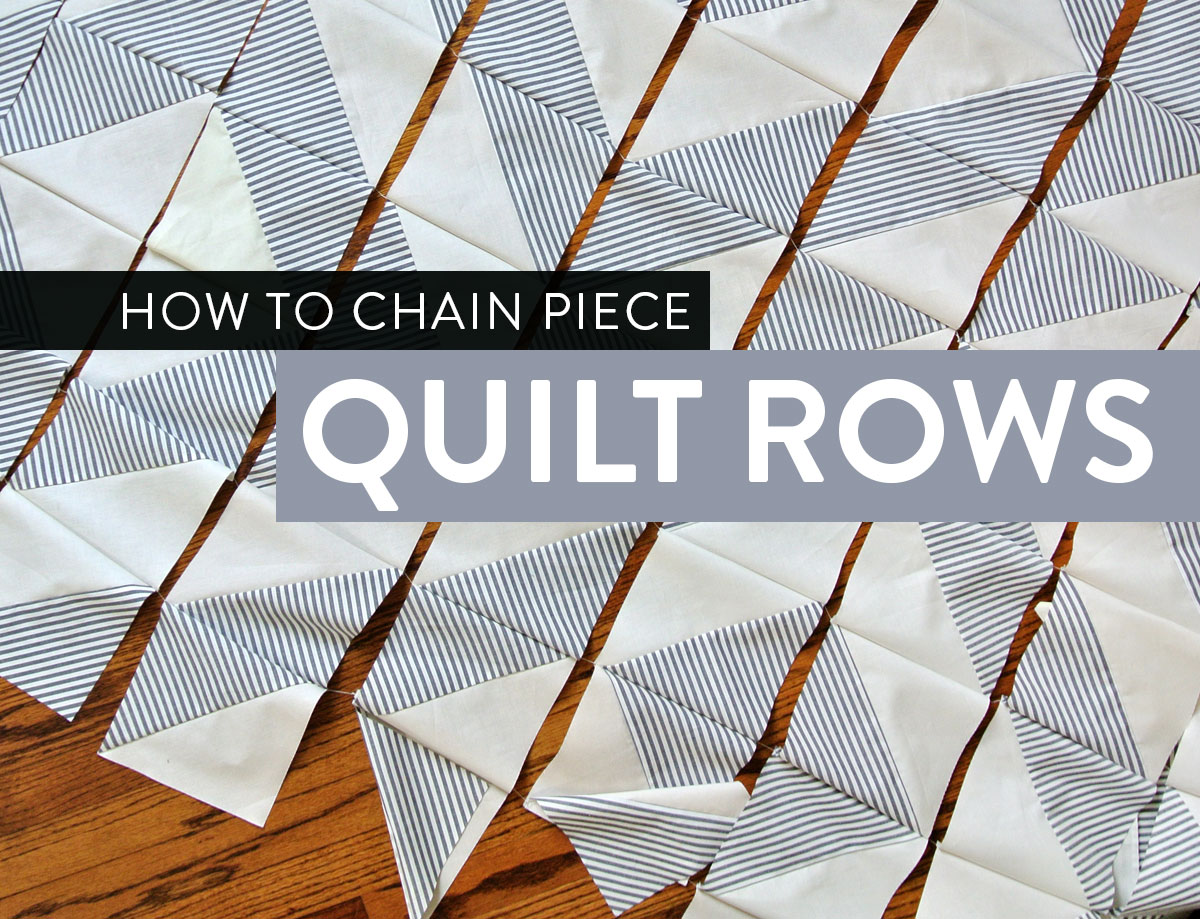
You may have heard of chain piecing quilt blocks, but have you chain pieced quilt rows? You can actually chain piece an entire quilt top in about 15-30 minutes based on how many blocks you have. This technique will cut your sewing time in half and keep you organized at the same time!
I have tried writing down instructions for this technique a couple times, but it never seems to make total sense. This really is one of those things you have to see before the lightbulb blinks on. If you follow my Instagram stories, you saw me demo this a few weeks ago. The one problem with IG stories, however, is that they disappear after 24 hours.
Since posting that quick and dirty tutorial about chain piecing quilt rows the first time, I have had multiple people ask me if I have those videos saved anywhere. Sadly, I didn't think enough ahead to do that.
Well, don't worry, my lovelies! I've made you an official YouTube video so it won't go away after 24 hours and you can keep coming back year after year to remind yourself, "Wait...how did I sew all of those row together that one time?"
See the video below for a step by step tutorial on the bestest and fastest way to sew your quilt tops together. Friends, I might even go so far as to say that once you try out this technique you will never go back to sewing individual quilt rows again. I might even go so far as to say that this will change your life so dramatically that you may feel inclined to write a comment below. Cause ya know, getting a comment from you feels a bit like Christmas morning.
Trending patterns!


Quilt Patterns


Quilt Patterns


Quilt Patterns


Quilt Patterns


Quilt Patterns


Quilt Patterns


Quilt Patterns


Quilt Patterns


Quilt Patterns
One more thing to add is that if you would like to make a quilt just like the one in the video, you toooootally can. The pattern is Triangle Jitters and can be downloaded instantly here. For the fabric I used various cream scraps and an old IKEA duvet. This IKEA duvet to be exact.
You can check out other Triangle Jitters quilts by visiting #trianglejittersquilt on Instagram.
For more free tutorials, coupons, sales, pattern updates and videos, sign up for the Suzy Quilts newsletter. There's always something new going on. Click here to sign up!


Get the Nordic Triangles quilt pattern here!


Yay! So awesome! I think I did this once somewhat by accident but haven’t tried it again purposefully, but now that you laid it all out, I’m definitely giving it a whirl again!
Great tutorial I have been using this method where I can for blocks and tops for about a year and it’s great. So much quicker and easier to keep track of!
This is AH-MAZING! I have a big queen sized quilt I’m making as a gift for my parents and this trick will be SO incredibly helpful. Love your tutorials, thank you for sharing your wisdom!
Awesome technique Suzy! I’ve used this process 2 columns at a time before, but never for the whole quilt top at once! Can’t wait to try it out with my next top!
yes!!
great video you make it look so easy! very envious of your wall too
It really is so easy. Promise! Also my design wall is made simply by sticking a piece of white batting to my wall with Command strips. 🙂
I was going to ask about your design wall so thanks for sharing your setup! Loved the video. I tried this before but didn’t cut the rows apart and that made it a bit cumbersome for me. Think I’ll try your method and separate the rows to make it easier to press in opposite directions first. Thanks!
You are so cool…I LOVE seeing the work you turn out! Thanks for sharing!
I love this! Question: is there risk of the quilt turning out wonky because there’s not completing a big block and trimming it to the correct size before sewing all the blocks big blocks together? Hope that makes sense!
This technique will just sew blocks into rows. After that, you will still need to sew the rows together to finish your quilt top. Once your top is complete, the quilting will be done just as it usually is. Does that answer your question?
Wonderful method, you make it look so easy! I’m going to try it on my next quilt! Thank you for the lesson.
This is such a great technique! I can’t wait to try it.
Can we see this quilt once it’s finished?
Thanks Suzy! Love this approach. Think I kind of did this by accident once, but I’ll be more deliberate next time. Great tutorial.
I’m pretty sure this is cheating! 😉 can’t wait to try one of head days! Since I have a much smaller space than I use to, this is going to be great!
Head = these 🤦🏼♀️
Watched your video. It seems like it will make things easier, especially keeping track of the blocks. Thank you for the great info! Have a great evening!!
you are amazing, I think I may have done this for the 1st two columns only before but not the entire thing. This is going to be happening on my next quilt top.
Awesome!! I’ve heard of this but never comprehended it before! Thanks so much for such a great video! xx
Brilliant! I cannot wait to try this method! Thanks for the great tutorial Suzy!
Suzy Q.!!!!!! That is GREAT!!!!!!! Thanks for sharing your brilliant idea!!!!! What is on the wall to keep the pieces stuck w/o tumbling down??????
It’s a piece of white batting that I stick to my wall with Command strips. Easy Peezy!
Amazing!! I just decided to whip together a baby quilt for a shower this weekend and I’ve already got the top done! Just like that! 👌 Thank you!!
You go, girl!!
Very clever! I’ve done this in part before, but keeping the rows connected as you sew the columns on is genius! Thanks for the video! Quite helpful. 🙂 I have a quilt just sitting on my design wall that would be perfect for this method! Two thumbs up.
Ah-mazing! I can’t wait to show my mom. We debate the need to iron when sewing (her answer – yes, iron everything and often) on a regular basis. And this has brought back my mojo to quilt (something I seem to lose every so often). Thanks so much Suzy.
I’m with ya. Quilting can be a serious workout if you have to get up from your machine to iron every single seam….every…single…time!
Genius!!! Thank you!
Thanks for the reminder about this technique. You do a terrific video! I’m going to link back in my next newsletter!
Thank you so much! xo
Thanks! I’ve never been able to make sense of that method! Forwarded this to all my quilty friends
If you leave a big enough chain, do you think you could iron the rows while attached and meet seams to sew the rows together, without any snipping? Sounds like witchcraft but also sounds doable?!
I definitely think you could!
oh my goodness, this is LIFE CHANGING!!
I wish I’d seen this video earlier! I quilt in a small space and made Triangle Jitters a few weeks ago – keeping things in order was definitely slowing me down. Great idea. Will definitely try it out some time. Thanks for taking the time to share.
Brilliant!!! I am using this method for my next quilt!
Is this still a good technique for small blocks? I guess that depends on the size of your iron?
It’s a great technique for smaller blocks. I’d say even better with small blocks than larger blocks because those are more likely to get out of order or lost.
I’m going to give it a go … thank you!
So smart! I have always thought there must be a better way to sew together rows and 🤯 mind blown.
I sure makes quilt assembly a lot more fun!
Genius! I’m trying out your method now!
You’re absolutely right. Without a doubt, life changing! Especially with a dog who won’t stay away from the carefully laid or quilt! 😍 Thank you! 🙌
Hi! First time watching this! I am wondering if you would have to cut your rows apart after chain piecing them together. Have you tried to iron them while they are in their chain pieced glory like that and just leave them attached when you go to sew the rows?
I haven’t tried that because I think inevitably I would get tangled, but I bet you could!
I do this all the time….. shared it with the Guild! I have done it in two halves and then connected the two. Then as a whole “net”, I press the top row left, and the next row right, and it’s immediately ready for sewing horizontally, and the intersections nest perfectly and I don’t even have to pin! Of course, accurate cutting and sewing are prerequisites…
It’s also great for piecing 9 patches or 16 patches: do two at a time and alternate between them… just snip after each block. I made over 100 9 patches while recovering from surgery: 3 quilts worth!
Don’t you think you can take it a step further &
Just iron all those seams open then sew the rows together without cutting them apart? I may try it just to see if I can!
You are amazing!, wish I’d known this a long time ago!, (say a least 45yrs)!
I definitely think you could, I just end up getting tangled in quilt blocks by the time I have everything chained together – that’s why I like to snip the rows apart and sew them together separately.
Phenomenal. Thank you. I am putting together the my squares lickety split. Will read all the comments to learn even more tips.
Hi Suzy! I’m new to quilting and I have a newbie question. In regards to the quilt with the striped ikea fabric, is there a certain way to cut the fabric to make sure the stripes are going in the correct direction? I would like it to look just like yours 😉
My stripes are totally helter skelter, so I don’t have any tricks for you. lol!
Haha.. okay thank you for responding! Your quilts are beautiful and your site is a goldmine! 😊 Gonna go purchase the triangle jitters pattern!
OMG!!! Finally I get it!!! Thank you so much!
I am confused. In most matrix situations rows go horizontal (across) and columns go vertically.(up and down). It looks like you are assembling the columns and you keep calling them rows.
You’re exactly right, however in this case I am assembling the rows by sewing them into columns. That sounds more confusing than it is. I think if you watch the video you will know what I mean.
Hi!
I’m currently working on your Rocksteady pattern and I LOVE how easy it is to follow.
My question is this: at the end of your video you mention pressing the seams of your finished rows in opposite directions and I was wondering why? This is my second quilt so I was just curious why they seams needed to be pressed in opposite directions.
Thanks for the easy to follow tutorial!
We do that so the seams of each row nest nicely with the seams of its neighboring rows. This blog post explains that – https://suzyquilts.com/basic-quilting-questions-answered-part-i/
Thanks for this! It is life changing! Would it work on an on-point quilt?
Yes, I believe so! I do something similiar in this video with the Thrive quilt pattern – https://suzyquilts.com/thrive-quilt-sew-along-week-5-sew-rows/
Hi Suzy,
Thanks for the tip! I love the (all) the fabric in the quilt with deck of cards theme- where can I find it?
Hey there! I think you’re referring to the Through the Looking Glass quilt pattern? Here’s a link – https://suzyquilts.com/looking-glass-free-quilt-pattern/ Unfortunately the fabric used in this quilt is out of stock because it’s a few years old.
Does this method only work if the squares/HSTs/flying geese are all the same size?
It works best that way, but in this video on chain piecing Voyage quilt blocks, I show you what to do if you have a section that is a different size – https://www.youtube.com/watch?v=-DiLfyIrT7w&t=2s
So clever! Thanks for the tutorial!
Wow! That is amazing! Thank you 😊
When I chain piece I inevitable tangle the chain along the way, usually multiple times. I’m about to put together a king size quilt top – any suggestions for avoiding the gigantic chain getting twisted and tangled? Thank you!
Great question! I think if I was having that issue I would try two things:
1. Sew on a larger surface. The blocks are probably getting tangled because they are hanging off the back of the table, dangling and winding around each other. Is that possible?
2. Chain piece sections of the the quilt at a time. Especially with a king, it will get really heavy really fast if you chain the whole thing at once. So maybe chain the top quarter of the quilt then set that aside, then move on to the next quarter.
Love your blog. I’ve been using the chain block technique for years. I learned it from Harriet Hargrave. She teaches it in her book “Quilters Academy Vol. 1”. In her technique, you make stacked rows and keep at your sewing machine. That saves you a few steps. It works great 🙂