FREE Quilted Christmas Stocking Pattern
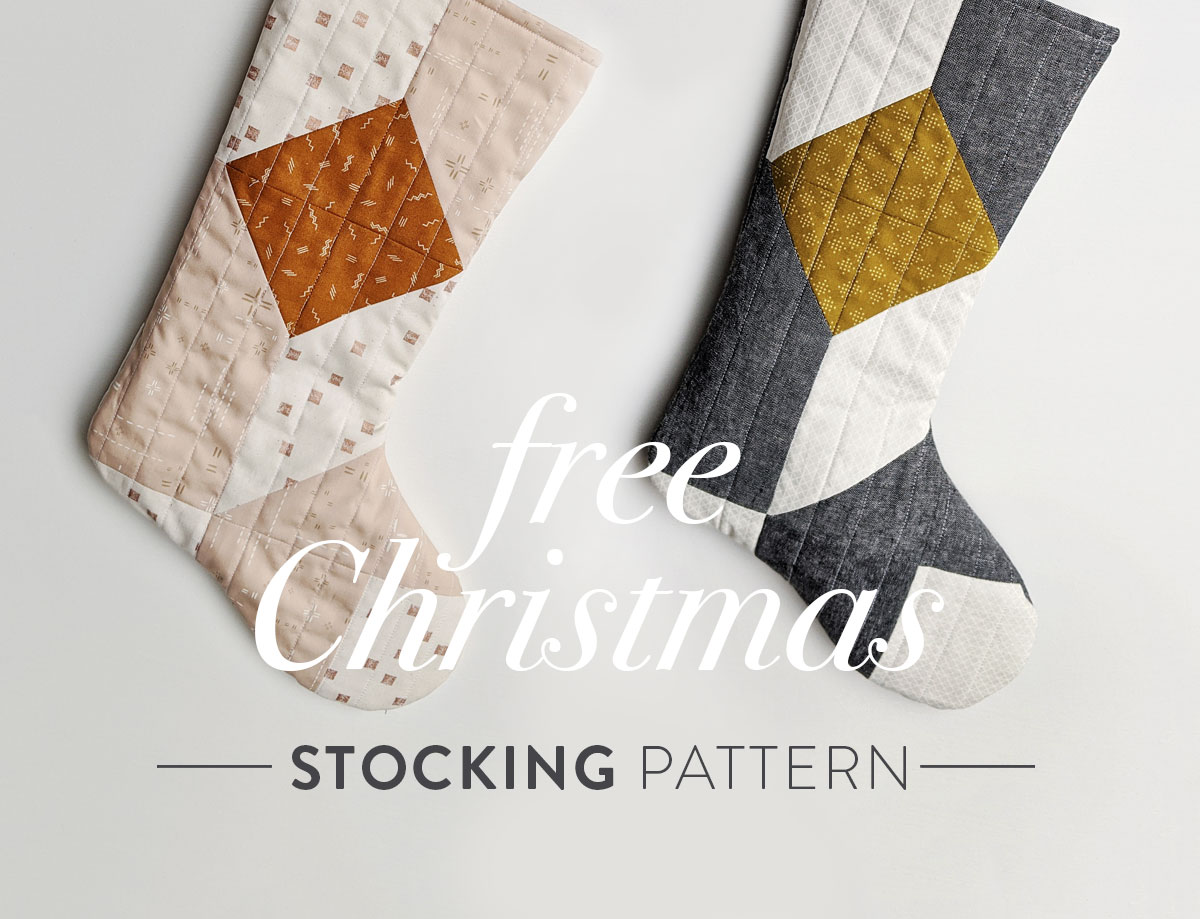
Before launching into your free quilted Christmas stocking pattern, let me explain why this pattern is squeaking in just five days before Christmas. It's simple, really. The first reason is that I didn't see these beautiful stockings until last week. For hours I had been on a cyber quest to find Christmas stockings for my family – which was proving to be no easy task!
I found plain stockings, glitter stockings, stiff canvas stockings and long skinny knitted stockings, but do you know what I could not find? Elegant and timeless stockings that would bring me joy year after year. I had given up my search and was pacifying my frustration with Facebook. But then viola! While scrolling through the Suzy Quilts Patterns Facebook group I saw these! Serendipity!
The second reason for the late delivery on this pattern is that today, December 20, 2019 is my 34th birthday. What better way to celebrate my birthday than to give you something! So without further ado, I bring you a beautiful quilted stocking pattern. - Suzy

‘Twas the week before Christmas and all through the house,
Not a creature was stirring, not even a mouse.
The stockings were hung by the chimney with care,
But needed a facelift, and looked a bit bare.
The quilters were nestled all snug in their beds,
While visions of flying geese danced in their heads.
So with 5 days ‘til Christmas, they gathered their scraps,
They sewed brand new stockings for their kids, dogs, and cats.
So if you’re looking to fit one more Christmas project in,
You can make these quick stockings for your next of kin!

You May Also Like...
A Quilted Christmas Stocking Pattern
With Christmas just around the corner, I wanted to make a few unique stockings this year. I made the Rocksteady quilt last fall for my daughter, and as I looked at it laying on our couch, I knew that it would be the perfect inspiration for a one-of-a-kind stocking!

Fabric:
This is easy, since it’s very likely that you already have most of these items in your stash.
- Fabric A (Diamond Shape): One 7” square cut into four 3 ½” squares- great for using a piece or two of your favorite scrap!
- Fabric B (Background Fabric): 1 FQ
- Fabric C (Contrasting Fabric): 1 FQ
- Fabric D (Fabric for Back of Stocking): 1 FQ
- Fabric E (Lining Fabric): 1/2 Yard
- Batting - ⅓ Yard (If you want to use up some batting scraps, this is a great project to do so! Check out a tutorial on fusing batting together here!
- 6” Ribbon (for hanging loop)
- Printed Stocking Template (originally from a cuffed Christmas stocking pattern)
Basic Sewing Supplies
- Basic sewing machine
- Thread
- Batting – This batting is low-loft for a beautiful drape. Something like Quilter's Dream bamboo batting would be great.
- Cutting mat
- Triangle ruler
- Ruler
- Rotary cutter
- Straight pins
- Iron and Ironing board
Optional Supplies (that'll make things easier)
- Fork pins - perfect for getting your points perfect every time!
- Template plastic - 12" x 18” piece
- Best Press starch
- Hera marker or Disappearing ink fabric marker
Terms
- RST = right sides together
- WST = wrong sides together
- FQ = fat quarter - a pre-cut of fabric measuring approximately 18" x 21"
- seam allowance = 1/4"


Step 1: Select and Cut Your Fabric
For this Christmas stocking pattern, choosing fabric ultimately comes down to personal preference, but I usually choose a fabric that will really POP for the diamond shape (Fabric A), and fabrics that will compliment it for Fabrics B and C. For this stocking, I fussy cut my Fabric A pieces so I could show off the little birds on the yellow fabric. I recommend pressing your fabric with a bit of starch prior to cutting.
Fabric A (Yellow):
- (4) 3 ½” Squares
Fabric B (Grey Lemons):
- (1) 5 ¼” x 7”
- (1) 4 ¾” x 8 ¼”
- (1) 4 ½” square
- (1) 4 ¾” x 8”
Fabric C (White):
- (1) 5 ¼” x 7”
- (1) 4 ¾” x 8 ¼”
- (2) 4 ½” squares

Step 2: Assemble the Front of the Stocking
Draw a diagonal line on the back of your 3 ½” square of Fabric A. If you are fussy cutting or using a directional fabric, be mindful of how they will look by putting RST and folding over the corner (to see how they will look once you sew, trim, and press.)
Lay out the 5 ¼” x 7” piece of Fabric B and the 5 ¼” x 7” piece of Fabric C next to each other. Place the 4 ¾” x 8 ¼” piece of Fabric C and the 4 ¾” x 8 ¼” piece of fabric B below. Place one square of Fabric A in the corner of each piece as shown, RST, making sure the drawn lines are as shown.

Sew along the drawn lines, trim ¼” away from the seam, and press seams open.

Now, you may think it’s time to sew all the pieces together BUT before you do, we’re going to add one more piece. Grab your 4 ¾” x 8” piece of Fabric B, measure 4 ¾” along the long edge, and make a small mark. Then, grab your ruler, and draw a diagonal line from that mark to the opposite bottom corner as shown.

Place this piece RST with the 4 ¾” x 8 ¼” piece of Fabric C as shown, and sew along the line. Trim ¼” from the line, press the seam open, and you will have a chunky L-shaped piece.

Lay the 5 ¼” x 7” of Fabric B and the 5 ¼” x 7” piece of Fabric C right sides together so that the triangles match up. (This is a good place to make sure that your points are lined up - pin if you would like. I personally love using fork pins - it holds both sides of the seam flat, and helps you get that perfect point!) Sew together using a ¼” seam allowance. Do the same thing with the 4 ¾” x 8 ¼” piece of Fabric B and the chunky L shape. Sew together, and press seam open.

Take the two pieces and align the centers of Fabric A. Don’t bother matching up the edges - those will be different sizes. Be sure your points match up, and sew pieces together. Press seams open, and you’ll have this!

Sew a 4 ½" square of Fabric C to opposite sides of the 4 ½" square of Fabric B. Press seams open.

Lay your 3-square piece RST with the bottom of the large piece, aligning the first seam of the bottom left corner with the first seam of the 3-square piece. Again, the edges will not match up, only be concerned about matching that seam. This is another great place to use fork pins to align the points! Sew pieces together, and press seams open. Wha la! Your entire front is pieced!

Step 3: Cut Your Stocking Pieces
Print your Christmas stocking pattern template, and make sure the 1" x 1" square in the corner is to scale. Cut it out, and tape together. If you’d like, you can trace the template onto clear template plastic.

Place your stocking front WST with your backing fabric. Trace your template onto your front (I find it helps to be sure the top of the template is parallel to the seam running through the diamond to ensure the diamond won’t look crooked.) Cut out the outline - if you’re worried about the layers shifting, you can pin through both layers to hold them together.
You should end up with this!

Step 4: Assemble the Stocking
Fold Fabric E (Lining Fabric) RST. Trace stocking onto fabric, and cut out. With RST, sew around the perimeter of the lining with a 1/2" seam allowance, leaving the top open as well as a 6" gap along the bottom (VERY IMPORTANT, DO NOT SKIP THIS STEP), which you’ll later use to turn the stocking right side out.

Take your front and back stocking pieces and baste them to your batting. I chose to spray baste since it’s such a small project and you don’t have to worry about shifting, but if you love pin basting, that would work too. If you’re spray basting, don’t forget to get out your fanciest green tablecloth to cover your floor. Spray baste on your floor is NO JOKE.
Since this quilted Christmas stocking doesn’t require large pieces of batting, you can use up leftover scraps from other projects. Need to figure out which side of your batting is the front? Check out this blog post to make sure you’re utilizing the correct side: Is There a Right Side to Batting?

Once basted, it’s time to quilt! I chose to do very simple quilting, but this could be a really fun project to try out some free motion quilting on! For my method of quilting, I found the center of the top of the stocking and marked a line down the front of my back piece with a straightedge and my Hera marker. You could do this with disappearing ink too, but I prefer to use a Hera marker when marking on the right side of my fabric.

From there, I used my walking foot and quilted 1” lines using the guide to keep me in perfectly straight lines. For the front of the stocking, I stitched in the ditch that runs through the center of the diamonds, then used my guide to quilt the remained of the stocking in 1” lines.

After quilting, cut out your stocking pieces using a rotary cutter or fabric scissors.

Place your stocking front and back RST. If you’re a pinning person (like myself) now would be a great time to pin around the perimeter of the stocking to ensure it won’t shift while you’re sewing. Sew with a 1/2" seam allowance around the stocking edge, leaving the top open.

Optional: After sewing around the edges, trim the curves and the top down to 1/4" - this just reduces bulk in your seams when you turn it inside out. Clipping darts in the curves can also give the same effect.

Turn your stocking right side out, and use a corner turner (or a chopstick from your favorite Chinese restaurant) to make sure all the curves are turned out nicely. Whoo hoo! It’s looking great already!

Now, grab that lining that you sewed together earlier (which should still be RST) and place the quilted stocking inside the lining.

Cut a 5 ½" piece of ribbon, and fold it in half. Place the folded ribbon so the loop is pointed down between the quilted stocking and the lining. Align the back of the stocking seam, the loop, and the back of the lining seam, and pin.

Also align the front seam of the stocking and lining seam, and pin. Pin around the rest of the opening if you would like.

Sew around the circumference of the opening using a 1/2" seam allowance with your walking foot. You may need to take off the extension table of your machine so that you can fit the stocking onto the machine.

Take your stocking, and pull the exterior out through the hole in the lining, turning it right side out.

Find the hole in the lining, and finger press the opening flat. Stitch the opening closed using an invisible/ladder stitch.

Place your lining back in the stocking. Press the circumference of the top of the stocking, and topstitch around it using a 1/4" seam allowance.

And there you have it! These Rocksteady Stockings are so fun to make, and after you make one, you’ll want to make one for everyone on your Christmas list!
The stockings were stuffed and the cookies were gone,
Santa’s no art critic as he’s hustling along,
But I heard him exclaim as he rode out of sight,
“Those Rocksteady Stockings were the best of the night!”


Happy Birthday Suzy!
Thanks, Lynne!
Trying to find the free template for your rock steady Christmas stocking. Thanks for any help you can give.
Hi Susan! You can find the stocking template in this blog post under the heading “Fabric.” Click on the link that says “Printed Stocking Template” and it will download! Enjoy making your stocking 🙂
Made this today and it’s beautiful! I’m new to quilting and loved your instructions and pictures. Thank you!!
What a great pattern! I’m making 12 of these for my family for next Christmas. Six down, six to go. Thanks for a great, well written pattern. I’m going to have a hard time stopping at 12!
Could you please tell me where you found the pattern? I tried the link above under FABRIC but it’s for a 4 piece stocking (top, middle and 2 piece bottom). Where can I find the pattern for the one pictured with the diamond in the middle???
Hey Kathy! The steps in this tutorial show you how to make the piecing (diamond) and then use the stocking template to cut out that shape. You’ll see that in steps one and two you piece the design on the stocking, and then in step 3 you trace the template so your piecing is in the shape of a stocking. Hope that helps and you enjoy making your stocking! 🙂
I’m having a terrible time with the part where the L-shaped piece goes on. I think I’m going by the directions but the piece doesn’t go on as pictured. What am I missing?
Happy birthday Suzy from hot hot hot Australia. 🐨🐨
Can we download this pattern or will it stay on here. I love it
It will stay up forever!
So excited for this. I hadn’t gotten my little Grandsons stocking made yet and I think this is just the perfect pattern and I could finish it in time. Thank you so much
Gorgeous, I love a good Christmas stocking! Are those hair pins used to hold the seam open?
They are fork pins. There’s a link in the supplies section!
Great, thanks!
Happy Birthday Suzy 🎂🎈 Thank you for the pattern.
Great pattern! Love the simple, sophisticated design!
Happy Birthday, Suzy!! Thank you for the gift of the free pattern!!!
Happiest Birthday wishes to you, Suzy!🎉🎂🥳
Beginner question… are you quilting the front and batting together with nothing else behind the batting?
Correct!
Happy Birthday! Thanks for the fantastic pattern.
What a wonderful way to celebrate your 34th birthday, Suzy! I love this stocking as it’s a bit more modern than most and the shape is just perfect. You have permission to whoop it up all weekend and have fun! Thanks so much!
Happy birthday Suzy! These are beautiful and I can’t wait to make some and stuff them with goodies to give as gifts!
Are the batting and the front the only two layers involved in the quilting part? I’ve never quilted with batting exposed (from the girl who made one quilt 20 years ago)
That’s correct. A separate lining is added after the quilting.
Any tips for how to get the exposed batting to feed through my sewing machine? It keeps getting stuck so just quilts over and over in one spot. I’ve only ever quilted with the batting between fabric layers so it feeds through nicely.
I was having a similar problem as well, and new to quilting.
Hey Suzy, I came from Instagram. I love this pattern and Happy Birthday!!!
Thank you!
This is great! Thanks for sharing and hope you had a great birthday!
Also have to call out that through this process you managed to decapitate a bird and sew him back together with a seam cutting off his neck but still a final product where he looks normal. Quilting + ornithological plastic surgery = impressive indeed!
This is a beautiful pattern! Thank you for sharing and Happy Birthday!
Happy Birthday! What a beautiful pattern. I have been looking for a good Christmas stocking pattern for a long time. This is it! Thank you.
Happy Birthday, Suzy! Thank you for the free Christmas Stocking pattern and tutorial! I love your site and learn many things with all your posts. It is evident that you put your heart and soul into your work and family. I made our little grandnephew the rock steady quilt and usedan almost all the same fabrics you used and it turned out so well! If I am able to post a picture I will. You are the best!
Happy birthday, darling Suzy, and thank you so very much for this awesome, thorough, detailed, amazing pattern. My two little granddaughters and baby number 3 (in July) will each have a special Christmas stocking from their grandma next Christmas. Blessings to you, your hubby, and your adorable little boy. 🙂
Happy Birthday Suzy!
Happy Birthday Suzy! Merry Christmas & Happy New Year 🎅
Happy Birthday Suzy!!! And thank you for an awesome pattern. I won’t be able to get this done for this year but I will get it for next year!
Many Happy Returns with Birthday Wishes and thank you for this wonderful pattern. Oh and the picture of your family at the tree farm(?) is fabulous.
Can you share the fabrics used? They’re just so gorgeous!
Hi Meg!
Both are Cotton + Steel “From Porto With Love” collection- the birds are Stork Nest in Yellow, and the lemons are Lemon Trees in Mint Unbleached!
Suzy,
I am going to make a Xmas stocking out of my leftover Birch whistle fabric (I just made a baby quilt and thought it would be adorable to make a stocking to match). I wanted to put a red binding around the opening of the stocking. I’m new too quilting. How would I do that with the lining?
Btw. I love your videos…I would fail miserably without them!
Mona
If I were you I would sew the stocking just like the tutorial says, and then follow this binding tutorial to add binding to the top. Make sense?
I didn’t end up doing the binding. I had stitched in red at the top! A bit easier. I am so excited how this turned out!
Mona
This looks so nice, thank you! I’m picturing a hand or machine embroidered monogram for the middle of the diamond on mine and my husband’s. Very sweet! -Jen
YES! I love that idea!
Hi Suzy! Would you mind sharing what fabric you used for the two stocking in your first image with the pinks and the charcoal? I love them and would love to make them for my kids this Christmas! Thanks so much!
Your patterns are great.
How do you download this? I don’t see a link for the stocking shape PDF.
There is no PDF download, the instructions and visuals are in this post.
I’m pretty sure this is what you’re looking for: http://site.fabricworm.com/stocking_tutorial.pdf
Happy quilting!
Hi Suzy! I am wanting to make 3 stockings today with your otters! Quick question – I printed the pattern and the directions say make sure the 1×1 inch square in the corner is to scale. Am I missing something? I don’t have a square on my pattern I printed.
You’re absolutely right, there is no 1″ square. huh. I swear it used to be there. You know, it’s possible fabricworm updated this PDF and changed that. Anyway, just make sure you don’t scale down the template when printing and you will be fine.
Hi Suzy, I’m a beginner quilter. Just wondering what the finished size is of these stockings. These look like a fun project!
I’m not sure off the top of my head, but it’s a very standard stocking size. 😉
Suzy – am I missing a place to download this stocking or print it? I keep looking but am at a loss! Thank you!
Under supplies there is a link to this template – http://site.fabricworm.com/stocking_tutorial.pdf
Thank you! I just used this to make two stockings and they turned out great!
Thank you Suzy. I love your patterns
Thank you for this pattern – I’m making them for our family of four right now and this is sooo easy to follow and they are comfy out beautifully! The only thing I changed was not cutting the diamond part into small squares and instead embroidering our initials on a diamond and appliquéing it on the quilt top. I’m so happy with this project!!
Hi Suzy,
Is this a project for a total quilting beginner? I love the design!
Emilia
Definitely!
Hi – is there by any chance a downloadable printed pattern for this lovely Christmas stocking?
Hi Jane! Here at Suzy Quilts, we only produce digital quilt patterns for sale as well as free tutorials on our blog like this one. There is not a printed version of this pattern, but if you’d rather use paper when working on your stockings, you can always print out the web page! Have a great time making your stockings!
Thank you for the pattern. It was easy to do. My father in law died last Christmas Eve. I used fabric from his favorite plaid flannels to make 10 lovely stockings, keepsakes for family members.
Such a great tutorial, thanks so much! If I wanted to add a fur trim/cuff, what step do you think would be best to add? just wrapped around the top of the right side (both right sides facing out) before sewing the lining?
Hi, Thank you so much for this pattern and tutorial. Where is the !” square on the stocking pattern referred to in step 3 to make sure your pattern is to scale?
Step 3: Cut Your Stocking Pieces
Print your Christmas stocking pattern template, and make sure the 1″ x 1″ square in the corner is to scale. Cut it out, and tape together. If you’d like, you can trace the template onto clear template plastic.
Thank you
I came here to ask the same and noticed someone else asked it as well. The answer was to make sure you print the pattern 100%. Don’t scale it down. There is no 1″ square on the pattern!
Thank you!
Hi I can’t open the pdf stocking template, is it still available?
Hi Ruth! Yep, you should be able to click where it says “Printed Stocking Template” under the heading “Fabric” and the template will open in another window. If it does not open, it’s possible that your computer may not be allowing pop-ups or downloads from websites, so you can check your settings to make sure you can download it! If you continue having difficulty, send us an email at [email protected] and I’ll try to email it to you. Enjoy making your stocking 🙂
Love, love, love the pattern. Thank you for sharing it. Can you sew the stocking together with a 1/4″ seam and not trim it or should you sew the 1/2″ seam and trim?
Sewing a 1/4″ seam and not trimming will work too 🙂
Thank you, Suzy! I wanted a cool way to “wrap” gifts for my sisters-in-law for shipping to the US. This was exactly what I needed! (did a bit of FMQ on the front-facing side and just love the finished product).
So adorable! I can see an initial in the pieced fabric diamond!
I see that the supplies list using fat quarters for some of the fabric, but is it possible to sub just a quarter yard of fabric?
Hi Bre! Theoretically yes, because none of the cuts are wider than 9″. However, we have not tested the pattern with a quarter yard instead so we can’t make any guarantees. Enjoy making your stocking! 🙂
This is my first sewing/ quilting project and I just finished!! I could cry it’s so cute! Thank you so much!!
Congratulations! How exciting!
So thrilled! A member of my family is trans and their old stocking has their dead name on it. This year I decided to make them a new stocking. This stocking was a one day project, including making frankenbatting from the trimmings of one of my last quilts!
This is my favorite quilted stocking pattern, have made several of them, thank you so much for sharing. 🙂
Thank you for this great pattern! I am a beginner and they turned out lovely. I made everything as instructed, except for two little time saving adjustments: I did not quilt the back and I topstitched the hole in the lining instead of hand stitching (it’s the lining after all!). I will definitely make these again.
Unable to print out patterns. Is there a secret?
Hi Joyce! Once you open the template, there should be a button that looks like a printer that you can push. If you need more help, feel free to email us letting us know more about the issue you’re having at [email protected]!
Hello Suzie
I Can’t download the pattern , please help me, I love this stockings !
Thank You
Cath WS
Hi Cath, could you tell us more about what’s happening when you try to download the stocking template? When you click the link “Printed Stocking Template (originally from a cuffed Christmas stocking pattern)” it should start downloading automatically. Is that not happening? You can also reach out to us at [email protected] if you’d like. Thanks!
Facing a stocking emergency, SuzyQuilts was the first place I looked for help! Thank you!
Any suggestions for a way to add a name to the stocking?
Hi Andrea! Embroidering a name along one of the block pieces would be a lovely addition. You’ll just want to do it before you assemble the final stocking so the back of your stitches will be hidden inside.
Hi. Love the pattern !! How do I print the instructions? I printed out the template but would like to print out the instructions.
Hi Jo-Ellen, we’re so glad you’re making this stocking! If you want to print out the instructions, you can just click print and the whole thing will print! It will be a lot of pages because the post is so long, but that’s the only option for printing this one. We recommend using your computer, phone, or tablet instead since it’s such a long and detailed tutorial 🙂
I love the white fabric used in your stocking! Do you know if it’s still available for purchase anywhere? Thanks!
That’s an old Cotton and Steel basics print that may not be available anymore, we’re not sure. But you could check Etsy!
What is the width of your fabric that you use? If I’m using 56” wide will I need less?
The width is based on basic quilting broadcloth — 42″ wide.
Is there any way I can get a printable step by step instructions for this stocking??
Hi Jessica, you can try printing or saving the article as a PDF on your computer. It will include some of the headers but all the instructions and photos should stay intact. happy quilting! 🙂
Many thanks Suzy for your lovely stocking pattern. Am on the case right now!
This is great! Nice and simple and easy to follow. Thank you!
K
This was my first time quilting (or at least first in over 15 years) and first time making a stocking. This was so easy to follow and ended up being beautiful! I made my sons first Christmas stocking and couldn’t be happier!
I just made 2 of these (for my husband and me) and loved every minute of it. From choosing fabric to putting it all together…your notes are super helpful and I love that the stocking is different from everything else I’d seen out there. Thanks for sharing and Happy belated birthday!