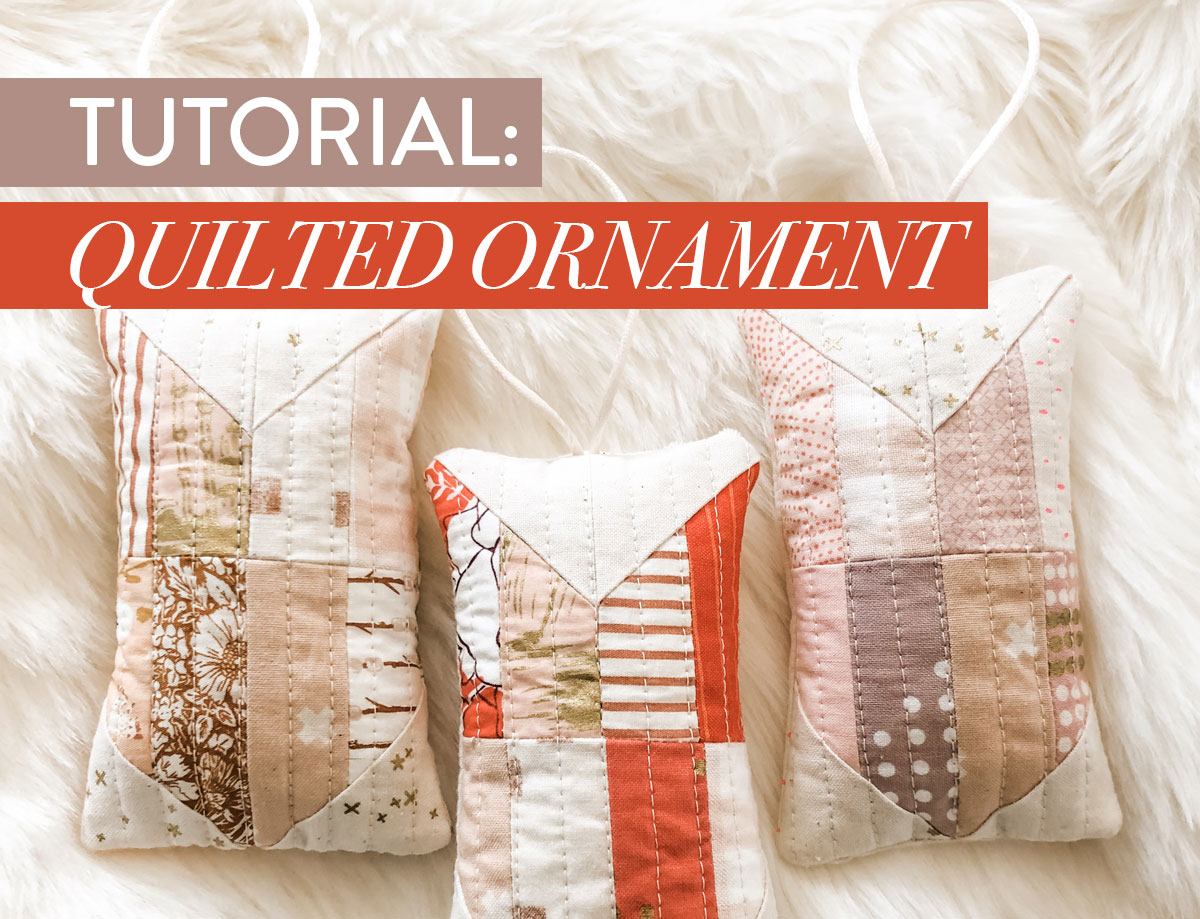
A Beautifully Modern Quilted Ornament Tutorial
A quilted ornament tutorial only means one thing: holiday sewing season is officially upon us, friends. Making handmade gifts is always so fun and meaningful! One thing that can make it extra great, though, is when the gift is made up entirely of scraps and things you already have on hand!
These quilted Christmas ornaments are a modified, scaled down Tail Feather block and are SO fun and easy to make. You'll have several of these whipped up in no time! They make great gifts, but are also perfect to make for your own tree.
Alright. Enough chit chat. Let's dive into our scrap bins and tackle this easy quilted ornament tutorial:

Quilted Ornament Supplies
- (4) 2" x 2" fabric squares
- (8) 1-1/4" x 3" fabric rectangles
- (1) 3-1/2" x 5-1/2" piece of scrap fabric (for ornament back)
- (1) Scrap piece of white or light colored fabric/muslin (approx. 6" x 8")
- (1) Scrap piece of batting (approx. 6" x 8")
- (1) Ribbon or twine of desired length (8" long was used in this quilted ornament tutorial)
- Fabric marking pen or Hera marker
- Quilting ruler
- Rotary cutter
- Scissors or pinking shears
- Poly-fil or other stuffing
- Quilting pins
- Needle + thread
- And of course, a trusty sewing machine

Block Assembly: 8 Simple Steps
Step 1: Pair the 1-1/4" x 3" rectangles into (4) sets of 2 as indicated in the photo below.

Step 2: With right sides together, sew all 4 pairs along long edge and press seams open. Chain piecing makes this quick work!
Trending patterns!


Quilt Patterns


Quilt Patterns


Quilt Patterns


Quilt Patterns


Quilt Patterns


Quilt Patterns


Quilt Patterns


Quilt Patterns


Quilt Patterns

Step 3: Mark a diagonal line on the wrong side of all (4) 2" x 2" fabric squares using a disappearing fabric marking utensil or Hera marker.

Step 4: Place one square on top of each strip set, right sides together. Orientation matters! Take note of diagonal line placement in the photo below:

Step 5: Sew a seam on each marked line.

Step 6: Cut 1/4" away from the seams you just sewed and press seams toward triangles.


Step 7: With right sides together, pin top and bottom sections in place, taking care to match up triangle meeting points. Tip! Glue basting is a great method during this step. Sew and press seams open.

Step 8: Pin top and bottom sections in place. Sew a seam and press seam open. The block is now ready to be quilted!

Quilting the Mini Tail Feather
Grab that scrap batting and scrap muslin/light colored fabric and make a teeny quilt sandwich: muslin, batting, and then tail feather block right side up.
This project is so small that basting is optional, but a couple of basting pins or spray can be used I preferred.

Quilt project as desired. I just used the edge of my walking foot as a guide. This would be a great project to practice some hand quilting, too!

Square Up Quilted Ornament
With a quilting ruler and rotary cutter, trim excess batting and muslin to square up the project. Ornament should measure 3-1/2" x 5-1/2".

Sew the Quilted Ornament Together
Place 3-1/2" x 5-1/2" ornament backing right side up, followed by quilted ornament top right side down.

Fold ribbon in half and place in between layers, with the loop toward the bottom of the ornament and the ends at the top. Seriously, make sure you have the loop at the bottom. I've heard horror stories of people sewing ribbons in upside down. Okay, okay....fine. It was me. I sewed the ribbon incorrectly at first. I'm not proud of it.

Beginning at the top of the ornament, start sewing a 1/4" seam, making sure ribbon ends are sewn securely in place. Leave a space along the bottom of the ornament open; you will use the opening to turn the ornament right side out after sewing.

Tip! Placing the 1/4" side of a measuring gauge in the corners as you sew is a great way to know when to stop and pivot, keeping corners nice and crisp.

Just another reminder to leave an opening on the bottom of the ornament when sewing around the perimeter.

After sewing a 1/4" around most of the perimeter of the ornament, trim all four corners. Make sure not to cut into the seam, though!

Turn, Stuff, and Stitch Closed
Using the opening at the bottom, carefully turn ornament right side out.

Carefully poke corners out using a dull tool. I usually use a pencil eraser but couldn't find one, so I used my Kwik Klip and it worked great.

Stuff ornament with poly-fill (or other stuffing material) until ornament is your desired "puffy-ness".

Fold bottom in 1/4" and pin in place. Stitch bottom closed with a needle and thread using a blind stitch.

And that's it! I hope this quilted ornament tutorial has been helpful. What is your favorite holiday sewing project? Let us know in the comments below!


Love, the quilted ornament, so cute
Squee!! These are so cute!! I love it. Will make a bunch of these. Thanks!!!
Darling! I can see a garland of these!!
Love this – Simple yet ever so lovely. I will be making a few of these, hopefully soon!
And…. it’s a quilted ornament, not one of the ones created by multiple folds and straight pins. Those don’t work in a house with small children or pets.
Thank you!!!
They are very sweet looking! i would use this as a key ring too! Thank you!
I am soooo doing this with my girls! <3 Thank you for sharing!!!
What stitch length did you use for the top quilting? It looks great!
Three 🙂
Love love love! Made one already in no time with many more to follow. Finally a cute idea to use up all these small pieces. Thank you!!
Great lavender sachets for stocking stuffers. Wonderful idea for Christmas gifts too. I have tons of dried lavender to use up.
Enjoy many of patterns But to print directions uses too much ink!
I stuffed mine with dried sage. Fragrant!