How to Baste a Quilt
This tutorial will show you 3 different ways to baste a quilt. For many of us, basting is the step we have to do to get from the fun of piecing a quilt to the fun of quilting a quilt. So, maybe some of us need a little pep talk before continuing...
Basting is great! It’s fun and not boring! Basting isn’t tedious at all and your fingers and back will feel great the whole time! Quilt sandwiches are just as amazing and delicious as real sandwiches! You can practice your stretchy yoga moves while doing it on the floor!
Although basting can feel like work at times, it has to be done, and it has to be done well. The good news is, when it comes to basting, you have some options. Though I have a strong preference for a certain method (cough pin basting cough), we’ll talk about basting three different ways, as well as some tips and tricks. The other good news is, we’re all in this together! Join my Basting Support Group, and read on.
You May Also Like...
- How to Choose the Right Quilt Batting
- Why Cotton Batting Is The Most Popular Choice For Quilters
- Quilting on a Budget with Poly-Blend Batting
- Why Wool Batting Makes the Warmest Quilts
- Why Bamboo Batting Makes the Perfect Summer Quilt
- Is There a Right Side to Quilt Batting?
- The Truth About Black Batting: When & Why to Use It
- Fusible Batting Tape: Why You Need It & How to Use It

Above is the Liberty and Flowers FREE quilt pattern. Get it here!
How to Baste a Quilt: Becoming a [Quilt] Sandwich Artist
No matter how you baste a quilt, you have to create your quilt sandwich first. The “quilt sandwich” is the winning combo of backing fabric, batting, and your pieced quilt that make up your finished product.
Trending patterns!


Quilt Patterns


Quilt Patterns


Quilt Patterns


Quilt Patterns


Quilt Patterns


Quilt Patterns


Quilt Patterns


Quilt Patterns


Quilt Patterns
Layering them and getting them ready to be bound forever in quilt matrimony is a reeeallly important step. Different quilters have different ways of doing it, but here’s MY way (AKA the coolest way). You can read more about my basting and quilting process in this article: How to Machine Quilt.
- Lay the backing fabric on the floor with the BACK of the fabric facing UP (that means the printed or right side of the fabric is facing the floor. If you are using a solid fabric, each side is reversible, so you’re good!)
- Starting with one side, use thick painter’s tape to stick one side of the backing to the floor. Jump to the opposite side of the fabric and tape the other side to the floor. I emphasize thick tape because below you can see what a disaster using thin tape can me. I ended up using waaay too much, wasting tons of tape to still do a mediocre job basting.
- Tape all sides of the backing to the floor, making sure to smooth out all of the wrinkles.
- Place the batting on top of the backing fabric and trim it to fit. They should be roughly the same size. (They both just need to be a few inches larger on all sides than the quilt top.)
- Use scissors to trim long stray threads.
- Smooth out the pieced quilt on top of the other two layers.

Below is the tape disaster I mentioned earlier that can happen if your tape is too thin. Try to use tape that is at least 2-inches thick. If you can fit your quilt sandwich on a table, clamps are also a good, eco-friendly way to keep the backing in place.

Above is the Mod Mountains quilt pattern. Get it here!
Tips for Quilt Sandwich Making
- If you have a pet, it’s not a bad idea to lint roll the back of your quilt top.
- When making your sandwich, the key ingredient is to pull your fabric so that it is taut, but not stretched. Let me say that again: TAUT BUT NOT STRETCHED.
- If you’re finding that painter’s tape just isn’t strong enough on the surface you’re working on, switch to masking tape. Same properties, just a little stronger.
Now, You’re Ready to Baste: It’s Your Party, You Can Baste How You Want To

Above is the Campfire quilt pattern. Get it here!
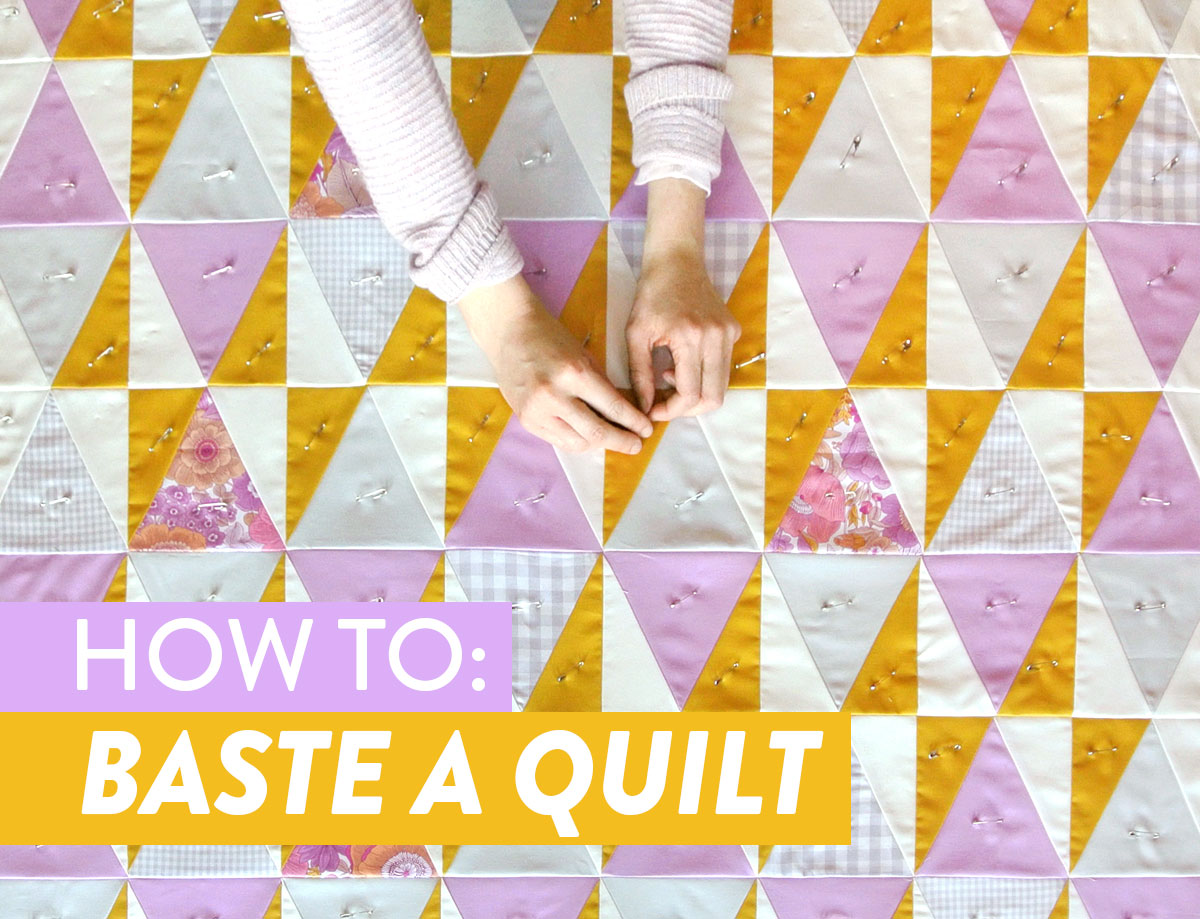
How to Pin Baste a Quilt
If I’m basting a quilt, I’m pin basting. Basically, if you choose to baste with pins, you’re signing up for some good quality time with your safety pin crew. To make sure you hold that sandwich in place, you are going to want to place a pin at least every four inches in rows throughout the quilt.
Want to test your placement? Randomly lay the palm of your hand on your quilt. No matter where you’re giving your quilt a high-five, your hand should be touching two pins. Yeah, I know it’s a lot of pins (I’ve basted a quilt a few times in my day…) but there are a few things you can do to make this pin party a little easier:
Above is the Little Houses FREE quilt pattern. Get it here!
Pin Basting Tricks and Tips
- Store all your pins in a box, and LEAVE THEM ALL OPEN. You have to open them up to remove them from your quilt, right? And you need to open them up to use them on the next quilt, right? SO DON’T CLOSE HUNDREDS OF TINY PINS FOR NO REASON. (End Rant.)
- Do you have a tile floor somewhere? You can use the lines on a tile floor to keep your layers straight and centered.
- There’s this magical wand called Kwik Klip if you want to save your fingers a little wear and tear while closing all those safety pins: Is it basically a screw on the end of a wooden stick? Yes. Does it work? You bet.

How to Spray Baste a Quilt
Spray basters use a product like this to temporarily stick the layers of their sandwich together long enough to quilt them up. I personally do not like spray basting for a few reasons:
- It's messy: No matter how careful I am, I get spray speckles everywhere – the floor, the walls, my furniture, my clothes, Scrappy – everywhere. And because the spray is sticky it's really hard to clean up.
- It shifts: Even quilting with a walking foot, my quilt sandwich shifts and puckers if spray basting is the only way I baste. You can probably get away with it if you're only quilting simple straight lines, but if you are rotating or sewing an intricate pattern, that much movement can cause the quilt layers to twist and move.
- It's expensive*: A single can of basting spray can cost almost $20 – and that adds up! *The exception to this is if you make your own basting spray. There are various recipes online if you do a quick search. This homemade basting spray recipe comes from String & Story along with her tips for using it.

One major advantage to spray basting? You can do it on a design wall (which is a great way to not spend time on your hands and knees on the floor.)
One reminder with spray basting – you have to spray baste both the backing and the top to the batting. If you forget and only spray baste the top to the batting, guess what? Major bunching and shifting at the machine.
How to Baste a Quilt with Boards
This method is impressive, and tricky, and also gets you off the floor and into your favorite comfy chair (as long as it fits next to a nicely sized table). This video shows you how to use two boards to keep your sandwich layers set for quilting. Some people use this method with safety pins (instead of thread basting, which is featured in this video) mostly because the aftermath is less messy and it's probably a bit faster.
The more you baste, the faster you get, so if you’re still working on your personal attitude adjustment, don’t worry! It gets better! (Little secret between you and me...I kinda like basting. Shhhhh.)
Do you have a favorite method of basting a quilt? Let us know about it in the comments!


I’m lucky enough to have a very large kitchen island that works perfectly for basting quilts as long as it’s throw size or smaller, so I don’t have to use the floor anymore. Also, amen to the kwik klip! It’s one of my very favorite quilting tools.
My favorite method is exactly yours. I have thick carpet, and no large tile area, so 2 inch wide packaging tape works for me. And, thank you for that tip about not closing the pins when I’m not using them. What was I thinking?!
Hahaha! It took me a while to realize that I didn’t need to close the pins too. 😉
Doesn’t anyone baste stitch anymore? I pin with straight pins and then run several rows of basting stitches. But, no one seems to talk about that method these days. I must be old fashioned. I like it because I don’t have to removed pins as I quilt along.
I actually hand baste, needle and thread. I find when I free motion quilt I catch the basting thread in my quilting foot and end up having t o cut to continue on. Any ideas to prevent this? Thanks
Use water soluble thread. It will break before your quilting thread will ever catch on it. When you are finished quilting, either wash the quilt or just spray a little water and the thread will dissolve.
Do you have to do the basting part all at one time? Or can you start it.. roll/fold your blanket up and pick up where you left off at a later time? This is my first time putting a “quilt” together using batting… and so far it’s scaring me tbh.
Hi Jill! You can probably roll it up and come back to it, but it would take some time to set it up upon your return, smooth everything out and retape to the floor (if you’re taping). We’ve seen some people baste on their dining tables, so that could be an option! All in all, you can do it! Put some music on or an audio book and you’ll be surprised how quickly it goes! Cheering you on!
Hi Suzy,
Great tips! We have carpet, not floorboards, so instead of tape I use straight pins to hold my backing fabric down. I just push the pin down through the fabric, and then angle it under a little under the fabric. Works great!
I like to do a light spray baste then pin!
I’m loving that purple and mustard triangle quilt – which pattern is that, please?
I wouldn’t have thought about using carpet as a basting advantage, but I totally see how it is! This lavender and mustard pattern is a free pattern that will soon be released on Bernina’s blog as a fun collaboration between us. I’ll post a link to it on social media and through the newsletter once it’s available. Thanks for the interest!
Thanks for that – I’ll look out for it!
Did this quilt pattern ever come out? I’m LOVING it!
Please?? How do you pin on carpet? Doesn’t the pin pick up carpet as well?
I know some people pin baste on carpet by using T-pins to secure the layers to the carpet. I think if you’re careful, and if you don’t have really shaggy loopy carpet, you should be fine.
Great roundup of ideas! The key to prevent shifting when using basting spray is to iron the quilt on both sides after it’s spray basted. Then every inch of the quilt is stuck to every other inch and there’s no shifting. You can also spray the backside of the layers separately and then bring them inside to assemble. That way you don’t have to worry about the overspray 🙂
Genius! C-baby, now that you say it, I can’t believe it never occurred to me! Ironing! I’m still not convinced I could spray outside with the Chicago winds blowing, but maybe I’ll test this out on a small project. Thanks so much for the tips!
I pin baste just like you do and love my kwik klip!! I’ve also started using my brother’s old Volleyball kneepads and that has helped my basting attitude tremendously!
I’m lucky enough to be able to use the boardroom table at work. I bought some cheap clamps and it’s a piece of cake to whizz around the table on a wheely chair – no bending or kneeling necessary!
Now there’s a good idea!
I dont prefer the safety pin method, they left holes in my quilt and were in the way when i started quilting…. im interested in the last method you showed. Have you tried that one? What were your thoughts about that one? Any cons? Takes longer maybe?
Suzy! I’m so happy you included board basting in your how-to! It’s my new-found way to baste and I love it. I’m a mold-breaker in one way, but traditional in others. At 55 years old, I don’t WANT to crawl around on the floor to baste my quilts anymore. But at 55 years old I purchase patterns online and watch a lot of Instagram stories (thanks for always making me smile with yours!). Your Webpage is my go-to for all things quilty. Thank you so much for all you do! xo
PS…I live in Texas, but am headed back to the Chicago area for a few weeks. I’d love to know if you have any “appearances” scheduled in the area! Thanks!
Hey Terri! I just had my last scheduled trunk show in the Chicago area for 2017. I do plan on being at QuilCon in Pasadena this up coming February, though. Maybe we’ll catch each other there! xo
I love your style of writing. Great tips too. Thank you.
Great post! Thank you. I use the board method and I use thread to baste the layers together. If you’re going to be basting big quilts though, you do need a pretty big table. I’ve been using this method for a couple of years now and I’m getting super fast. I don’t have problems with puckers and I love that I don’t have pins to worry about when I’m quilting.
I’m a pin baster too! Although, unlike you, it’s still my least favourite step in the quilting journey 😉 Podcasts and music do make it somewhat more enjoyable!
I’ve been meaning to give spray basting a go, but have been worried about getting that stuff everywhere, and the fumes in the winter (-20 is not ideal for having windows open for any stretch of time!)…so, you’re points on why you don’t like it totally hit home with me! I think I’ll stick with pin basting.
Which leads to me ask…how do you avoid scratching your wooden floors while pin basting?
Scratching my floors is something I’ve always been really aware of, however, I’ve yet for it to happen once…and I’m not that careful and I baste A LOT. I think as long as you’re not throwing all of your weight into stabbing straight down through your quilt sandwich, your floors will be safe. I also think the angle of the movement and shallow scraping of the safety pin makes it hard to truly gouge wooden floors. Some wooden floors may be softer than others, thought, so I suppose how easily they can be scratched depends on your floor materials.
Before basting an entire quilt on your dining room floor, you could do a little testing in the corner. Take one of your safety pins and scratch the floor lightly and then gradually harder. That way you can see at what point the floors are in danger.
Use a smallish 12” x 18” rotary cutting mat under the quilt area you are pin basting, to save floor or table from scratches and just slide it along. I used yo use the boards, now I use pool noodles to roll each layer along. They weigh nothing and are cheap. Tape three together and shove inside a closet or under a bed when not in use! I pick a different color pool noodle for the backing, batting and quilt top, so no confusion of placement for the layers. Lay on a table top, slide a ruler cutting mat or cheap thin plastic kitchen cutting mat under area to be pinned and you are off to the races! You can easily straight pin into the noodles to secure fabric if you need to stop, mid process and stand them in a corner to use table to eat at! Lol Who does that? Not me!
If you have an older, no-longer-great-for-actually-cutting cutting mat, you could probably minimally pin the quilt then slide that cutting mat underneath everything to finish pin basting and greatly reduce the chance of scratching your floor. Just a thought.
oh dear, I try to read your tips until the end but your triangle quilts distracted me (in a good way , of course!) so when you going to release that pattern ? I’m dying now.. :p
It’s actually going to be a free pattern coming out soon – hopefully by mid-October! I will send out the link through my newsletter and on social media once it’s available. xoxo
Let’s talk more about this “taut not tight” thing. I am thinking this might be why I tend to have little ripples next to my stitch lines. How do you know what’s too tight?
Think about how gentle you are when smoothing your quilt top over the batting – be that gently with your backing. With a quilt top, if you stretch it too tight you can see the seams pull and look stressed. Same thing with the backing. If you’re pulling it as tight as possible and taping that to the floor, chances are it’s too tight. Make sense?
I started board basting a couple of years ago and have never gone back to crawling around on the floor. I do use pins and the kwikclip tool to save my fingers and fingernails. I have used spray basting for small projects and I really hate the smell so I’m pretty sure I will never baste a larger quilt that way.
Well my knees are no longer able to kneel on any sort of floor(think broken glass under the knee caps) i couldnt bend over it on the floor if i wanted to😃 so my kind husband got 2 tables and put them together for me but one is just a little higher…and getting to the middle…maybe this quilting is a young gals game after all😃…im going to have to work something else out for my next one (this is my 1st pieced quilt…my only other was appliqued wall hanging – much smaller!). to top this little party off i bought cheap pins that’s what i get for being cheap hard to pin!😃…But i will gladly tske your tip on the pins! thankyou
So informative and impressive!! The tutorials are fabulous!! Thank you!!
I think I’m ready to try basting with pins! Any recommendations on size? like 27mm or 37mm? Do you think I’ll need more than 100 pins for a double quilt?
Thanks so much !
I’m a 100% quilting virgin, so don’t have a favorite basting method, but the pin basting looks like the easiest to me. I’m definitely bookmarking this post for when I decide to embark on my first quilt. and I’m so excited to finally know what a quilt sandwich is! 🙂
Hahaha Quilts sandwiches are the yummiest of sandwiches. 😉
Hi Suzy!
A few weeks ago The Quilt Show had a link to a You Tube video where a woman used pool noodles with dowels in them (instead of boards). Looked like it might work well. 🙂
Indian Summer is my favorite of you patterns (so far!), so it was nice to see it pop up again. Although, really, choosing among your patterns is tough. Thanks for sharing your creativity and style with us.
If you don’t have a Kwik Klip, a small metal crochet hook works like a charm. (I go back and forth on which I like better, so I tend to use both…maybe less hand fatigue by changing the size of the grip?). I’ve taken to pin-basting on the big tables at the library. That works great for baby quilts and throws, and it gives me a great chance to talk to people about quilts. I usually have my cow-fearing son (and husband) with me, so we pin baste in the kids section and lots of families want to learn more! I tried spray basting there by taping my batting down and then spraying my back outside, bringing it in and smoothing it down and then reversing, and I then pinned some over it just in case. I had forgotten what a difference ironing makes! And that pins get in the way of ironing(though I made it work)! But I had to do tons of turning because I had a minky back that didn’t want to slide, so I had to use my walking foot, and I did great…no puckers. Next I’ll have to try the board method, since I’ve got a lot of tops to be basted/quilted suddenly!
I’ve been thinking about trying pin basting because spray basting is always a disaster 😩 But I’ve been straying away from it. I’m afraid once I start quilting I’ll have to stop every few seconds just to take a pin out! Or the pins will get in the way once I start outlining my quilting design with a water pin. Do you have this issue?
That is one drawback with pin basting. If you have an intricate quilting design you will want to draw that on your quilt top before pin basting. I haven’t found it to be too bothersome to remove pins as I quilt. And you definitely don’t want to sew over them.
I have thread basted since my first quilt about 10 years ago and still prefer this method. I only have carpeted floors of which masking tape sticks quite well. But the body getting older and tired has made me baste only one way, horizontal about every 3″ and then my son comes and pin bastes in between every 4 – 5″ the other way. I do not like removing the safety pins while quilting but will rather have that than not enough basting.
NOT ON THE FLOOR! (unless you are very young!). I have a gateleg table, that the extra large black binder clips fit on the edges! So no tape or spray expense. Just binder clip the back to the table sides. If you have access to Folding tables – the kind with formica or 3/4′ wood tops, you are also in like flint! I do the quilt in sections. Securing the back, and floating the batting and top. Moving to the next area, clip back and repeat. Fancy quilts will be done with thread basting every 3 inches. More casual jobs get pins. Old rug hooks, or big crochet hooks work great to close pins. I like the medium sized curved pins.
Used your tape-to-the -floor and safety pin basting method for my first on-my-own- quilt. You ROCK! thank you!
yay! It’s my favorite way. Good luck with the quilting! xo
What size safety pins do you prefer?
Great question…to tell you the truth I have a tub of safety pins that are all different size, shapes and ages. And most days they are in a complete tangle. ha! Personally I prefer straight safety pins that are on the smaller side. I think they slide through the layers the best.
Pin basting just wasn’t it for me. My first attempt at spray basting did not go smoothly either. After much research, I adapted the Board method to spray basting. GAME CHANGER for me. I use three boards on a 6 foot folding table. No overspray on the floor and does a great job. I do spray liberally but not excessively. If you are stingy with the spray, you will notice shifting. This is the only way I will baste. Taught it to a friend recently and she too is hooked. Cost of spray is a factor but I always use 50-60% off coupons.
Good to know! Thanks for the tip, Mary!
ok – i’m a beginner quilter here…have a couple baby quilts and rag quilts under my belt. I’ve been so perplexed on basting. i believe i’m won over by pin basting…due to my cheapness as well as disdain for cleaning up stick stuff… and I don’t have a sweet table to lay the quilt on. Thanks for your 101 tips…I have my eye on that rocksteady pattern! feeling excited!
So happy to help! A lot of people hate this part of the quilting process, but I think there are lots of ways to make it fun. 🙂 Happy quilting!
Hi – I was very interested in your basting info but the video for the “Basting with Boards” was missing 🙁 Is it still available?
It stills seems to be working for me. Try this direct link – https://www.youtube.com/watch?time_continue=4&v=HyaLsMafElo
What are your thoughts on using water soluble thread for machine basting once the safety pins are in? Because you take out the safety pins as you machine baste, you don’t have to worry about removing the pins when you’re quilting. Washing the quilt removes the thread basting…
Water soluble thread is new to me! Sounds magical 🙂
When you mention using “thick” tape, do you just mean wide instead of narrow?
That’s exactly right.
Hi Suzy! It looks as though you quilted lines on your top fabric before quilting the sandwich together. Is that to add decoration to your finished product? What would the quilted pattern look like at that point? I’m not sure if this makes sense, but worth a shot! Lol. Thanks, Kassandra
It may look like that, but that’s a technique I haven’t tried. Anytime I quilt, I like to do it through all three layers so that I get that added dimension.
Ok, so this might be obvious… but I am only on my 2nd quilt and the first was a baby quilt! When you are basting with safety pins do you start in the middle, or at the edge, or where? Does it even matter?? Thanks so much! I am making the queen size rocksteady quilt as a wedding gift 🙂
I like to start either in the middle or on an edge. It’s just good to start in one place and then work your way out so you can smooth away any ripples or bubbles that occur while your pinning.
Hi, I’m new to quilting. A lady I knew, who was 94 years old when she passed, quilted by hand. She’d see the patterned together and hand stitch around the patterns. She got me hooked on this method. What I would like to know is, the best way to secure the edges after the quilt is finished. She would tuck everything in and see it closed, but I’m worried that I don’t really understand how she did this. Do you have a video that shows how to finish the edges?
I want to do a quilt for my great granddaughter, and I don’t want to mess it up. Your video on basting with the herring bone stitch I think is my option for sandwiching, but should I have as much edge as it indicates to begin with, before trimming?
I have never done a quilt before, so I’m a bit nervous about this.
Thank you for any help you can give.
Hey Sharon, I have a great post for you all about how to finish the edges of a quilt with binding. There’s even a video. The best part is that it’s not hard 😉 https://suzyquilts.com/how-to-sew-binding-on-a-quilt/
Thank you for being my quilt whisperer with all these really helpful posts! If I’m going to machine quilt along the seams of my quilt top, is it good, bad, or no difference to pin baste at the seams (vs avoiding pinning in the places I’ll be quilting)? Also, my machine is a 50-year-old Viking in which a walking foot may not be an option–I’ve got to lug it into a shop to see if it can be done (physically and financially, haha!). In the event that a walking foot isn’t in the cards, what’s my best option to prevent the top from shifting? I tried it out with the utility foot really slowly on a pretty lightweight quilt just to see if I could get away with it and by the time I got to the second pin it was already bubbled up quite a bit–is my basting not perfect, should I not have pinned along the seams where I was going to be quilting, or is it just the foot?? The world may never know, haha.
Thanks for the info! I pin baste as well but not on my floor. I actually pin baste on an elevated queen size bed. I’ve found that the quilt back sticks quit well to a fitted flannel sheet. I’m able to smooth out as I go along. Just for what it’s worth. What ever works. Thanks again for sharing your talents. Helps a lot.
I am totally new to quilting. I am with a child at the moment and would like to make a few baby quilts to prepare. I love all of what you’ve written. It’s helped me so much. I have my hand-sewn patchwork, my batting, and my backing all ready. I am unsure of how to sew the corners of the outside. I tried to watch your tutorial video on that, but unfortunately, where I live the internet isn’t great so I can’t get it to play! Help? Thanks!
Hey Em, I’m not sure I fully understand the question. Are you wondering about how to sew the corners of binding once you have the quilt sandwich quilted? If that’s the case, you will need to fold the edges in at 45-degree angles to create a mitered edge. The video does help a lot in visualizing this, but here is a picture that should help too.
Thank you for all your reviews and tips. For queen to king size quilts, I prefer using a PVC quilt frame with legs for the basting. I can stretch each layer over the top, tighten them with the PVC pipes and stand up while basting with thread. Mine is a Dritz Quilter’s Floor Frame. The legs are adjustable so it can be set at a comfortable height. Her’e’s the link, but feel free to remove it from the post if there are restrictions on your site. https://www.joann.com/floor-quilt-frame/4794046.html#q=quilt%2Bframe&start=1
Thank you for these tips. I am currently working on my second quilt. I am 75 and the floor thing does not work for me. I set up my old quilt frames and pinned the quilt. So far it is ok but I still am getting puckers on top. Just wondering what stitch you used on the first quilt. It looks like hand stitching so beautiful.
Help! I pin basted my very first quilt, and now have all of these little holes in my fabric pieces 🙁 Do you have any recommendations how to get rid of all of these little holes? Did I do something wrong? Here, I was so excited to get my first quilt done, was happy with pin basting, and now I’m worried I’ve ruined all that hard work!
Holes happen when the threads of the fabric weave get smooshed and pushed to make room for the pin. If you scratch the area with your fingernail or wash the quilt, all of those holes will magically disappear!
Where on Earth do I get a nice straight 7 foot long 4 inch wide board with no splinters? Homebase?
I recently quilted and pin-basted a top and the backing was starched, ironed and very stiff and flat. I’m not sure why, but it made machine quilting so easy. The entire quilt was laundered and dried after quilting. I’m going to try starch again.
I’ve tried spray basting and my tip is to do it with a friend. Top, batt and back kept sticking where I didn’t want them to stick and I found having an extra pair of hands a great help. I added pins to the spray basted top but not as many as I would have if it were a ‘pin only’ project.
I’ve also heard that long arm quilters will baste for a small fee. Great idea if you are a hand quilter or if you have a king size quilt.
That’s a wonderful idea!
Hi,
I also pin baste on our queen sized bed and am lucky to be married to a carpenter who installs a lot of kitchens so I have an endless supply of refrigerator boxes!! He cut one slit down a long side so then I have this huge four panel piece that I can lay on top of the bed and use the painter’s tape he puts in my stocking every year!:) I fold it up like a screen and leave it behind a door!
How clever!
May I suggest you use the words “narrow” or “wide” for the tape to be used. Until I saw the picture, I thought “thin” was regarding the thickness of the tape rather than the width.
I am also new to quilting. A few crazy’s in my past without any guidance. I am making a bed-sized quilt now and several experienced advisors (bless you for your love and sharing) have instructed us to make the backing 4 inches all around larger than the pieced top. Why. I am planning on a bias binding.
You want the backing and batting to be a few inches larger than your top to give allowances for the shrinkage that occurs during the quilting process. Depending on how densely you quilt it, you can lose an inch or two during the process. Then once the quilting is completed, you will trim the excess off (also called squaring up the quilt) – so that the top, batting, & backing are all the same size….Then you begin the binding process. 🙂
Hope this helps Mary-Ann.
Since I am older, getting down on the floor is not a good option for me. I have a basement and I set up 3 folding tables and I have clamps that I use to hold the quilt back tight while I pin baste it. I also have back trouble, so this works out well for me.
I love all of your tutorials, thank you! I have a question: Do all spray bastes have to be washed/rinsed out? I make small landscape quilts (which I frame) (www.anniecardinaux.com), so I’m not as concerned about final texture/stiffness as I am about any fading of the fabric (or other damage from the spray) that might occur over time. I don’t usually pin baste my landscape quilts when I top stitch, but I’m starting to make larger ones, which and so some kind of basting seems like a good idea.
If you’re making art quilts, washing out the basting spray isn’t necessary. Basting spray is basically spray glue, so if you use the quilt as a “blanket” then you’ll want to wash it out.
What about grates and guns? Any experience? I’m getting ready donate my grates because the basting gun clogged up, left huge holes and elevated me to a whole new level of cursing.
I think basting guns are pretty annoying, but could be a good option if you have back or knew issues and basting with pins or spray is too labor intensive.
Thank you for all of the wonderful tips! Could you tell me please what basting pins you use? The size and if you have a favorite brand? Thanks again!
I have a tupperware with a jumble of three different brands so I can’t say for sure what is what. However, I can say that I like the thinner pins since they glide through the fabric the easiest. These size 3 pins would be a good size.
Awesome! Thanks so much I’ll just wander the store to see what I find 🙂 Do you have curved pins? Or do you just have straight safety pins? Thanks again!
Hi Suzie, thank you for your great tutorials.I never saw those technics to baste a quilt. Well I´m still rather in the beginning and only used spry and was never happy, cause it stopped basting after a short period and glued everywhere else. I learned a lot this afternoon.Thanky you so much.
Susanne from Austria
I am rekindling my love of quilting and am amazed at all the new products and techniques available now. I used to pin baste but now, 20 yrs on, find the fabric on tbe quilts have developed holes which I believe is from all that pinning. Hence looking for a new way to baste .
As soon as I read your very passionate note about leaving the pins open, I immediately ripped open my new pack of pins and unpinned them all as an activity for my hands while I read the rest of the article 😀
Hahaha! Nice work 😉
Do I read correctly that you never close the pins when you baste or only after you open them after unpinning?, I left them open all through the the process. That’s what I did in my last quilt and it’s saved my fingers but I only did a cross hatch.
I close the pins to secure the quilt layers together, but when I take them out during the quilting process I open them and then keep them open. I don’t reclose them. That’s amazing that you were able to quilt without securing the pins closed!
First time quilter here with a beginner’s question: do my quilt top & backing fabric need to be ironed/pressed before I pin baste it? I live in a small apartment and I have a toddler, so I have little space & no time. My crib quilt top has been folded in my closet for a couple weeks and has gotten some creases, but I’m going to have to baste it on my living room floor all one evening after my munchkin is asleep, and I don’t know that I’ll have time to iron, make my quilt sandwich & pin it all…
Thanks for the help, any and all advice appreciated!
They should be pressed, but here’s a shortcut for you, because I too have a toddler and understand the need for shortcuts. An hour or so before you baste lay the quilt top out somehow – you could drape it over the ironing board or on your bed. Spray it with a little water – this will make the fold creases relax. When it’s time to baste, you do need to iron your backing fabric (at least at some point.) That can’t be avoided, but once you have the backing and batting down, lay the quilt top down and lightly mist any creased areas with more water. Gently smooth them out. As long as they aren’t deep creases that will cause pleats, you will be ok during the quilting process.
THANK YOU for linking the video with the board method, as someone wanting to get in to quilting in a not-large apartment was trying to figure out how I’d need to move furniture to lay out any but the smallest projects on the floor, being able to work on at least anything up to the size of my dining table without using the floor seems like an attractive option…
My husband screwed a screw halfway into the end of a dowel, then clipped off its head. FREE PINNING TOOL!!! I love it! He even autographed it for me, and made one for my friend.
This is a wonderful article. I have just finished my first quilt top and am not-so-patiently waiting for the wool batting I ordered to arrive. I’m wondering about vertical quilting. Is it possible, with the safety pin basting method, to then make a vertical frame to quilt it on, rather than the traditional horizontal type of frame? Would that cause the fabrics to shift too much, or is it ok as long as you have enough pins? I just don’t have the space in my house to set up a horizontal frame permanently, or even for the time I am assuming it will take to get one quilt done.
There’s actually a wonderful tutorial on basting a quilt vertically on a wall. I can’t remember who made it, but if you search I’m sure you will find what I’m talking about.
I’m a new-ish quilter and am trying to not get acuaght up in buying ‘all’ the gadgets. but the Kwik Klip is going to be retired soon. Seems like a ‘get it while you can’ sort of thing. Is there an alternative waiting in the wings ?
Thank you! I’m working on my first quilt and I didn’t realize the basting part was so important to get right. It would have probably gotten all messed up when I went to quilt it! I think this is going to be the last quilt I make for a really long time, this is an exhausting process.
My tip for spray basting enthusiasts (which includes me!) – ThermoWeb Spray N Bond.. It’s less expensive than 505, doesn’t smell AT ALL, and doesn’t overspray. I spray baste all my quilts in my sewing room and have yet for the spray to get on anything it’s not supposed to! I have knee issues, so I baste everything on my work table. I layer the quilt sandwich and clamp one side down, spray baste the accessible layers, then unclamp, move it down, reclamp and spray more until the whole thing is done!
I bought 2 plastic folding banquet tables from Walmart and clamps from the home store (look like jumper cable clamps which come in various sizes). I push the tables together any time I need to square up/trim, sandwich or pin a quilt. Once done, they easily fold in half for storage. The tables are big enough to accommodate a full baby and some throw quilts, bigger quilts you shift after initial pinning. Works great! The clamps hold way better than tape ever did for me. I also used the quick tool for pinning until they came out with the new angled, plastic coated pins that easily close with a tap of the head (open just as easily when ready to remove). These were a game changer … now so, so easy to pin. I never had success with spray basting – messy, shifted, difficult for anything larger than small item like a pot holder etc.
I do all my basting using pins (which I have always left open in a small plastic container!😎) I also use painter’s tape on the top, so I tape twice- once for the back and again for the top. My biggest problem is that it is hard on my arthritic knees to crawl around on the floor. Solution? I wear gardener’s knee pads to cushion my knees! They are inexpensive and readily available during gardening season at Home Depot. Problem solved! Although I admit, basting is still my least favorite part of quilt-making.
A grapefruit spoon is serrated on the edges and makes a great cheap tool to use for pinning.
I use an old teaspoon to save my fingers when pinning, lifts pin points painlessly.
I’m interested to know how to pin baste on carpet. Doesn’t the carpet get caught in the pins?
I don’t have a hard floor or big table.
You can use T-pins to secure the layers of the quilt to the carpet.
The link for the Liberty and Flowers pattern doesn’t take you to the pattern, it takes you to your Switzerland trip…which is fun, but not what I was looking for! How can I get the pattern? Thx
Hi Wendy! The Liberty and Flowers pattern was designed as part of the trip. If you scroll to the bottom of the Switzerland trip post, you’ll see the free pattern! Have fun making it!
Just finishing my first quilt and I learned a big lesson – mark your quilt lines before pin basting!
Got all my pin is and realized there would be no way to mark Hera lines with all those pins in the way! Ended up removing pins by section, adding lines, and quilting, but would have saved time if on any of the how-tos I read it mentioned thinking about quilting patterns prior to pin basting.
Agreed! That makes life a lot easier. I have a bit more information on that here – https://suzyquilts.com/5-reasons-why-a-hera-marker-is-the-best-quilt-marking-tool/
When I click on the Board Basting video, it says it’s private and won’t open. Would you mind sending me the link?
I have never quited anything. I don’t even know where to start. I would like to give it a try, and hope I love it.
I need instructions for how to sew top of quilt sandwich after I have. Sewers the backing together. Now I have my sandwich, but don’t know. How to correctly sew tow of quilt together
Hey Pat, Check out the Quilting section on our blog. We offer lots of different options for quilting your quilt — anything from tying, hand quilting, straight-line machine quilting, or free motion quilting!
If you use the board basting method with the stitch pattern she shows and machine quilt (i.e. straight line quilting), do you remove the basting stitch as you go or after you are complete? BTW, I love your tips and tutorials. ❤️
Great question! I’d guess that you should remove the basting as you go with the board method, but you could try either way and see what works for you! We prefer pin or spray basting here at Suzy Quilts! Let us know what works for you when you try! And we’re so glad you like our tips 🙂