Appliqué All Day! Raw Edge Appliqué Tutorial
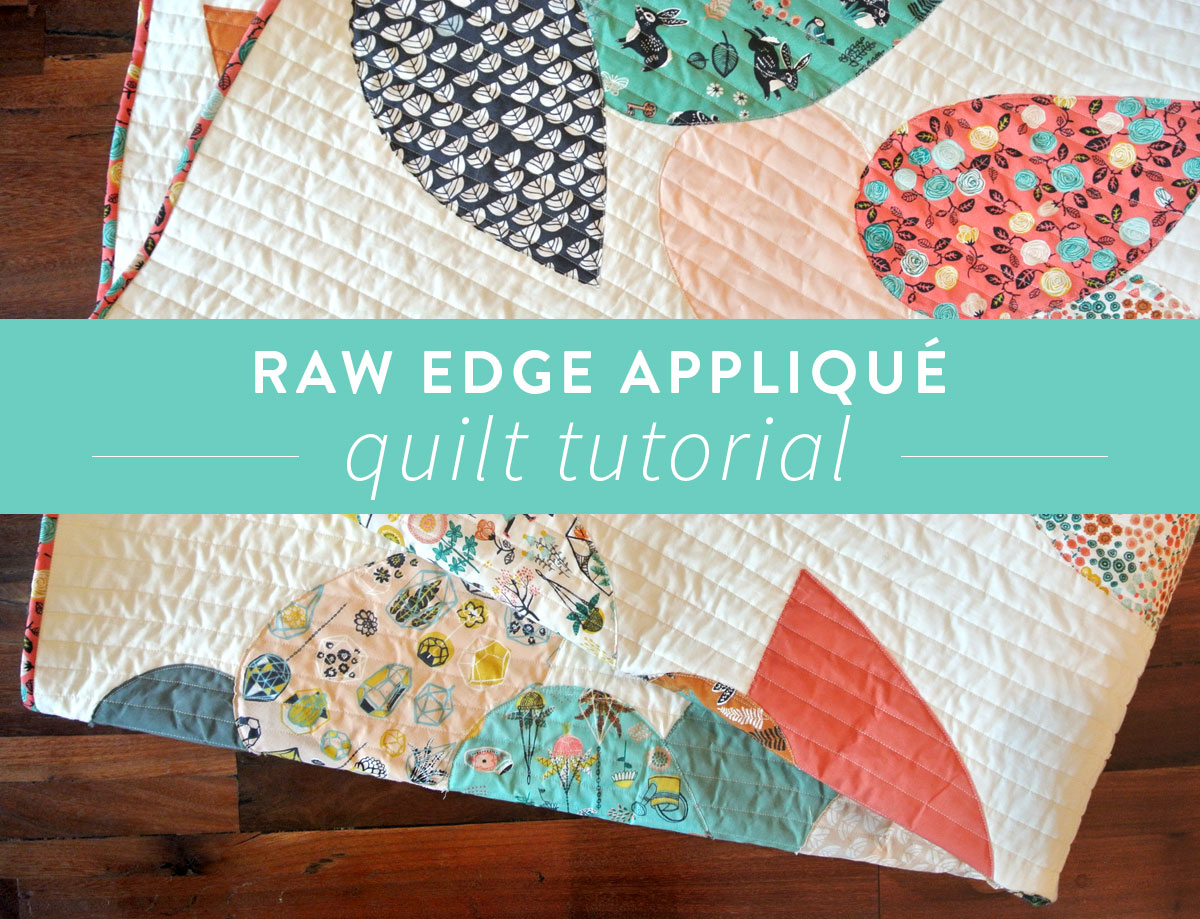
Welcome to raw-edge appliqué – also known as appliqué that's so easy you'll think you're cheating...but you're not. 😉
A few days ago we went over the ins and outs, highs and lows of needle-turn appliqué. If you missed it, you'll definitely want to read up – click here!
Now that we’ve covered turn-needle appliqué you're going to think raw-edge appliqué is a cakewalk. I'm guessing you may not even believe these instructions because they are so simple. You’re going to read this and think, “What? That’s it?” And then I will say, "Yes, young grasshopper. It is."
And then you will go forth with confidence, like the champion quilt ninja that you are.

Raw-Edge Appliqué Supplies:
- Fabric Scissors
- Marking Tool
- Pellon Wonder Under Fusible Web 805
- Iron
- Spray Bottle (I'm going to let you in on a little secret I learned through trial and error. I still think following the fusible web instructions is a good idea, but I found that spraying water directly on the fabric you wish to fuse down is quicker and more effective than using a damp cloth. I spray a little mist over the fabric, then place the iron directly on that piece and hold it there for about 5 seconds. I then slowly start moving it around so the fabric doesn't burn.)
- Safety Pins
The 6 Easy Steps of Raw-Edge Appliqué
- With a marking tool, trace the outline of your template onto the right side of your fabric.
- BEFORE cutting out your shape precisely, roughly cut out the area around your shape – leaving at least a 1/2" of wiggle room all around.
- On the wrong side of your fabric, iron the textured side of your fusible webbing.
- Peel off the paper and cut out your shape precisely.
- Arrange the appliqué piece onto another piece of fabric, and following the fusible webbing packaging instructions, iron it on top of the other fabric to fuse it in place.
- Once your pieces are secure, straight stitch or zig zag stitch around the edges to completely secure it in place.

Raw-edge appliqué doesn’t need a lot of set-up or mental prep (though depending on your project, you may want certain tools to keep your pieces in place. More on that later). For raw-edge appliqué, the raw edge of your fabric pieces will be visible in your finished product… hence the name. So make sure when you’re precisely cutting your fabric, you’re pretty happy with how it looks – cause that's how the pieces are going to look when finished.
Trending patterns!


Quilt Patterns


Quilt Patterns


Quilt Patterns


Quilt Patterns


Quilt Patterns


Quilt Patterns


Quilt Patterns


Quilt Patterns


Quilt Patterns

Once all of your pieces are cut, arrange them where you want them on your fabric surface, and adhere them in place*. The final step is to sew them onto the background fabric by stitching around the perimeter depending on how much you want the edges to fray. I personally do not like a lot of fraying, so I stitch as closely to the edge as possible.
Oh, were you expecting something complicated and difficult?
Too bad! Raw-edge appliqué is very straight forward. Sure, it may take a little practice to get used to machine sewing around those points and curves, but you’ll get there sooner than you think.
* In the needle-turn appliqué tutorial I used safety pins to keep my fabric pieces in place. This time around I used a fusible webbing. I did that because I had fewer pieces to adhere, and they were much larger than the pieces in my needle-turn appliqué quilt. When choosing what to use in your project, keep those factors in mind.
Raw-Edge Appliqué – The Possibilities are Endless
Last summer I was commissioned by Toyota to create a cityscape quilt. There were a few different ways I could have tackled this, but with a deadline of ten days (that's right. I said TEN DAYS), raw- edge appliqué was my only realistic option.
Because this technique is similar to cutting pieces of paper and glueing them down, the design possibilities are huge! Just look what I was able to achieve with some scraps of fabric and fusible webbing!
Read more about my adventures with Toyota here.


Are you ready to practice your new raw-edge appliqué skills?? How about you practice with a FREE PATTERN! That's right!!! You get a pattern and YOU get a pattern and YOU GET A PATTERN!!

Click here to get the free Hidden Garden quilt pattern. With this quilt, I actually fused the fabric pieces to the background fabric first. I then basted my quilt sandwich together. The final step was stitching around the fabric petals so I was feeding two birds with one scone by sewing the appliqué down AND quilting the quilt. Nifty, huh?
Remember that since these raw-edge appliqué and needle-turn appliqué are simply two ways of doing the same thing – you can interchange these techniques. Just because I made my Hidden Garden quilt with the raw-edge appliqué technique doesn't mean you can't change it up and use needle-turn appliqué. Know what I mean, Jean?

Good luck, my little Crickets! Or was it Grasshoppers? I can't remember. I wish you well on your adventures in appliqué, my sweet chirping bugs! And let me know about tricks you've picked up along the way in the comments! xo


Hi Suzy, Thanks for this tutorial and all the others. Do you have pics of the back of this quilt? Would love to see how the stitching of the applique blends with your straight line quilting.
Can’t wait to give this a try after having finished my Triangle Jitters.
You made that quilt in 10 DAYS?? I’m imagining you striding through the streets of Chicago deflecting bullets with your death-defying wrist cuffs.
hahaha! I would have cried a lot less during the making of that quilt if I had you by my side comparing me to Wonder Woman.
Is there some kind of spray or finish that can be applied to raw edge quilting, so that it can only fray so much? Thank you
There is! Fray Check comes in liquid form and Fray Stop is a spray.
Can you use old dryer sheets?
That’s an interesting idea. I haven’t done it, but you could try!
I don’t understand how to use the dryer sheets. Please explain.
You are ALWAYS my favorite!! Do you have a tutorial about quilting the way you did the cityscape background? I love it!! I also LOVED feeding two birds with one scone…I have never heard that! So much less violent than the alternative saying… 🙂
So looking forward to the Bohemian Rhapsody! Blessings.
Does the Wonder Under make it stiff? I’m trying to figure out the easiest way to do a lot of fairly smallish shapes without making the quilt feel like a board.
Not at all. Once you remove the paper, it leaves a very thin film of adhesive that completely dissolves once the quilt is washed. But even before it’s washed it’s incredibly thin.
Oh my… I’m a Chicago girl at heart, having grown up in the 50s and 60s on the far south side (Go White Sox!) and I am smitten with your city street quilt! Have you won an award (or 2, or 30) for that beauty? It’s amazing to say the least. And thanks for the pattern and this wonderful tutorial
A fellow Chicago girl! How wonderful! You’re so sweet for thinking this quilt is award worthy. It was actually a commission I worked on for an ad campaign. You can read more about that here – https://suzyquilts.com/quilt-collaboration-with-toyota/
Hi Suzy, I have made several quilts using raw edge applique, I use Heat n Bond lite printable sheets. No tracing of the pattern. Have you used these? Your thoughts please? I love your patterns!
I didn’t know about this, but it’s genius! It would completely take out a tedious part of the process. Thank you for sharing, Chris! For others seeing this comment, here is a link to the Heat and Bond EZ-Print Lite Iron-On Adhesive she is talking about. According to the manufacturer, all you have to do is print the PDF templates onto one of these sheets (make sure you’re printing on the correct side) and then adhere it to the wrong side of the appliqué fabric. Once they are stuck together, trim it and voilà! You’re ready to adhere it to the backing fabric and stitch in place.
Do the applique edges fray when the quilt is washed?
That depends on how closely you sew to the edge. Some quilters like the frayed look and purposefully sew a full 1/4″ away from the edges. You can also use a blanket stitch or zig-zag stitch to full encase those edges so no fraying occurs.
WHat about using tool (sp?) to hold the pieces in?
I am planning an applique quilt, I love the Bohemian Garden. But I was thinking ultrasuede??? It doesn’t fray, is super soft, comes in great colors and you don’t need much. That being said, The last of my stash was bought at a sewing show and I can’t seem to find it anywhere! I know it kinda went out in the 70’s…but I am a fan!
I’m sold!! I’ll be getting some of this in the near future. Thank you for the tip!!
I made this quilt, using your pattern, hand appliquing every ‘petal’. Its one of my favorite quilts I’ve ever made, and one of the very few I’ve kept out of hundreds of quilts made over the years. Mine was set against a lovely shade of deep yellow and the ‘petals’ are in autumn colors, and I quilted it just as you did & LOVE that part of it….so easy to do. Thanks for your lovely blog, the things I learn even after quilting over 40 years, and all the ideas….thank you!
I made a sewing machine cover that looks like a sewing room – has an iron and ironing board, itty-bitty pin cushion, tiny thread spools, a dress dummy wearing an outfit, some draped fabric, a tiny measuring tape and buttons, and an antique sewing machine. It was so much fun to do – like playing with paper dolls as a kid again. This is my absolute favorite way of doing applique now. Thank you for showing this! 🙂
That sounds amazing!!
What kind of presser foot are you using to stitch around the petals?
I am using my very basic patchwork foot that I use for all of my piecing.
Is there any particular trick to hand stitching around raw edge appliqué?
If you are willing to put in the handwork, most people choice needle-turn applique. Here’s an article, if you’re interested – https://suzyquilts.com/needle-turn-applique-tutorial/
Can you use Soft Fuse instead of Wonder Under?
You sure can!
Hi. Do you have a picture of a washed quilt? Usually I use a tight zigzag for applications because I don’t like fraying. But a little bit would be okay…. Thank you very much. (Am about to start a quilt with lots of applications….)
I don’t have a closeup photo of a washed raw-edge appliqué quilt, but I can tell you that after washing it still looks great because I sewed so close to the edges. Any spot that looks a little frayed can just be trimmed.