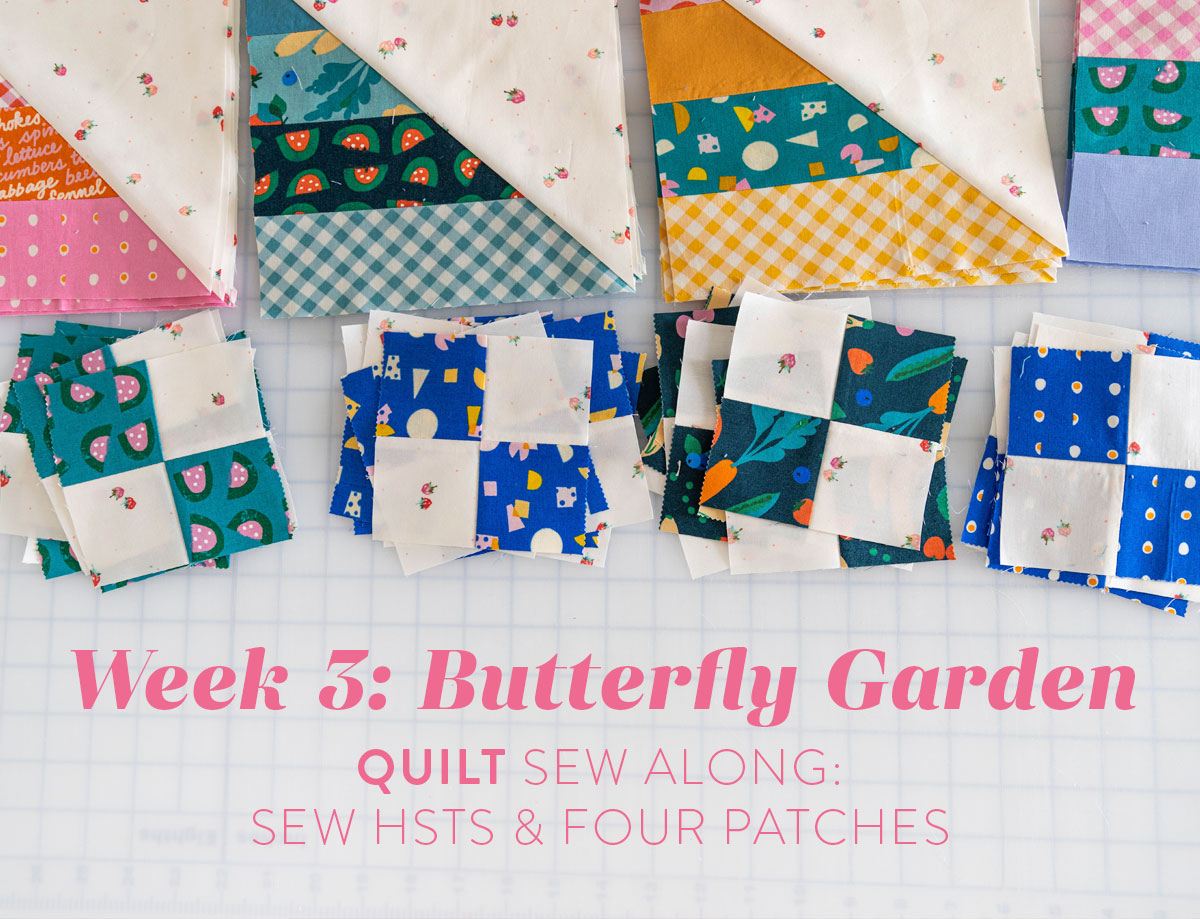
Butterfly Garden Quilt Sew Along Week 3: Sew HSTs & Four Patches
Welcome to Week 3 of the Butterfly Garden sew along! I've got lots of tips for you this week so let's not waste any time dilly dallying about. If you are new to sew alongs, check out last week's post for a run down. Otherwise, here we go!
You May Also Like...
- Butterfly Garden Quilt Pattern
- How To Make A Butterfly Garden Table Runner
- Kid’s Butterfly Tote Bag Tutorial
Butterfly Garden Quilt Sew Along Schedule
- Week 1, June 16: Gather fabric
Sponsor: Crimson Tate - Butterfly Garden Quilt Kit featuring Tilda Chambray
IG LIVE - @suzyquilts: Join me on Instagram to chat about fabric and color Tuesday, June 20, 2023 at 2PM CT - Week 2, June 23: Cut Fabric
Sponsor: Jenn B Quilts - throw size quilting - Week 3, June 30: Sew HSTs and Four Patches
Sponsor: DuckaDilly - $100 gift card AND Sarah Hearts - Four sets of labels - Week 4, July 7: Assemble Blocks
Sponsor: Trace Creek Quilting - throw size quilting
IG LIVE - @suzyquilts: Join me on Instagram for a sewing demo and to chat about different ways to quilt your finished quilt top, July 11, 2023 at 2PM CT - Week 5, July 14: Assemble the quilt top
Sponsor: Aurifil - Best Selection Box including 45 small spools of 50 wt. thread!

Week 3 Assignment: Sew HSTs & Four Patches
Tip #1: Measure the width of your strips to see what you're working with.
I'm sewing with both a jelly roll and cut yardage. Since I'm the one who cut the yardage, I already know those strips are 2.5". The jelly roll strips, on the other hand, are a hair wider than that. If this is the case for you, here are a couple options:
- Sewing with just a jelly roll: Line up the tips of the pinked edges and sew a 1/4" seam or a slightly generous 1/4" seam. Don't sew a scant 1/4".
- Sewing with yardage and a jelly roll: Center the 2.5" yardage strip with the jelly roll strip. Sew a scant 1/4" seam using the yardage strip as the guide.


What is a scant 1/4" seam? This question comes up a lot because seam allowance gets blamed for many of our quilting inaccuracies. A scant 1/4" seam takes into account the width of your thread (so tiny!) So it's a thread's width scant of a 1/4" seam.
Typically when our blocks are too small it's not because we didn't sew with a scant 1/4" seam, but because our seam went even wider than a 1/4" — it's easy to do! A patchwork foot for your sewing machine is incredibly helpful if you don't have one.
Tip #2: Line 'em up!
Take those pretty strips of yours and line 'em up next to your sewing machine. Make sure you like the order they're in so once you start sewing you won't have double check — you can just rock 'n roll!
Trending patterns!


Quilt Patterns


Quilt Patterns


Quilt Patterns


Quilt Patterns


Quilt Patterns


Quilt Patterns


Quilt Patterns


Quilt Patterns


Quilt Patterns

Tip #3: Pinning isn't necessary when sewing strips together.
Pinning when piecing is usually a good idea because inevitably the two layers of fabric are fed through a sewing machine at different rates of tension — causing the fabric to get more and more distorted the longer the strip of fabric.
The reason pinning isn't necessary when sewing your strips is because once all of the strips are sewn together, you will trim the raggedy edge. If your strips are warping and bowing into curves, slow down when sewing. You've got a lot of strips to sew, so test out your sewing speed until you find a groove that works best for you.
I chose to pin again once it was time to sew my HSTs, however, I didn't pin when sewing my Four Patches together. I found that if I nested the seams well, and used my finger to guide the blocks through my machine, my seams came out accurately.


Tip #4: Change your stitch length
When sewing strips together for both the HSTs and the Four Patches, I suggest you make your stitch length smaller than your typical piecing stitch length. This is because we will sub-cut these strip sets and we want the seams to remain secure. Smaller stitches = more secure seams.
So if you typically piece your seams with a 2.5 stitch length, just when sewing these strip sets, take it town to about a 1.75.
Tip #5: Chain piece 🙂
This quilt works best if you chain piece at every stage. For now we will chain piece our HST strips. Next, we will chain piece our HSTs, then chain piece the four patches. It's all going to happen so fast that by the time you finish reading this paragraph about chaining piecing you'll probably be finished sewing.

Tip #6: Sew everything together before pressing.
Especially with these strips, I suggest chaining them all together and then taking them to your ironing board. Of course, while you're there, use a tailor's clapper.
If you are new to pressing with a tailor's clapper, here's a detailed post with the process explained - How to Press Seams in a Quilt.
The one difference from this tutorial and the video below is that for the long HST strip units we press the seams open rather than to the side. Can you press your seams to the side if you would rather not press them open? Yes! That's fine too.
The pattern instructs pressing seams open because you aren't nesting these seams and pressing seams open keeps the seams extra flat and uniform. All in all, either way works and it's not a big deal which one you choose.
Fun Idea! Slice up your extra strip sets into 2.25" units so you can use them in your quilt binding! Also, waffles with almond butter and bananas make the BEST breakfast. 😉

Tip #7: Trim your HSTs.
It can be tempting to sew an HST and then call it finished, but at a minimum, do trim off the dog ears. In my case, because I had used a jelly roll where the strips were a little wide, by strip sets turned out slightly larger than the Background squares.
I knew this would be OK because I was going to trim them down after sewing them together, so I lined up the Background square with the center of the strip unit and sewed my HSTs like normal.

These HSTs need to be trimmed down to 8 1/8" squares. I used tape as a guide and connected the two 8 1/8" marks on a square ruler. I then lined up the tape with the stitched seam, NOT the raw edge.

Once I trimmed the two sides, I pressed my HSTs and then trimmed off the dog ears.

Tip #8: Save a little time and stack your Four Patch strips.
I lined up my four strip units and sliced them all at the same time. This worked out great and saved a bit of time.

Week 3 Sponsors & Prizes
We've got TWO more amazing prizes for you this week! First up is our favorite vendor of Liberty of London fabric, DuckaDilly giving away a $100 gift card!! Our second sponsor is your new favorite sewing label maker, Sarah Hearts! She is giving away four sets of labels! What an amazing prize bundle this week!
Don't forget that you get 25% off longarm quilting on your Butterfly Garden quilt from Jenn B Quilts now through August 2023.
How to Win
- Post a pic to Instagram. The photo prompt for Instagram this week is to post a pic of your Butterfly Garden progress. Use #ButterflyGardenQuiltSA in the caption.
- You must have a public Instagram profile to participate.
- Each photo posted is an entry and you can enter as many times as you want in a single week. Once the week is over, those posts do not count in the next week's giveaway. Every week we start fresh.
- Your photo must be posted between Friday, June 30 and Friday, July 7. The winner will be picked randomly from all qualifying posts and announced at approximately 4:00 p.m. on the 7th. Good luck!


Hi Suzy, I will be cutting my FE’s into 2.5 “ strips. I have a 1/4 “ foot. Should I sew the strip sets using the 1/4 “ foot and a regular 1/4 “ seam or should I sew a scant 1/4 “ seam? I wanted to make sure that I sew the strip sets using a correct seam allowance. Thanks.
Hi Sheela! A regular 1/4″ seam allowance will do, although this assumes that your strips are the prescribed 2.5 inches. If for some reason they’re a bit skinny (it happens to all of us!), then a scant 1/4″ seams will ensure that your squares finish at the correct size.
Thanks for the prompt response.