DIY Fly Away Quilt Block Punch Needle Tutorial
Read below for a free tutorial on punch needling! Today, guest contributor Anna Maria Gramelspacher of @anna_maria_handmade shows you how to make a Fly Away quilt block punch needle project that will add a quick, quilty handmade touch to any wall!
Are you looking for a new fiber art hobby? Do you have any extra yarn or fabric lying around just waiting to be transformed into a lovely piece of art? (We know you do.) Gather a few of these inexpensive supplies and follow along!

My interest in punch needling first piqued as I started seeing beautiful projects pop up on Instagram and Pinterest. It seemed like a great way to use up scraps of yarn or fabric.
I purchased Rose Pearlman’s Modern Rug Hooking, and ever since have imagined every sewing project I do as something that could also be punched!
After finishing my daughter’s Fly Away quilt this past year, I knew a punch needle version of the pattern would look lovely above her bed; so I gathered my supplies and got to work.
in the steps below I show how you too can make a quilt block punch needle masterpiece!
Trending patterns!


Quilt Patterns


Quilt Patterns


Quilt Patterns


Quilt Patterns


Quilt Patterns


Quilt Patterns


Quilt Patterns


Quilt Patterns


Quilt Patterns

You Might Also Like...

Fly Away Quilt Block Punch Needle Materials
- Foundation cloth: Loose monk’s cloth or a pre-stretched canvas both work great
- Morgan No-Slip Hoop if you prefer a circular canvas
- Oxford Punch Needle: I use a size 10
- Fiber for punching: This tutorial uses an orange grab bag and a few balls of natural color rug yarn from Seal Harbor Rug Company.
- Ruler
- Fabric marker
Tip: The best of fiber to learn punch needling with is rug yarn because it is fairly thick and coarse; however, you can punch with anything—leftover scrap yarn, fabric strips cut down to 1/4" wide, or even butcher’s twine.


Step 1: Prep Your Quilt Block Punch Needle Canvas
If you are using a pre-stretched canvas, skip ahead to Step 2! If you’d like to make your own stretched canvas, keep reading for tips.
There are many different ways to create a canvas for punching. In this tutorial, I built my own so that I can show you how it’s done. You can also use a Morgan No-Slip Hoop and place your fabric in that.
If you’re making your own, you’ll need wood stretcher bar frames and a staple gun. You can purchase wood stretcher bars at any art supply store or online. However you choose to stretch your foundation cloth, you’ll need to make sure the cloth is as taut as possible so that it doesn’t slip around while you’re punching.
Follow these steps to make your own canvas!

- Assemble your stretcher bars by placing them together in the pre-cut grooves.
- Cut your monk’s cloth about 2 inches wider than your frame on all sides.
- Finish the edges of your month’s cloth with a zig-zag stitch or serger. This step is optional, but does make the back of your project look nicer as the monk’s cloth tends to fray.
- Place your frame in the center of your monk’s cloth.
- Starting at the middle and working toward the edge, staple the monk’s cloth to the side of the frame.
- Once the sides are finished, pull the top and bottom pieces of the cloth around the frame. Again, staple from the middle and work your way toward the corner.
- Once you reach the corner, pull the cloth up and then down and staple it securely.
- Done! Head to Step 2!

Step 2: Draw Your Design
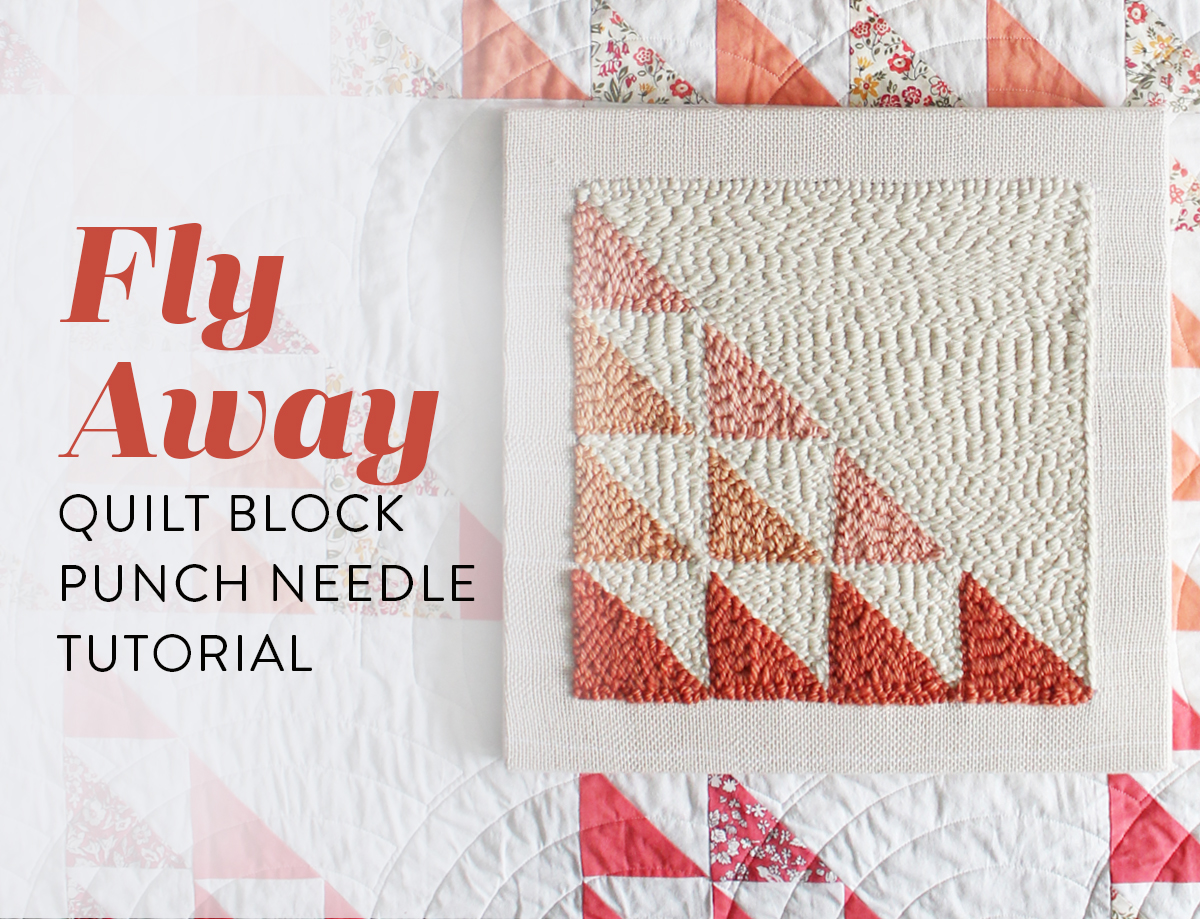
I chose the Suzy Quilts Fly Away quilt pattern for this project because I wanted it to match the design of my daughter’s quilt. However, you can use any quilt pattern you like and transfer it to the punch needle canvas.
The Fly Away pattern worked great because it’s a series of squares and rectangles, making it very easy to reproduce on any size canvas you create. That means your project can be any dimensions you want by following these instructions!

Start by drawing a square outline onto the canvas, then draw a 45-degree line through the square to create two large triangles.

Next, draw two perpendicular lines halfway through the square to create the smaller sections. Then, draw another set of lines halfway through those. Finally, draw a diagonal line through every remaining square to create the final design.

Step 3: Thread Your Punch Needle
Take the end of your yarn and thread it through the punch needle on the side of the tool with the slit in the handle. Leave a small tail hanging at the tip of the needle. Bring the remaining yarn down over the slit then pull it taut so that the yarn slips into the slit of the handle.

You can hold your punch needle in whatever way feels comfortable to you. Make sure the open slip is facing up and away from the fabric.It is best to punch into the cloth at a slight angle instead of vertically as this will give you more control as you punch along.

Insert the punch needle completely into the fabric until the wood handle is flush with the fabric. Pull the needle out but keep it close to the fabric. Move forward another 1/8 - 1/4” and insert the needle again.

It may take some practice holding the needle to get the best grip for you and to master the motions of punching. Feel free to practice a few rows, as you can always simply grab the yarn you’ve punched and pull it out in one go to start over—there are no knots. Then, simply punch back over the same area.

Step 4: Punch Your Outline
Start by outlining the area to be punched with smaller stitches. For this pattern I punched approximately every 1/4” around the perimeter of the design.
I did not measure, as this does not need to be exact and I like the irregularity of the stitches created in the final pattern. I chose to first outline all the white areas, and then worked triangle by triangle for the colored areas.

Step 5: Fill In Your Design
You can map out the colors you will use ahead of time, but I just filled them in as I went along to see what looked best. You do you! If you fill in a triangle and don’t love the color, simply pull the yarn out. It will come out easily with a tug in one continuous strip of yarn, as shown below. Then simply punch over the area again with a different color.

When you get to the end of a row, simply cut your yarn about a quarter inch from the canvas then use your punch needle to poke the end back into the canvas so that it’s not showing.
Also note the pattern you follow when filling in. I find it easiest to go in a straight line back and forth which you can see on my canvas. For the background color (the cream) I chose horizontal lines and for the complementary triangles I chose vertical. I love how these lines mimic what a quilted design on fabric looks like!

Step 6: Finish Off and Display Your Quilt Block Punch Needle Creation!
Yay! You’ve punched a quilt pattern! Now you just need to decide where it will go. Personally, I think the canvas or hoop looks great just hanging on the wall as-is. You could also choose to remove the punched project from your hoop or frame and then turn it into a wall hanging or frame it.
Do you have a favorite quilt pattern you want to punch? Share your quilt block punch needle project with us on social media with the hashtag #SuzyQuiltPatterns!
Do you want to see more tutorials for creative quilt block punch needle projects? Think pillows, bags, and even rugs! Let us know in the comments!


Very cool! Is there a way to secure the stitches on the back so that they don’t pull out? I’m thinking for an application where the finished piece might stand to get a little more wear and tear than a picture frame.
I am confused. I have done a little punch needle, I punch from the back. It looks like you are displaying what I would call the back, but my backs are not that tidy. Your work is so pretty, I want to give it a try!
Hi Lynn! Looks like you may have just done a different technique in the past. This tutorial shows a technique of punching from the front. Definitely give it a try!
Thanks so much! Yes, displayed here is the “stitch side”. Traditional rugs are usually displayed on the “loop side”, but if it’s just for art, it doesn’t matter. Another fun technique is to stitch some areas one way, and other parts the other way so you get contrasting textures of stitch and loop sides on the “front” of your piece 🙂
There is no need to secure the stitches on the back, as this is the traditional way to punch a rug and will withstand being used as a rug – walked on, stepped on, etc. So no need to worry about unraveling! If you are taking your piece out of the frame, you can steam each side by laying a damp kitchen towel on top and ironing a bit to flatten in out a bit more. Hope that helps!
I absolutely love this idea & always wanted to give punch needle a try… thank you for explaining every step of the process!
Thank you for this wonderful idea! I took up rug hooking/punch needle a few years ago, but can’t find any fun patterns to make trivets or wall hangings. I would never have thought of using a quilt block pattern. Brilliant! Would love to see more ideas.
I am wondering if you could incorporate this into a quilt by using it as a quilt square?
It would be a bit difficult to incorporate into a quilt just because the final product is a lot thicker than a quilt. It’s basically a rug, so would be quite difficult to sew into a quilt and would be significantly different weight than the rest of the quilt.
Thanks for sharing this, what a great idea on using a quilt pattern! I’ve stepped my toes in the water, bought a beginner kit, follow Rose Perlman and Punch Color Studio, watched a tutorial on Craftsy, But I’ve never gotten any further than that! I would like to try a small bag with my beginner kit, so if you tackle one of those and decide to share it that would be wonderful!
Loved and enjoyed the tutorial on needle punch and will add that to my quilting hobby. Thanks for sharing. Opened a whole new window of gift ideas.
I have some punch needle supplies and have made some small projects I incorporated a small one the says Smile into a folded patchwork quilt. The quilt is named ‘Smile’.
I will definitely try the larger scale.
Thank you for sharing needle punch. I’ve always wanted to try this but I got hooked on quilting. I would love to see needle punch using fabric scraps ( I have so much). It would be a great way to use some of it up.
You can definitely use fabric scraps! They are a little more difficult to punch, so for beginners I recommend learning using a rug yarn. To use fabric scraps all you will need to do is cut 1/4 – 1/2″ strips of fabric and feed them through the punch needle the same as you would the rug yarn. It takes a little more finesse just to get the tension right, and you may need to experiment with cutting different widths of your fabric based on how thick it is. I would check out Rose Pearlman’s instagram for some examples of projects using recycled fabric!