How to Sew a Quilted Coat: Tips and Tools
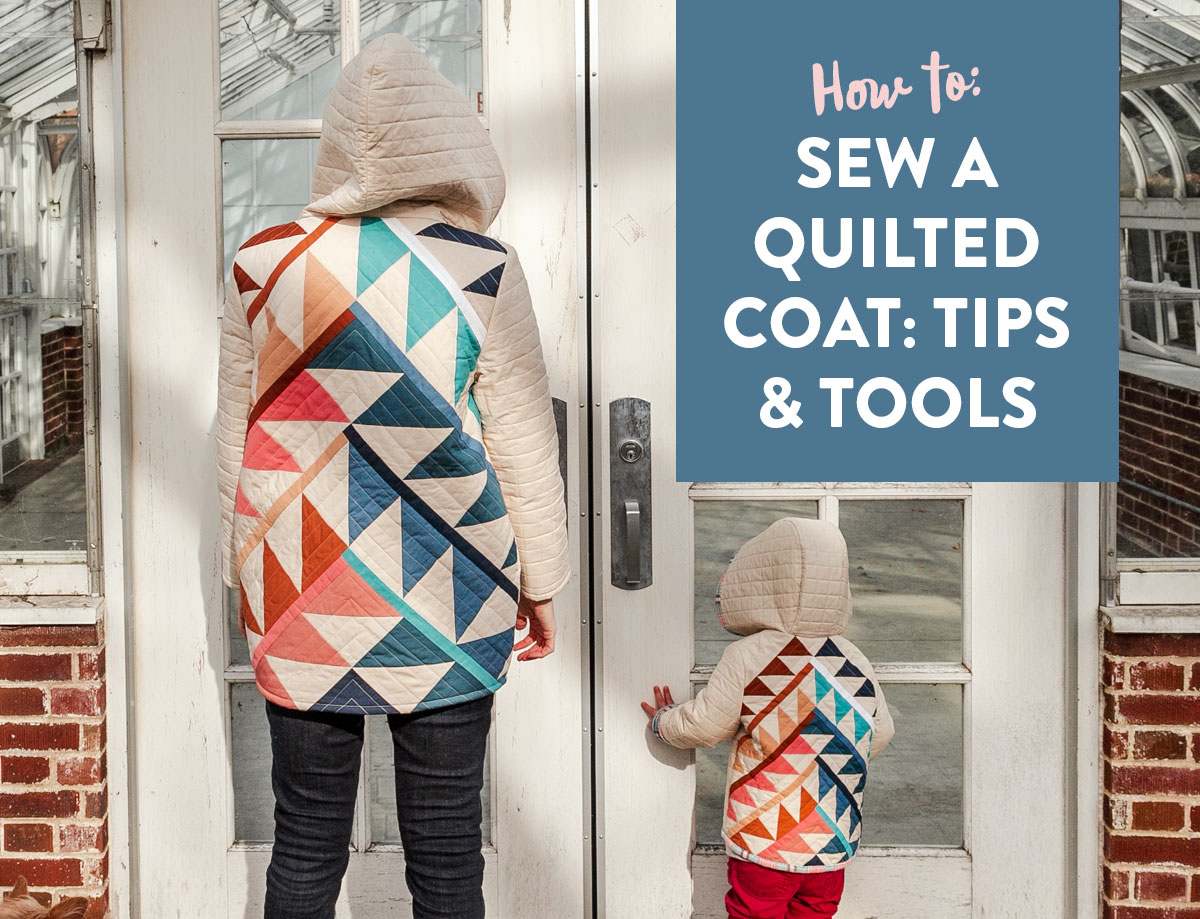
Our guest today is a self proclaimed "professional quilt coat lover," but I feel the need to correct her modesty and title her a professional quilt coat maker and designer. Brittney Frey has made many beautiful quilted coats in multiple sizes and styles and has finally sat down to share with you all of her hard-earned tips on how to sew a quilted coat.
After sharing photos of Brittney's stunning Gather quilt coats on social media, she and I both have been inundated with requests for patterns, tutorials and custom made coats.
Well I'm happy to report that she's willing to give you all of that! Later on this year and into early next year, Brittney will launch sales of her one-of-a-kind coats. If you are motivated enough to make your own, you're in luck because this tutorial will cover:
- How to make a muslin/toile pattern sample.
- How to select fabric for your quilted coat.
- Tips on color placement for your patchwork coat.
- How to scale a quilt pattern for a coat.
- Tips on piecing, cutting, and assembling the various parts of a quilted coat.
- Tips for choosing how to finish your coat.
Now it's time for me to pass the mic to the star of the show...
Are you ready to take a ride on the quilted coat train and want to know where to hop on? You’re in the right place. This tutorial will cover some tips and tricks to give you the confidence you need to turn a coat pattern into a quilted masterpiece. Grab your favorite coat pattern, or two, and buckle up!
Trending patterns!


Quilt Patterns


Quilt Patterns


Quilt Patterns


Quilt Patterns


Quilt Patterns


Quilt Patterns


Quilt Patterns


Quilt Patterns


Quilt Patterns

How to Make a Muslin Pattern Sample
If you’re feeling overwhelmed by the thought of making your own clothes, you’re not alone! I didn't start off as an expert myself, but you know what they say about practice.
Regardless of your comfort level, it's always a good idea to do a test run with your pattern before you add any quilting into the mix. It would be a real bummer to do all that work just to make a wrong cut and have to start over.
A muslin or toile is a test garment sewn from inexpensive fabric (like muslin or toile), so you can check and alter the fit of the garment. It’s also a great way to verify your size. Do the measurements given on the pattern work for you or do you need to size up or down?
Keep in mind that quilting will add a little bulk so you’ll want to round up if you’re on the fence about sizing. Consider using a quilted fabric or an inexpensive quilted bedspread to practice with so you get a better feel for how the finished quilted coat will fit and how it will drape.


NOTE: Not all coat patterns were designed to be quilted coats. Keep that in mind as you work through your test piece.
TIP! Also think about if there is anything you want to omit from the pattern. Little details won’t be missed when the quilty goodness steals the show. It could be something as simple as omitting additional stabilizers/interfacing because the quilt batting will be sufficient enough.
For example, the Sapporo Coat by Papercut Patterns calls for fusible interfacing along the outside edges of the lower front and bottom back pieces. However, I leave that part out in lieu of folding over my quilted edges to get the stability I need.

Similarly, think about any modifications or simplifications you want to make to the pattern to better accommodate your quilt design.
For example, with the Sapporo Coat, the pattern calls for 3 separate back panels. I knew pattern matching with patchwork would be tricky. Luckily, the panels sewn together created a flat piece, so I made a combined template before cutting out my quilted back piece.

As you work through the pattern for the first time, take note of how the pieces go together. Which areas/intersections are most important to get right? Are there certain seams that will show more than others where you’ll want to be mindful of pattern matching?

Pockets and side seams are two places I like to focus on because it’s possible to get a nearly seamless looking seam if the pattern matches up nicely.

Most importantly, give yourself some slack because rules were made to be broken and seams were meant to be fudged. Don't be afraid to make mistakes and experiment a little bit. The possibilities are endless so maybe plan to make one or two...dozen quilted coats!

How to Select Fabric for Your Quilted Coat
You've done the hard part, picking your pattern and studying up. Now for the fun stuff – shopping for fabric! This bit will be totally subjective based on your own personal preferences.
You know what you like but maybe you're overwhelmed by the millions of choices. I find it helpful to look for starter kits: fabric bundles or collections that visually draw me in. You can even replicate specific quilts like I did with the Gather coats!

Above is the Gather quilt pattern. Get it here!

Many of the fabrics from the original Gather quilt are also used to make these matching coats. The lining for the adult coat is even the same flannel backing as the quilt! (All of the quilt fabrics are listed here, in case you're curious.)


Fabric requirements will be one of the biggest variables based on your quilt design and which coat/jacket pattern you’re using.
When I make my classic patchwork coats, I cut 4” squares, so I typically look for 20 to 30 fat quarters or quarter yards. This gives me enough breathing room to repeat my layout but I also always end up with various amounts of extra fabric. I then use the extra fabric to make matching bags and pouches so there’s less waste in the end.
Most fabric bundles/collections don't come with 20 to 30 fat quarters, hence my use of the phrase “starter kit”. If that is the case, I build out my starter kit with coordinating/complimentary patterns and colors.

When picking fabric, I like to have a good range of light to dark within each color set. I always think in groups of four to six per color for a total of 5 color groups. I’ve found that to work best for dispersing the color and diversifying my coat panels while not making them overly busy.
Tips on Color Placement for Your Patchwork Coat
This section will talk about arranging your colors and pieces and will probably be most relevant to a patchwork quilt coat design. Again, this is very subjective so skip along if you already know what you want!
Regardless of what style you're going for though, always start with the back panel first as this will be the largest piece of real estate on your coat. It functions as a great roadmap for laying out the rest of the panels.

When it comes to arranging, I like to start by laying out my fabrics in a nice gradient that runs dark to light within each color set. I try to place adjacent color groups together to make the gradient flow better.
I often find myself anchoring the top and bottom with some dark/bold colors and using some of the quieter tones in the middle to add more depth.

Once I have my order figured out, I start laying out the rows. I find that ~2.5 rows per color group is a good mix but this will also greatly depend on the size of your coat pieces, the number of different fabrics you’re using, and the overall look and feel you’re trying to achieve, etc. I start with 2-3 rows of each color.
When I get to the end of my first draft, I snap a photo. The colors tend to pop more on screen making it easier to see which areas need to be reworked and blended a little better. I’ll bend the rules a little more each time I make an adjustment, snapping photos along the way, until I’m happy with the overall balance of colors.
There’s no right or wrong way to do this part. Once your beautiful coat is sewn together you’ll likely forget about how many times you rearranged your squares.

Most importantly, double check that your coat pattern templates fit the panels you’re making before you call it good and start quilting. That way you can go back and add more rows/columns as needed before it’s too late.
How to Scale a Quilt Pattern for a Coat
Do you have a favorite quilt pattern but don't know if it's the right fit for the coat pattern? Think about scaling it up or down.
The quickest way to tell is to measure the overall size of the back piece of the coat. Is it relatively close to an existing quilt pattern or will you have to chop off a lot of the design when you cut out your coat pieces?
Take the Gather Quilt pattern by Suzy Quilts for example. The finished baby size is 36" wide by 40" high. However, the rough size of the back piece for this particular coat pattern I’m using is only 24" wide by 32" high. If I keep the scale at 100% I'll lose a whole row of the design on the top or bottom. To solve my dilemma, I did some quick math.
The coat pattern height divided by the quilt pattern height = 32" / 40" = .8 (80%)
Therefore I scaled the finished block size down to 80% of the original size and voila, my new back panel is roughly 29” wide by 32” high. With this particular design, it was more important to fit the design vertically (in height) instead of horizontally (in width), so if it meant sacrificing slightly more on the sides, I was ok with it.

And of course, the same logic applies if you want to make some quilted coats for your tiny humans and furry companions. I used these two coat patterns for the matching family coats I made for the Suzy Quilts family:
- Dog coat pattern: Timmy Gilet by The Tailoress
- Toddler and kids coat pattern: Quilted Hooded Tamarack by North Patterns


Piecing, Cutting, & Assembling the Various Parts of a Quilted Coat
I have made many quilted coats so far and have found these tips to be helpful for better accuracy and consistency.
If you’re working with simple blocks and rows, like a patchwork design, it’s particularly helpful to iron your seams in alternating directions every other row. That way, when you go to sew the rows together, everything nestles into place resulting in perfectly aligned seams.
I prefer to press my seams open between rows. I know, I know, the great debate...open, to the dark side, or whichever way the wind blows. I find it helps to keep the bulk down and everything more evenly dispersed. It will also help the quilt top to lay nice and flat.

Because I make my coats from scratch, instead of cutting up a larger heirloom quilt or quilts, I make separate quilt top panels for each coat pattern template. You’ll want to quilt all your panels before you cut any of your coat pieces.


Each piece will be relatively small, compared to a full size quilt, so I find spray basting to be the quickest and easiest way to baste.

When you’re ready to start quilting your pieces, you have two options depending on which finishing method you plan to use (see next section). In short, if you’re adding a separate lining piece, you’ll only need to quilt the quilt top to a layer of batting.
If you’re going to bind your finished seams, you’ll want to make up the full quilt sandwich: quilt top, batting, and backing (lining of your coat). I don’t add any additional interfacing or stabilizers because the quilt batting is sufficient enough for what I want.

Most garment patterns will have pieces that instruct you to cut on the fold. When I’m cutting these quilted pieces, I find the best way to ensure symmetry is to cut one half using the template. I then remove the template and fold the quilted piece in half, aligning and pinning the adjacent seams on the other half before cutting the rest of it.


Similarly, for duplicate pieces like the sleeves, I use one trimmed sleeve to cut the second sleeve, aligning seams and pinning. This ensures both pieces have identical pattern placement and symmetry.

For pieces that will be sewn together, like your front and back pieces, be mindful of where you’re making your cuts. I like to work from the bottom so I align the bottom edge of my coat pattern template to the bottom edge of my quilted piece for all adjacent pattern pieces. That way, I can align my quilt seams up the side seam of the coat.
When you start sewing your coat pieces together, pin each adjacent intersection where you want your rows to align. I like to throw in a basting stitch along the seam first. That way I can check if everything looks good and pull it apart if I need to redo it before I do my final stitching.
Matching seams (and mismatched seams) will be most obvious when you sew your sleeves into a tube, attach the front coat halves to the back panel down the side seam, and possibly at the pockets. I like using this matching technique on all these very visible seams.


Choosing How to Finish your Coat
You’ve got a few options for finishing your quilted coat, but it mostly depends on the coat pattern you’re using and any modifications you plan on making. Your options are:
- Serged or zigzag the edges
- French seams
- Hong kong finished seams
- Bound seams
- Adding a separate lining piece
I’m not going to cover all of them here, but I will explain my prefered method – adding a separate lining piece.
Some patterns, like the Sapporo Coat, are designed to have a separate lining piece. Liners are great for hiding the guts of the coat and you don’t have to fuss with finishing edges. You get a really polished look without all the headache of being super neat and tidy.


As I mentioned in the previous section, if you are going to use this method, don’t bother adding backing to your quilted pieces, you’ll just need the quilt top and the batting because the backside will be hidden behind the lining.
With the Sapporo Coat, I followed all of the pattern instructions except for one change. The last step of the coat assembly calls for you to turn the coat right side out through a hole that you left in the side seam of the lining from a previous step.
To close that hole, you’re supposed to hand sew the hole shut. After losing a little bit of sleep wondering how the heck I was going to make an acceptable and hopefully invisible hand stitch in my otherwise thoughtfully handcrafted coat, it hit me - add an invisible zipper!

The first time I added an invisible zipper, I ended up sloppily sewing one in after the fact. I knew I wanted to properly install one in my next coat. Now I sew it into place while I’m attaching one of the front lining pieces to the back lining piece and then go about the coat assembly as per usual.
Think of it as a fancy seam that you can open and close. It is a game changer, yet not all that difficult to add.

Do you have a favorite coat pattern that could be transformed into a quilted coat? Tell us about your coat-making plans in the comments!


I have been waiting for this post!!! Love all the little tips! I am almost done with my first quilt coat but there will be many more! I will be referring back to this post often. Would LOVE a pattern or more details if that ever was an option in the future. 😊
Thanks for reading. I’m so glad you find it helpful! And I love hearing that there will be more than one quilt coat in your future 🙂 You can never have too many!
Love this so much! Thanks for sharing.
An interesting read and great tips for making a professional looking coat. Thank you! 🙂
Thanks for reading and happy quilting!
I am so thrilled to see thus “how to” post as I’ve been combing through your IG feed to try and decipher it myself and make my own. I made my first quilt coat thus summer (using Wikstens Haori Jacket) and love it and want to make more. Love your creations – thanks for sharing your wisdom! Lorraine
Love it! Hopefully you have everything you need now to crack the code 😉
Thanks so much for this post!! Love your fabric and pattern chooses…I want to make my first quilt coat and I’m nervous and excited. Wondering if you plan on doing any video tutorials on making the quilt coat? Thanks again
That’s exciting! It’ll be a fun journey ( I hope!) I do not have any plans to make video tutorials but hopefully the photos in this blog help to answer any questions that might come up 🙂
Where can I find a pattern for the hooded matching coats
Hi Tina! Brittney, our guest blogger for this post, uses her own pattern that is not available for sale. However, she links to this pattern as one that can be used: https://papercutpatterns.com/products/nova-coat
I’ve been obsessed with the idea of making a quilted coat for nearly a year, but have been too intimidated to jump in- now I can’t wait! Thank you for the tips
This coat is a dream, there are so many colour way options but the gather coat as-is is absolute perfection.
Is there a pattern for the adult hooded jacket?
The hooded adult coat is something I drafted myself but the pattern is not for sale, sorry! Simplicity 8298 and New Look 6585 are other great hooded coat options to check out!
Do you have a preference for batting? Cotton, bamboo, wool?? Super helpful post!
This! My question too!
These are great tips! One question-how did you draft the hood for the Sapporo adult coat? It does not look it comes with a hood?
Thanks for all the good tips!
Thank you! The hooded adult coat is not a Sapporo coat. It is a completely different pattern that I drafted myself but the pattern is not for sale, sorry! Simplicity 8298 and New Look 6585 are some other hooded coat patterns worth exploring 🙂
Thanks so much!
Kristen
So inspiring! Thank you! I’m already planning my first quilted coat!
Which pattern did you use for the hood on Suzy’s coat? I love the size and depth and would love to add one to my coat too!
Woohoo! The hooded adult coat is something I drafted myself but the pattern is not for sale, sorry! You should check out Simplicity 8298 and New Look 6585, they both have hoods that might be adaptable to other patterns. My pattern drafting experience was simply a lot of trial and error since I have no formal training in this stuff but if there’s a will, there’s a way, right?? 🙂
Thank you very much for sharing this!! Your coats are just out of this world😍
Love the coats! Did you pre-wash your fabric?
Thank you! Yes, I prewash all my fabric before I iron and cut. I would hate to do all that work and then have the colors bleed the first time I wash it!
Hi There! Thank you so much for sharing. I am in the process of figuring out the right fit and pattern for my quilt coat. Do you recommend using the pattern’s recommended seam allowance or is there one you would suggest? I would be making mine with a lining. Thanks!
I love love LOVE this!
Great question! I typically use a 3/8” / 1cm seam allowance. I’ve seen that on a couple different coat patterns too. Unless the coat is a very fitted style, I wouldn’t worry too much about an exact seam allowance. My recommendation is to stay between 3/8” – 1/2” so there’s enough to keep the coat together but not too much that it gets bulky in the seams.
Made one many years ago from a Back Porch bomber jacket pattern. You have inspired me to do again. Thanks for tips. Will be using many of them.
Do you have a pattern that we can buy for the jacket Suzy is wearing? Or know of a place we could purchase it? I would love to have matching quilt coats with my 1 year old daughter!!!
The pattern for the coat that Suzy is wearing is self-drafted but not for sale, sorry! There are a few other hooded coat patterns out there that are good alternatives or might offer some ideas on how to add a hood to another pattern you like 🙂
Love this tutorial! I’ve been wanting to make a quilt coat for a while but have been nervous about the batting. I usually use cotton batting in quilts which shrinks some after washing. Do you just use a batting that doesn’t shrink much or size it up a little? Thanks!
I’ve been using cotton batting for all my coats. I have yet to wash one…but the coats aren’t super fitted anyway. Another option would be to pre-wash your cotton batting to reduce shrinkage.
Love this! I can’t wait to make a couple of baby coats for my nieces.
Did you have to scale the adult size at all or was that the same as…the throw pattern or baby pattern?
I scaled the adult gather blocks to 5″ and the strips to 1 1/4″ 🙂
Thank you for sharing your tips. I am going to attempt to make a jacket for myself. I just adore your jacket! Please keep posting your work.
Thanks for sharing! I want to try making a quilted coat for the first time. Yours are very inspiring!
Thank you for all of your tips. I have been waiting for this post and have learned so much. I can’t wait to dig in and make my own quilt coat. Your work is beautiful and you have inspired me. Mahalo!
Thanks for sharing. I hope to make a quilt coat at some point.
Would love it if you sold your coat pattern!
Any suggestions for a men’s pattern that would be good to follow by chance ☺️
Hmm great question! I haven’t done much research in this department but I found a shop on Etsy that has a handful of patterns that might work with a few modifications…formpatternshop
Adding that invisible zipper is brilliant. You could even make it into a small pocket for a credit card or something? Add pocket flaps to each side of the zipper, install and flip the coat inside out through the unsewn pocket, then invert the pocket and hand stitch. A poor description perhaps but I think it would work 🙂
LOVE the invisible zipper idea, too! GENIUS! And I was also thinking how to make this into a hidden pocket, and a less than perfect looking seam inside the pocket wouldn’t matter at all. Fantastic ideas!
So my 2021 resolution is to make a quilt coat… or 10 depending where quarantine takes us. When looking at the Sapporo coat (the one you use correct?) it says they are completely sold out of their paper versions, do you recommend getting the PDF version instead? Or is that a bigger hassle?
Buying the PDF version would allow you to size up/down easier if needed. It does require a printer and a lot of paper, tape, and patience but is more flexible in my opinion 🙂
I want to make a quilted coat, can you use fleece for lining as I am cold all the time.
Yes, definitely!
Are the pockets just a second layer of the quilt sewn over the front?
It totally depends on which pattern you use. You definitely can add them that way but it’s up to your personal preference!
Thanks for all the detail here. I do not see a link or reference for the adult size hooded example. Would you please provide that? Thanks.
The hooded adult coat is self-drafted but the pattern is not for sale, sorry! Some other hooded coat patterns to check out are Simplicity 8298 and New Look 6585.
Beautiful coats! Thanks for the tips! Have to make one of them!
Love your jackets!!! So excited to make one of my own! What size of squares did you use?
I use 4″ squares
Thank you so much for all the information. I’ve been wanting to make a quilt coat for sometime. This has encouraged me to start planning my first coat. One question (to start)- do you have any guidance on the fit of the Sapporo Coat? I think I’m going to use that pattern for my first coat. I’ve seen some comments about the oversized fit. Is there anything I should consider when I start the coat?
What size in the Sapporo jacket pattern is closest to the one Suzy is wearing?
In typical US sizes I wear a Small.
Stunning coats, and great tips. I’m new to quilting and an really interested in making a coat, but nervous about it. I will definitely give it a go, thank you.
Wow – this is great! I made quilted coats 30 years ago and it is so nice to see they are coming back with modern designs! I’m starting mine NOW! Thank you so much for sharing your knowledge!
Do I need some fancy quilting sewing machine to do the basic quilting pattern for this? Been really wanting to get into quilting and making a quilted jacket seems to be a great foray into quilts… but I’m not sure if I can do it on a regular, but good quality, sewing machine?
You can definitely quilt on a regular machine! I have a few articles that will help:
– 6 Tips for Straight Line Machine Quilting (a.k.a. Matchstick Quilting)
– The 5 Best Machine Quilting Books: Quilt Like a Pro at Home!
– How to Machine Quilt
– How to Troubleshoot Sewing Machine Tension
What type of batting did you use? 100% cotton, 80/20, and would polyseter batting work for this coat?
If you use cotton batting did you prewash it to prevent shrinkage before quilting the top?
Brittney uses cotton batting for all of her coats and does not prewash it. Hope you have fun making a quilt coat!
I’m loving it! Using Warm and natural white, blocks are variuos shades of greys, whites and turquiose Back piece is quilted front pieces are marked, pinned and ready to quilt. When all pieces are quilted will wash in the machine. Then will cut out pattern pieces to prevent shrinking in finished jacket.
Is there a pattern you recommend for the dog jacket? Thank you.
Thanks so much for sharing this post, I’ve seen her patchwork coats on Instagram and each one is so beautiful!
Good afternoon! Are there darts on the front of the jacket? I have a big bust. What about darts? Thanks
I’m late to the party but obsessed. Can not wait to make quilt coats for me and my daughter!! Thank you for sharing this info!!
Did you do a post about invisible zippers? You mentioned one but I haven’t been able to find it.
You know what, that was on the schedule, but never done. Thanks for reminding me! haha!We do have other posts on zippers if you’re interested:
– https://suzyquilts.com/zipper-pouch-tutorial/
– https://suzyquilts.com/tutorial-how-to-insert-an-exposed-zipper-into-a-pillow/
– https://suzyquilts.com/quilted-zipper-pillow-tutorial/
😀 thanks!
How did you go about adding a hood to your coats? I love that extra part of them!
Glad this blog was still up – the toddler coat and dog coat is so cute. Would be the perfect size to adapt to the country of Panama bright colored style of using hand appliqued Mola blocks. Found this thru a reference on Instagram. Keep up the good work.
This is amazing! Congratulations for designing such beautiful and inspirational coats!! What kind of material have you used for your main matetial? The beige colour one.
So glad you like the quilted coats, Sophie! Brittney mentions in her post that she used most of the same colors that Suzy did in her Gather quilt. Here is the link that lists Suzy’s colors! Scroll down until you see the heading “My Original Gather Quilt” and you’ll see a list of the fabrics! https://suzyquilts.com/gather-quilt-pattern-total-hst-madness/
May I suggest another Quilt Coat pattern that was just released a couple weeks ago? It combines everything you’re talking about in your post perfectly .. I’m a beginner quilter but even more novice sewer so your post is awesome and so helpful and generous with the details. Thank you so much! https://megannielsen.com/collections/sewing-patterns/products/hovea-curve-jacket-coat-pattern
Love this and very excited to get started. I have a Vogue jacket pattern that I think will work well. Still looking for that quilt block that talks to me. Then I will pick out fabric. SO EXCITED!
Do you have any tips for adding a hood to a pattern without a hood? I am having a hard time finding a hooded jacket pattern that I like for a quilted coat
Thankyou for your tips do for. I decided rather ambitiously to try and make a reversible short jacket but am confused about sewing on the sleeves. I am padding out each section and hope to bind the neck and edges . Any help or advice on any book to help would be great Thankyou so much
Where May I purchase the coat pattern
WOW!! Love the definitive method and especially ‘Scrappy’s coat’.
As to the photo location…private greenhouse or public conservatory? Beautiful!
How do you determine what size quilt equivalent would be needed for a jacket…
Wow! Never thought I can make quilt coat. That is so awesome. I will try to make this after I do three or four quilt throws. One for my large dog and couple coats for me and my wife. Brilliant idea! Thank you for all of the info how to make this coat. I am looking forward to make this.
Hi so I know the Sapporo pattern is mentioned for the adult coat but the pattern has no hood like the one in the matching coat photos is this an adjustment, or is a different pattern used for the adult hood that matches the toddler coat??
Hi Karen! Brittney, our guest blogger for this post, uses her own pattern, which is not available for sale, for the hooded adult coat. However, she suggests Simplicity 8298 and New Look 6585 are other great hooded coat options to check out!
Hi Suzy, thank you so much for this post! I’m planning to sew a patchwork jacket for my best friend for her birthday, so I obviously want it to be perfect. Your post really helped me to put things together in my mind.
One of my biggest concerns was the lining. With the usual quilt backing it wouldn’t be practical as the cotton would be “catching” agains woolen sweaters and it would be just unplesent to wear together. The normal, slipery lining is much better and the method with the invisible zipper is really genius! It also allows an easy access to the backside in case anything comes undone for whatever reason! I love it!
I will be using Burda Easy pattern (1/2005, a hoodie model no 3B with raglan sleeves).
Wish me luck, but I’m sure after reading this post I will do just fine 🙂
Thanks again!
Wera
What a thoughtful gift! Your friend is going to love it, I’m sure! Cheering you on! 🙂
Thank you for sharing your tips! I am almost done quilting the patchwork panels for my upcycle denim coat and now lie awake wondering how I am going to stop the seems from unraveling after I’ve cut the pattern pieces. Do you have any tips?
Love from the Netherlands <3
Hi! You can use pinking shears to limit the amount of fraying, especially as you handle your pieces. Hope this helps! 🙂
Hello Suzy, I’ve jumped in with both feet for my first ever patch work garment. A jacket!!my plan is to use an oversized wind cheater as the pattern and lining.I have sewn 3 inch squares together to make a big sheet of multi coloured fabric. I will place the” pattern” on the fabric and go from there.Am I being too simplistic for my first effort🥴🥴 Is 86 too old to have an addiction!!! I’m hooked🤭
Not at all, Ellie! Your enthusiasm is contagious! We are cheering you on! 🙂
If I order the print pattern do I receive a pattern of usable size no something on a 8X10 sheet of paper? I have made of one of your quilts the “butterfly” for a friend’s baby. It was a huge hit.
Hi Michelle! That depends on the pattern you are wanting to purchase. As a reminder, this is a tutorial but Suzy Quilts does not sell printed quilt coat patterns. If you use one of the mentioned patterns, and follow the links, you’ll be able to purchase from there. Most have an option to buy a printed pattern so you receive the pattern already printed in large format. Hope this helps!