How to Sew Pom Pom Trim to a Quilt
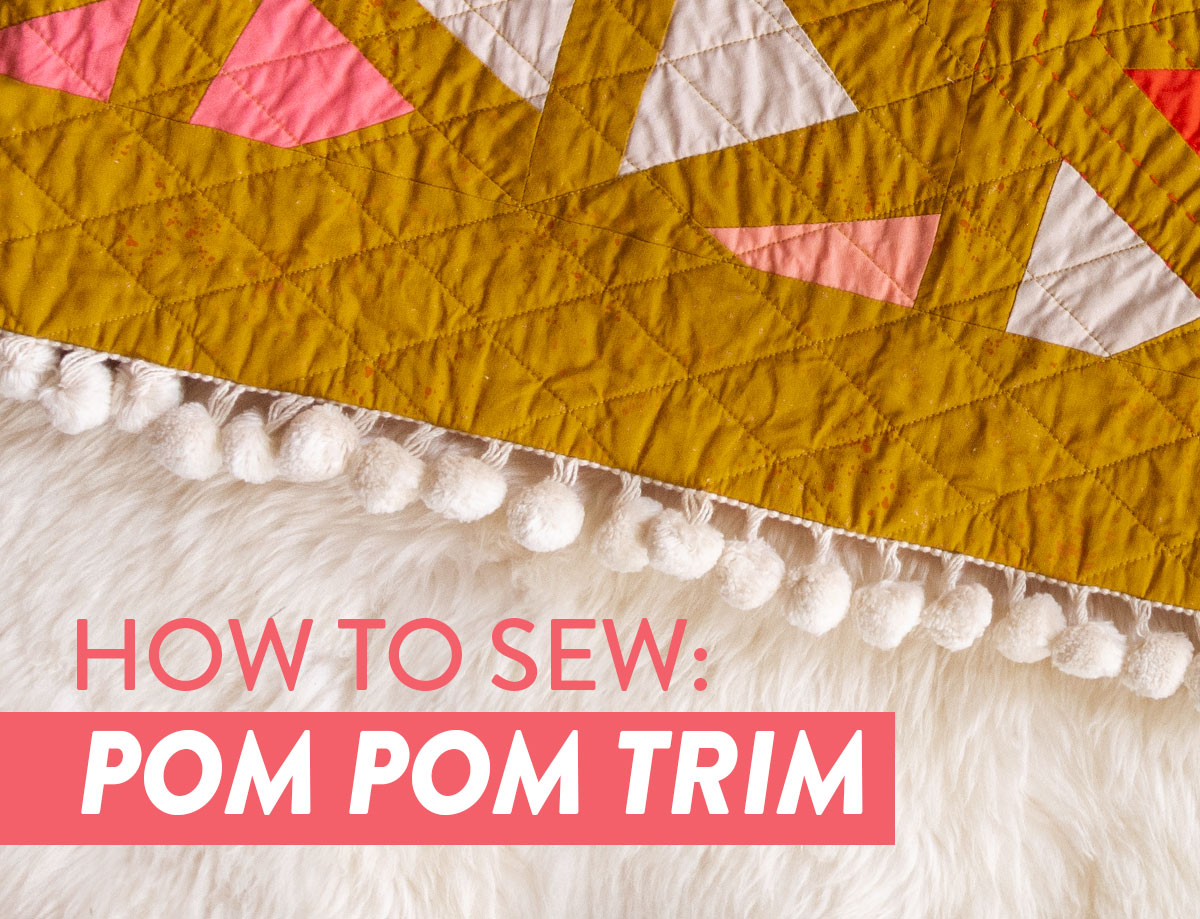
In this step-by-step tutorial we'll show you how to add some fun flare to your quilts by sewing pom pom trim to the edges. Even though these instructions are written specifically with quilts in mind, you could pom-ify a lot of things in your life! Pom pom pillows, rugs, clothes and even pot holders like the one below!
A Quasi-Historical History of Pom Poms
The history of pom poms is long and and full of mystery. Many have tried to ascertain who first invented these circular ornaments of fuzz, but pom historians still cannot agree to this day.
My favorite theory is that a piece of wool got wedged in a camel hoof, or, camel toe, if you will. As the camel walked around doing camel-ie things, the wool that had contact with the ground felted into a strip while the remaining portion stayed nice and fluffy. A local camel-shoer was re-shoeing said camel and, finding the wooly mess, ripped it from the camel's hoof and tossed it aside.
A local street rat with high dreams of becoming a tailor picked up the trim and, seeing it's fabulous potential, decided to attach it to the edge of his monkey's vest. Was that street rat Aladdin? I would say most definitely yes, however the sticklers of pom history would say that hasn't been confirmed. His flying carpet has been really hard to pin down for comment.
What Even Is Pom Pom Trim?
Pom pom trim is a form of fringed trim that is typically sewn around the edges of quilts, scarves, tree skirts, human skirts, dog collars, coasters, kimonos or anything else you have laying around that needs some light bedazzling.
Trending patterns!


Quilt Patterns


Quilt Patterns


Quilt Patterns


Quilt Patterns


Quilt Patterns


Quilt Patterns


Quilt Patterns


Quilt Patterns


Quilt Patterns
Pom poms are fluffy balls of thread, yarn or fabric that are held together in the center by another piece of thread, yarn or fabric or even sometimes by a metal clip. These pom poms are then woven into a piece of stabilizing tape, gimp trim or braid. (That's the trim part.)
In some fringe trims this stabilizing tape is decorative and looks good top-stitched – this is often done in upholstery. However, in this tutorial, we will hide it between the quilt layer and a strip of fabric. This method can be applied to any type of fringed trim, just remember when planning your quilt that it will take the place of traditional binding.

Above is the Perennial quilt pattern – get it here in the shop!
Sewing Pom Pom Trim Tips
Generally, the more decorative a trim is, the more fragile and finicky it will behave, especially when laundered.
- Pre-wash and dry a sample of any trim that you plan on using in a quilt to ensure that it can stand up to being laundered.
- Wash pom pom trim as infrequently as possible. Not all pom pom trim is of equal quality and it would be such a bummer if your trim fell apart after the first wash! It is important to remember that it is a decorative trim, it is not recommended that this trim be used on a quilt that you will be laundering every other week.
- Make sure your pom pom trim is very securely sewn into the quilt before letting a baby near it. Babies love to play with pom pom trim, so make sure you give your trim a rigorous beating and roughing up before you decide to put it into the hands (and consequently mouth) of one so small.
Important Note!
Before beginning your project, measure the width of the stabilizing tape on the pom pom trim. You will be sewing the edge of this tape to the edge of your quilt and then folding the tape to the back of the quilt – this may cause you to lose more of your quilt top than you would if you were binding your quilt.
You can make an allowance for this while you are piecing a quilt or you can offset the trim from the edge of your quilt, allowing some of it hang over the edge. It is not recommended that you trim the stabilizing tape down to match the seam allowances left for binding, as this will have an unknown affect on the integrity of the trim.


How to Sew Pom Pom Trim to a Quilt
Supplies
- A finished quilt with trimmed raw edges and no binding. The quilt seen above is the Perennial quilt pattern – get it here in the shop!*
- Pom pom trim equal to the perimeter of your quilt, plus 12" for a wash test and wiggle room when sewing. The pom pom trim used here was purchased in a Joann store but for some reason it isn't listed online. This 1" trim looks very similar.
- Backing or corresponding fabric (See below for instructions on how to measure.)
*For information on the fabric used to make this Perennial quilt, check out this blog post or scroll to the bottom of this post.

The mini quilt used in this tutorial is the Maypole Pillow Extension pattern.
Cut and Prepare Backing Strips
1. Measure the width of trim stabilizing tape (WOT).
2. Multiply WOT x 4 and add ½". For example, if the width of your trim is ½", cut your backing strips to be 2 ½" wide.
3. Measure and add together all four sides of quilt, then add 12". Divide that number by 42 (42" is typically the width of quilting fabric), this is the number of backing strips you will need.
4. Join the backing strips together with diagonal seams. Trim and press open.

5. Once all strips are joined together, fold the backing strip in half lengthwise, wrong sides together, and press flat. (Similarly to how you would prep regular quilt binding)

6. Fold one side edge inward to create a turned under edge.
Attach the Backing Strips to the Pom Pom Trim
7. Starting with your turned under edge, pin the backing strip to the pom pom trim, lining up the raw edge of strip to the edge of the trim. Pin in place.

8. Use a zipper foot to sew ~1/16" away from the pom-pom edge of stabilizing trim. Note: if you want part of the edge of the stabilizing trim to peek out, similar to lingerie trim, then stitch slightly further from the side.

9. Grade the seam allowance. Seam grading is used to reduce bulk from a seam. To grade, cut the seam allowances in half (do not cut stabilizing trim!). Then, cut the top layer in half again.

10. With a pair of fabric scissors, clip into the trim. Do not clip past seam-line. Clip at approximately 1" intervals. This step relieves tension in the trim and will keep it from bunching up like a well washed towel over time.

Attach the Pom Pom Trim to the Quilt
11. With raw edges together, and the pom pom trim sandwiched in the middle of the two layers, pin the trim to the right side of the quilt. When you come to the corner of the quilt, clip into the corner of the trim and pivot.

The corner will look like this...

12. Sew the trim to the quilt. Use your previous stitch line as a guide, and sew to the outside (left) of it. Note: This step can prove very difficult depending on how close the pom poms are to the edge of stabilizing tape. You may find it easier to machine or hand baste the edges of the quilt together first along the raw edge.
Snip the corners of the quilt to alleviate bulk.

13. Allow the beginning and end of the trim to overlap slightly before backstitching and cutting off the excess backing strip.

14. Iron the seam flat and check the front of the quilt to make sure there are no areas that appear uneven where more stabilizing trim is showing than you intended. Pin and mark any places that need to be fixed and then go back and adjust if necessary.

15. Press and pin the backing strip to the back of the quilt so that your pom pom trim sticks out from the edge of the quilt.

16. Whip stitch, blind stitch or running stitch the backing strip to the backing fabric. Be careful not to poke your needle all the way through the layers of the quilt, just like you would hand stitch traditional quilt binding.


Perennial Baby Quilt Fabric
- Flowers: Cotton Couture Clementine
- Garden: Cotton Couture Cream, Cotton Couture Creamsicle, Cotton Couture Petal, Cotton Couture Geranium
- Background: Speckled Metallic Cactus by Ruby Star Society
- Binding: Cotton Couture Petal and 1" pom pom trim
- Backing: Fruitful in Caramel by Ruby Star Society (out of print)
Have you added pom pom trim to a sewing project? Tell us about it in the comments!
Below is the Kris Kross quilt – get the pattern here! This adorable baby quilt was made by Christina of Figo Fabrics.


Hi Suzy! I just found your website through my phones google browser history ads.. I love pom-poms, thanks for the info on adding to a quilt!!
Could you share the mustard fabric color used in the first quilt? Thank you! Love the pompom idea!
It’s Speckled Metallic Cactus by Ruby Star Society.
I just love this idea! I will start with a nice little mug mat like yours and use some of the black pom pom trim left over from a project for granddaughter. You are right about the washing. I had sewn it down the long sides of white cotton curtains and they got so tangled in the wash! Maybe a strip of fabric would have helped that issue. Also cannot believe how big Dez is! Still a cutie! Thanks for this fresh idea!
He’s almost one!! ahhh!
I really love this idea. Always looking for a way to spice up my quilts and Pom poms are the spice of life so this is perfect!
Thank you for always sharing your expertise with us! It really helps. One handsome man in the making, your Desi!!!
finished my perennial quilt using the pom pom binding..a really fun pattern to make and happy I tried the trim…thank you for your great patterns and all the ideas you share with us! hugs to Desi and of course Scraps!
I’m so glad to hear that!!
Hey Suzy, hey Caitlyn,
maybe an abstract question: do you think this method would work for adding a zipper to a quilted blanket, to turn it into a sleeping bag?
Thanks.
First of all, I love the idea of turning a quilt into a sleeping bag!
I think that this method could work for adding a zipper to the quilt. If you wanted to used the backing strip to hide the raw edge of the zipper the only thing I would do differently is sew it down by machine instead of by hand in the final step. I would also do an additional row of top-stitching closer to the zipper teeth to keep the fabric from getting zipped up and caught in the zipper. You will also want to make sure that you do not sew too close to the zipper teeth when you initially put the zipper in because the bulk of the quilt and backing strip will make it difficult to zip up.
Or, you could take your quilt before binding it, fold it on half right sides together, sew the bottom and part of the side. Then put your zipper in. After putting your zipper in, drop a lining in the sleeping bag. The lining would be the same size as the quilt and would need to be sewn at the bottom and on the side just like the quilt. On the side seam, put right sides together and sandwich the zipper inside of your quilt and lining, then sew and repeat on the other side. Then top stitch those layers together like I mentioned above. I would then sew around the top (wrong sides together) and bind the top edge.
As a side note, if you did the lining method, I’d save your cute backing fabric for the lining, and instead back your quilt with an old flannel sheet.
I hope you try this sometime! It sounds so warm and cozy! I think I might have to too!! If my brief instructions above confuse you, just let me know and I will go into more detail.
Thank you so much for taking the time to think about that and writing such a detailed instruction. 🙂 I’m still on the quilt top, but will definitely get back you, if get I into too much of a hassle. Right now I would try it the first method. Thanks again.
Hi! I have been wanting to add Pom pom ever since I saw your version of your Perinneal quilt with it! May I ask if you have a source of good Pom Pom? Your looks really sturdy with a good braid at the top. I was also wondering how it holds up after washing?
Thank you!
The pom pom trim used in this tutorial was purchased in a Joann store but for some reason it isn’t listed online. This 1″ trim looks very similar. After one wash it held up well! Because of the pom poms though, it’s best to wash as infrequently as possible. In the Sewing Pom Pom Tips section of this post we recommend washing a test strip before sewing it to your quilt.
Oh my gosh! I surely wish I had read this article before I tried to sell ruffles to a baby quilt.
Your theory on the origin on poms has me laughing so hard. You are a delight. I never thought about pom trims, thanks for sharing this idea!!