Star Tote Bag Tutorial with the Planetarium Quilt Pattern
What’s better than a Planetarium quilt? A Planetarium quilt with a coordinating Planetarium quilted tote bag! Plus, if you’re too busy to make an entire Planetarium quilt, this star tote bag tutorial offers you the perfect chance to try out a block, participate in our Planetarium sew along, and see if you want to dive in and make a full quilt.
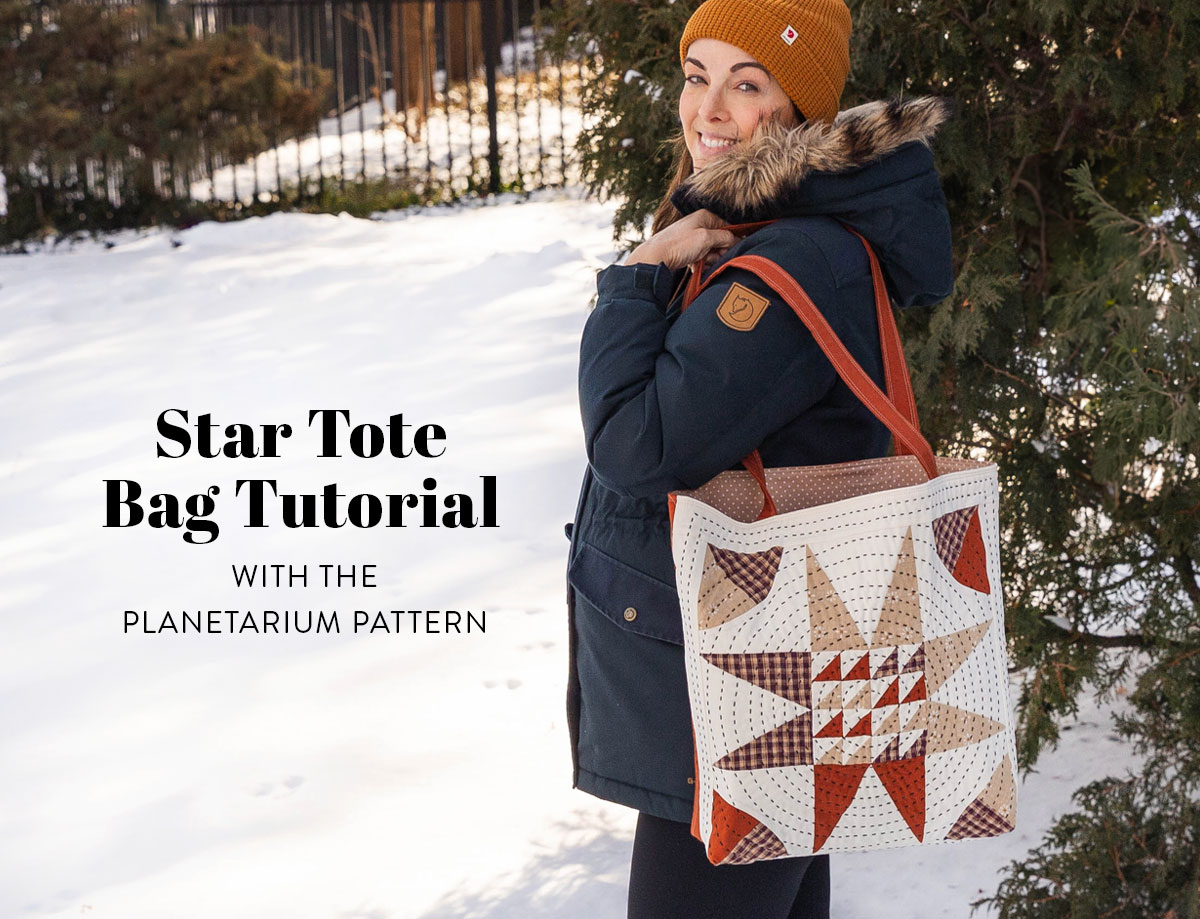
I’m so excited to share this beginner-friendly quilted tote bag tutorial featuring the block from Planetarium, the new quilt pattern by Suzy Quilts.
You Might Also Like...


The fabric in the above tote is Suzy Quilts Signature Solid Pearl, Spiced, and Snapdragon, plus Boho Birds Snapdragon from the Duval collection.
The flower pillow in the background is a tutorial found on The Cutting Table - Mod Daisy Appliqué Tutorial.
Planetarium Tote Bag Tutorial Materials
This tutorial uses woven fabrics from Fableism, Moda, and Ruby Star Society. The background fabric is Bella solids in Ivory. Here is a list of how much fabric you'll need to make the Planetarium tote bag:
Trending patterns!


Quilt Patterns


Quilt Patterns


Quilt Patterns


Quilt Patterns


Quilt Patterns


Quilt Patterns


Quilt Patterns


Quilt Patterns


Quilt Patterns
- Color 1: 1 fat quarter (Moda Homemade Homespuns in Purple & Tan)
- Color 2: 1 fat quarter (Fableism Forest Forage in Biscuit)
- Color 3, Back Panel, and Straps: 1 yard (Ruby Star Society Warp and Weft Honey in Terracotta)
- Background: 3/8 yard (round up to 1/2 yard if needed)
- Lining: 3/4 yard

Step 1: Make the Planetarium Block
Begin by making one Planetarium quilt block as instructed in the pattern, but with smaller cutting measurements. Normally, you would make sure your print scaling is set to 100% or actual size.
But to make a tote-sized block, scale it down to 50% before printing. The 1" test square after printing should measure 1/2". Assemble your templates according to the instructions on page 16.


To assemble the block, refer to the Planetarium Quilt Pattern for full instructions. Follow the cutting instructions below to make one small block for this project:
- Color 1: (1) Template B, (1) Template B-R, a: (2) - 2 1/4" squares, c: (4) – 4 1/4" x 6"
- Color 2: (2) Template B, (2) Template B-R, a: (3) - 2 1/4" squares, c: (2) – 4 1/4" x 6"
- Color 3: (1) Template B, (1) Template B-R, a: (3) - 2 1/4" squares, c: (2) – 4 1/4" x 6"
- Background Fabric: (4) Template A, (4) Template D, a: (8) - 2 1/4" squares
Trim each unit to the following sizes:
- HST units: trim to 1 3/4" square
- Triangle units: trim to 5 1/2" square
- Quarter-Circle units: trim to 5 1/2" square
Follow the Planetarium pattern instructions on pages 6-9 to assemble the block. The unfinished Planetarium block should measure 15 1/2" square.

Step 2: Cut the Tote Bag Pieces
Below are additional cutting instructions for the remaining pieces of the tote bag:
- Background Fabric: (2) – 2 1/2" x 15 1/2" for the side borders, (2) – 2 1/2" x 19 1/2" for the top & bottom borders
- Color 3: (1) 19 1/2" square for the back panel, (2) 5" x 28" for the straps
- Batting: (2) 19 1/2" for the exterior pieces, (2) 1 1/4" x 28" for the straps
- Lining Fabric: (2) 19 1/2" squares
Step 3: Assemble the Planetarium Front Exterior Panel
Add borders to make the block a 19 1/2" square. If you prefer a smaller size without the borders, you can adjust the measurements for back panel, batting, and lining pieces accordingly. This tote bag is going to be roomy!
To add the border pieces, sew two 2 1/2" x 15 1/2" Background pieces to both sides of the Planetarium block. Press seams towards the border strips. Then add two 2 1/2" x 19 1/2" strips to the top and bottom of the block and press seams towards the border strips.


Step 4: Baste and Quilt the Exterior Panels
Lay the Planetarium quilt block right side up on top of the batting. Baste and quilt as desired.


Once you’re done quilting the front exterior panel, repeat with the back exterior panel. I opted for hand quilting with circular lines about 1/2" apart for the front panel, and a mix of machine quilting and hand quilting for the back panel.

Step 5: Assemble the Exterior and Lining
Place the exterior pieces right sides together and pin around the perimeter. Sew around the sides and bottom using a 1/2" seam allowance, leaving the top open.

With the disappearing fabric marker, measure and mark 2 1/2" squares from the bottom corners as shown in the image below. Cut along the marked line. Repeat with the other corner. Press seams open.


Match up the side seam and bottom seam and sew 1/2" away from the edge, backstitching at the beginning and end. Repeat with the other corner of the bag. Note that by matching up the seams, it will line up perfectly when you turn the bag right side out.


Follow the instructions in Step 5 to create a boxed corner interior lining.

Step 6: Make Fabric Straps
Fold the handle fabric strip in half length-wise, wrong sides together. Press to create a crease. Then fold both raw edges in towards the center crease and press again.

Place one 1 1/4" x 28" of batting strip next to the center crease line and fold the strap in half with folded edges matching up. All raw edges should be facing inside the handle. Pin in place, and top stitch 1/8" down both sides of the bag handle. Top stitch again 1/4" from the edges. Repeat to make the second handle.


Step 7: Finish the Planetarium Tote Bag
Flip the bag exterior right sides out. Create a mark on the bag top for the strap placement 4" from the side seams on each side with the disappearing fabric maker. Place the exterior of the tote bag inside the lining, right sides together.


Tuck the strap between the bag exterior and lining with the raw edges of the strap aligned with the raw edges of the bag. Use the 4" marks as a guide for the strap placement.
Make sure that the strap is not twisted and pin in place. Pin the back handle the same way, aligning with the front handle.

Align the seams of the exterior bag with the seams of the lining, pin in place, and sew around the top with 1/2" seam allowance. Make sure to leave a 3" opening for turning the bag right side out.


Turn the bag right side out through the opening. Press the top edge so that the lining lays nicely inside the bag. Top stitch around the top with 1/8" seam and then 1/4" seam.


Your Planetarium Tote Bag is Complete!
I hope you enjoy making this Planetarium quilted tote bag. The generous size makes it perfect to carry your groceries, library books, or your next fabric haul from your local quilt shop.
Let us know in the comments if you have any best tips for bag making or which Suzy Quilts Pattern you’re going to turn into a quilted tote bag next! Be sure to tag @suzyquilts and use the hashtag #SuzyQuiltsBlog in your pictures on Instagram!


Hi Suzy,
I love the smaller size of the block for the tote bag.
How hard would it be to translate that smaller block size to a throw size quilt while using four colors for each color group?
Math is not my stong suit!
Using this size to make a quilt is really easy — just scale the templates down like this tutorial says. If you want to use four colors instead of three, you could change the background color in each block. Is that what you mean?
I want to make the tote. If I order the quilt pattern is there a scaled down size chart and directions for the tote also or is it a separate pattern to purchase?
There’s no separate pattern — you will be able to make the tote using this tutorial and the quilt pattern 👍
I guess I’m not understanding the pattern. In the cutting directions for the throw it says four colors for each color group and one background. So that means 13 fabrics?
Yes, that’s right. So each block has three colors plus the background. Since you’re making the throw, that’s four total blocks. So you will need 12 colors plus background fabric.
Hi Suzy,
I love this bag! I am using it as a warm up for my throw quilt. I cut the squares at 2-1/4” but my HST are closer to 2”, am I doing something wrong?
Hi Melissa,
HSTs need to be trimmed to 1.75″ x 1.75″, so when you make the center block (4×4 layout) it should measure 5.5″ x 5.5″.