Maypole Quilted Floor Pillow Tutorial
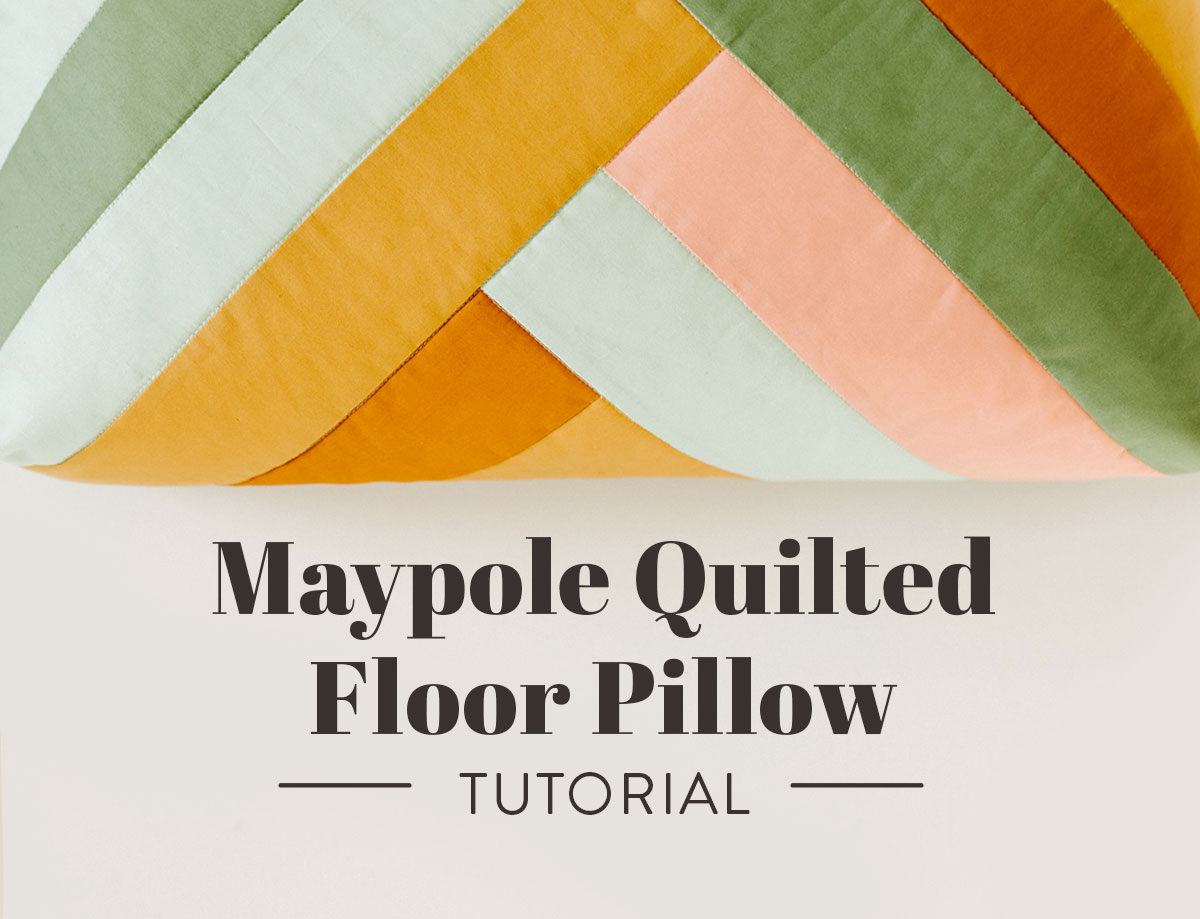
Crafty friends, this quilted floor pillow tutorial is one you'll be bookmarking so you can make it again and again. The reason is because at some point in your life, you've probably had to sit on the floor. It might've been while you were playing with your kids or grandkids, visiting some friends with limited seating, or maybe while you were waiting for a delayed flight at an airport.
Whatever the case may have been, I'm sure in that moment you wished for a seat on something softer – something a bit cushy, something quilted, something adorable, something featuring the Maypole pattern – right?? Too specific? Well, the Maypole quilted floor pillow checks all of those boxes, and is such a fun project to sew!

As a mom of a two-year-old with a baby on the way, we sit on the floor to play with toys a LOT. I'm pretty sure any pregnant woman (not just me!) will tell you that they'd rather sit on a floor pillow than a hard surface.
But the Maypole quilted floor pillow isn't just for moms; this could be the perfect extra seating in a college dorm, a first home without much furniture, or an extra spot to sit when having a gathering with friends or family!
Since this floor pillow isn't huge, and has a handle for easy transportation, it's the perfect solution to temporary (and stylish) seating!
Trending patterns!


Quilt Patterns


Quilt Patterns


Quilt Patterns


Quilt Patterns


Quilt Patterns


Quilt Patterns


Quilt Patterns


Quilt Patterns


Quilt Patterns


You May Also Like...

Maypole Quilted Floor Pillow Materials
- Maypole Wall Hanging Pattern
- Fabric - Fabric requirements are listed in the Maypole Wall Hanging Pattern, but you'll need an additional 23" x 23" piece for the bottom of the floor pillow and a 3.5" x 8.5" piece for the handle. I'm using Art Gallery Fabrics PURE solids and a pano from the Pacha collection.
- Muslin (or other basic fabric - this will be used for the interior of the floor pillow) - 1 1/2 yd
- (Optional) Fabric/muslin for pillow form - 1 1/2 yd
- Batting - One piece 31" x 31", one piece 23" x 23", one piece 1 1/4" x 8"
- 22" (or longer) invisible nylon zipper (you'll need two if you'd like your pillow form insert to have one as well)
- Something to fill your quilted floor pillow with - I used foam bean bag beans, but you could also use a block of foam, poly-fil, or a bunch of fabric scraps
- Cutting mat
- Rotary cutter
- Scissors
- Ruler
- Temporary marker
- Basting supplies - either safety pins or basting spray
- Tailor's Clapper
- Simple Sewing Machine
- Thread
- Straight pins
- Iron & ironing board or pressing mat

Step 1: Assemble the Maypole Wall Hanging Top
First things first - assemble your Maypole Wall Hanging top. You may have made a Maypole quilt or Maypole pillow before, and it's SUCH a fun pattern that you'll quickly fall in love with! The construction is simple enough for a beginner, but gives the illusion of a much more complex quilting pattern.

Step 2: Baste the Maypole Floor Pillow Top
Once you've assembled the Maypole wall hanging top, it's time to baste! Create and baste a quilt sandwich with the wall hanging top, 31" x 31" piece of batting, and 31" x 31" piece of muslin. Create a second quilt sandwich with the 23" x 23" piece of fabric for the bottom of the pillow, 23" x 23" piece of batting, and 23" x 23" piece of muslin. Spray basting or pin basting will work, it's totally up to you.

Step 3: Quilt the Maypole Floor Pillow Top and Bottom
After your quilt sandwiches are basted securely, it's time to quilt! For the top of my floor pillow, I just stitched in the ditch to keep the emphasis on graphic piecing design. For the bottom, I used a panel from the Art Gallery Pacha collection with an added border, and quilted it with a grid pattern. How adorable is this panel?!


Step 4: Trim Your Floor Pillow Top & Bottom
Now that your top and bottom are quilted, we are going to trim them down just a bit to be sure they are perfectly square, then cut out the corners to give the pillow the boxy sides. Trim your quilted floor pillow top so that it measures 29" x 29", and trim the bottom so it measures 21 1/2" x 21 1/2".
Then, using your ruler, mark a 3 3/4" square in each of the four corners, using the two raw edges as two of the square sides. Then, use a scissors to cut out the square.


Step 5: Install the Invisible Zipper
Next up is installing the zipper! If you've never installed an invisible zipper, it's truly not that difficult. First, unzip the zipper all the way, and use the tip of your iron to press the teeth away from the edge of the fabric to open it up a bit.

Next, lay your zipper (the side with the zipper pull facing down) on one of the edges of your floor pillow. I did my best to line up where the zipper started while fully unzipped on one end, then matched the edge up with the raw edge of the pillow top and pinned in place.
Sew next to the zipper teeth, using an invisible zipper foot, backstitching at the beginning and end. Then take the other side of the zipper and place it RST with the bottom piece of the floor pillow. Do your best to square it up with how the other side of the zipper is aligned with the top of the pillow and pin in place. Sew along the zipper teeth using the invisible zipper foot. The finished product should look like the photo below:

If you used an invisible zipper longer than 22", zip the zipper halfway closed and trim off any excess zipper from the ends of your seam.

Step 6: Creating and Installing the Handle
Take your 3 1/2" x 8 1/2" piece of handle fabric and press 1/4" under along the long edge. Then, fold the corners in 1/4" and press 1/4" under on each end. The result will look like the photo above.

Next, slip the 1 1/4" x 8" piece of batting into the handle, tucking it under the pressed under edges as shown. Then, fold the fabric in half, matching up the edges. Edgestitch around the perimeter of the handle to secure the pressed edges and batting in place.

Center your handle between two of the corner cutouts. Stitch the handle in place making a square shape, then sewing an "X" through the square for added reinforcement.


Step 7: Boxing the Corners
Remember those cute little corner cutouts we made? Well now it's time to sew them to create a perfect boxed corner! Fold the corner in half right sides together, matching the raw edges together and pin in place as shown above.

Starting at the top, sew down the side using a 1/4" seam allowance, stopping 1/4" from the bottom. Be sure not to stitch all the way to the bottom, or you won't be able to pivot your corner when we're sewing the front and back together. Backstitch at the beginning and end to secure your stitches.
Repeat for the remaining three corners.

Optional - use an overlock foot or serger to finish your edge if you'd like. Be sure to stop 1/4" from the bottom if you opt to do this step.

Step 8: Attach the Top and Bottom of the Floor Pillow
We're nearing the end! Now it's time to join the three edges of the pillow without the zipper. Before you sew them together, be sure your zipper is unzipped partway so that you can turn it right sides out at the end.
With the top and bottom right sides together, and the pillow top on the bottom, match up the raw edge adjacent to the zipper and begin sewing from the corner using a 1/4" seam allowance. Backstitch at the beginning to secure your stitches.
When you get 1/4" from the corner, stop with your needle position down (it should hit right in the corner seam) and lift your presser foot.

Pivot the top piece of fabric so it's aligned with the next raw edge that you'll be sewing along. You may need to finagle your fabric a bit to get it to lay flat so you don't get a bunch in the corner.
Once it's laying in place, continue sewing along the next edge using the 1/4" seam allowance. Your corner should then look like the photo below:


Step 9: Filling the Quilted Floor Pillow
You can now turn your quilted floor pillow right sides out by turning it through the zipper. Neatly push out your boxed corners, and admire your work - we're almost done!
Now it's time to fill the floor pillow. There are two options - to sew and additional casing to hold your filling which will be inserted into the floor pillow, or simply put your filling directly into the floor pillow itself. I opted to create a separate casing, by making an identical pillow casing by using just muslin to repeat steps 4, 5, 7, and 8.
Insert your stuffing or pillow case, zip it up, and you're finished!

Voila! Your quilted floor pillow is complete. Sitting on the floor doesn't have to be uncomfortable - and this pillow can add a bit of fun decor to any room as well!


Wonderful pattern again. I made a regular size maypole pillow in shades of turquoise and smile every time I look at it. Would really love to make the floor pillow since I too sit on the floor with grandsons and it sure is hard on the old bottom. Thanks for your inspirations.
This pillow is perfect. I’m going to make a couple for my daughter at college. I’m going to order the filler and have it sent to her directly to save on shipping. So can you estimate how much filler you used for 1 pillow? Will 100L bag be enough for 2 or should Ibuy 200L of filler? Thanks Suzy for another great tutorial!
1 – 100L bag should be enough for 3 floor pillows, actually, so for 2 pillows, 1 should do the job.
Thank you so much!
Wow!!! Just beautiful. Instructions are exquisite. I have never seen the foam filling pellets that you show. These look so tiny and almost plastic like. Did I miss the brand/manufacturer of these?
Aren’t those neat? There’s a link in the Supplies section, but here it is again. In the photo they look hard, but they are tiny soft bean bag balls. You could stuff this with poly-fill too.
Wonderful pattern!!!
hello! I just got the pattern! so nice! I have a question, can I use canvas por this project? cheers from Germany!
Yes! That is a wonderful fabric for a floor pillow. Great idea!
ohhh great!!! thanks!!!
My scotties would like a his and hers maybe it would keep them off the settee ?! So they’re on the todo list thank you 😊
So I am guessing, now that I have already done it, that I am not supposed to cut the 3.75 inch square corners out of the bottom of the pillow. 🙁
I just finished one of these. Total labor of love. I think that you should make the insert slightly larger than the outer pillow cover, similar to how you normally overstuff a pillow cover. Mine just doesn’t look awesome. Maybe I put too much filling in the insert?
Hi!! I’m not able to find the pattern for the Maypole wall hanging … when I click on the links, I’m taken to the blog (not pattern). Is it still available for purchase??
… I hope so bc I’ve been collecting my quilting scraps and finally have enough to stuff this floor pillow! 🙂
Sorry about that! I removed the listing briefly, but it’s back in action again. Here’s the link – https://suzyquilts.com/shop/maypole-wall-hanging-extension-pattern-download/