Thrive Quilt Sew Along: Week 6: Final Quilt Top
Thrivers, you made it! You are so close to victory you can probably smell it, and it smells like spray starch and sewing machine oil. Yummm! This week we wrap up our six-week sew along making the Thrive quilt pattern.
Throughout the course of this sew along we covered lots of techniques, so be sure to bookmark the Sew Along tab so you can revisit them in the future. Some of the sewing skills we mastered over the last month and a half include:
- Stacking and slicing fabric (including triangles!) - Week 2
- Pressing seams with a tailor's clapper to make them flat as a pancake - Weeks 3 & 4
- Chain piecing - Weeks 3 & 4
- Matching and pinning seams even when the seams don't nest - Week 5
- Sewing blocks on point - Week 5
- Trimming and squaring up a quilt - Week 6

Here's a final recap of our sew along schedule:
Thrive Sew Along Weekly Schedule
- Week 1, July 1: Task: Pick fabric, gather supplies, and choose your pattern layout (if different from the original)
Meditation: What is your intention for this time? To learn? To relax? To work through some anxious energy? Sit for a moment and set a clear intention. This can change day to day!
Thrive Challenge: Support a local business in your area, especially if it's one that is struggling due to COVID-19. - Week 2, July 8: Task: Cut all pieces (Fig. 1-3)
Meditation: Hold some of your fabric in your hands, close your eyes, and feel its weight and texture. What do you love about fabric?
Thrive Challenge: Check in on a neighbor or friend. These are the people woven into your life. Make sure that the weft and warp of your community is thriving. - Week 3, July 15: Task: Sew 21 blocks (Fig. 4-8)
Meditation: Before turning on your iron or sewing machine, pause for a minute to close your eyes and take some deep breaths. Listen to your body’s natural rhythm. Simply be in this moment.
Thrive Challenge: Check in on yourself. If you need help or encouragement, don't be afraid to let someone know. - Week 4, July 22: Task: Sew 20 blocks
Meditation: Close your eyes. Let your shoulders relax. How are you currently thriving? Remember, no judgement. 😉
Thrive Challenge: Move that body! Stretch, dance, walk, drop and do a few push ups – create some energy with your body. - Week 5, July 29: Task: Sew all blocks into rows (Fig. 9-12)
Meditation: Sit by your sewing machine. Breathe in with the count of one and out with the count of two. After counting to ten, start again. Do this a few times or until you feel relaxed. Think about how grateful you are for your sewing machine. What a blessing it is!
Thrive Challenge: Give. Give a donation online or some food to a neighbor or some time to a person who needs support. Write down a specific way you will give this week. - Week 6, August 5: Task: Sew rows together into a quilt top (Fig. 12-15)
Meditation: After taking some breaths and feeling at ease, lift your heart up and picture warm sunshine streaming onto your face. Enjoy this sense of warmth and lightness. Enjoy the feeling of being happy in your accomplishments!
Thrive Challenge: Commit to continuing these challenges. Write reminders and schedule them on your calendar.

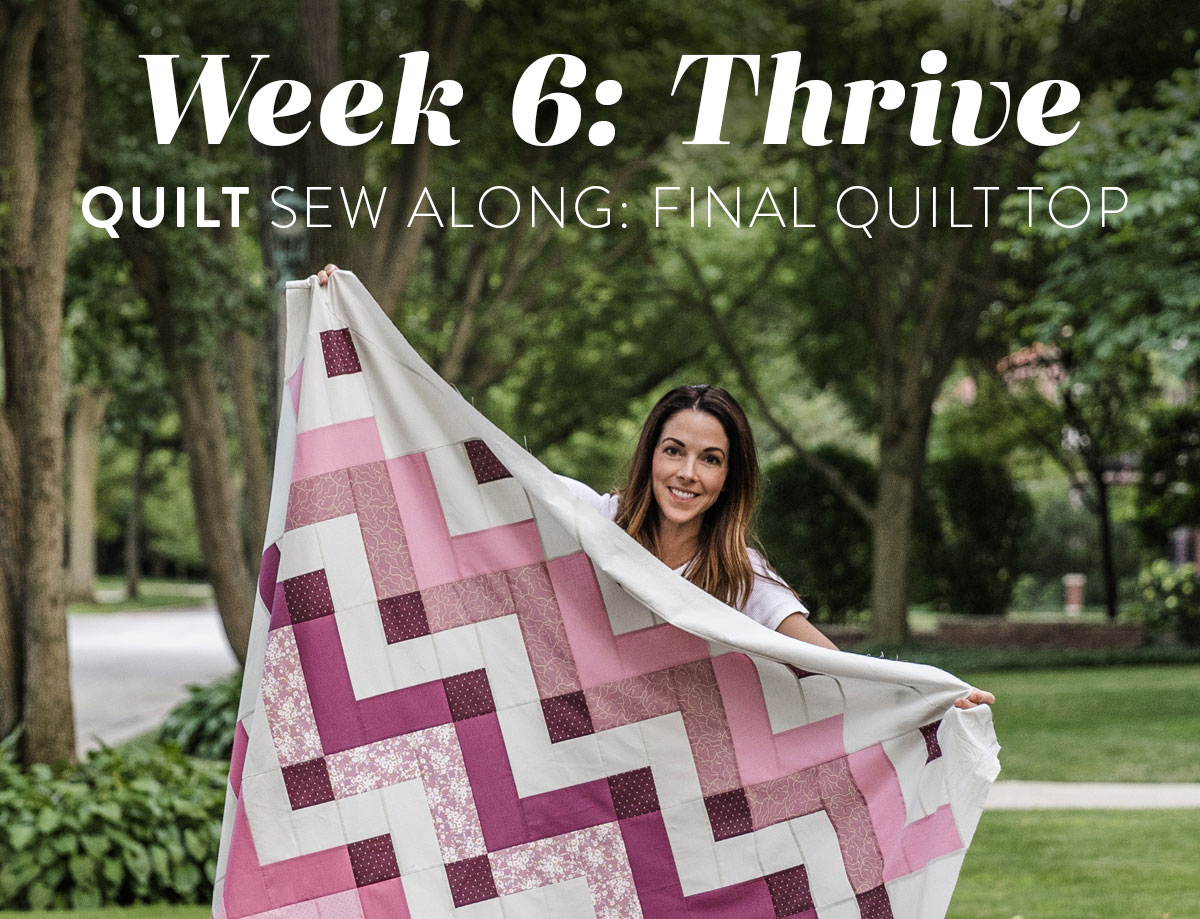
Thrive Sew Along Week 6: Final Quilt Top
When sewing our rows into the final quilt top we use the same pinning technique from Week 5. Check out that post for a quick refresher and video tutorial.
In the video below I talk a little bit about the background of the Thrive quilt and why there's only one top border – I've gotten a lot of questions about that! Afterwards, I show you how to use a ruler (or rulers), rotary cutter and cutting mat to trim your quilt top and square up the corners.
Trending patterns!


Quilt Patterns


Quilt Patterns


Quilt Patterns


Quilt Patterns


Quilt Patterns


Quilt Patterns


Quilt Patterns


Quilt Patterns


Quilt Patterns
Supplies Used in the Video Include:
- Cutting mat
- Rotary cutter
- 6" x 24" ruler (however I recommend an 8 1/2" x 24" if you have it) and a 12 1/2" square ruler (which if you don't already have, I highly recommend because the next SQ pattern in our four-part series uses it to trim the 12 1/2" blocks. More on that later...)


Tip #1: Line up two points.
When trimming your Thrive quilt top, I recommend lining up the 1/4" line of your ruler with two separate points. You can see in the photo above that in one cut I will trim two sections of dog ears. This ensures that the top remains lined up as you go.
If you skip this part of the trimming process and just snip the dog ears with your scissors, you may wind up with some bowed triangles or overly wide sections. Not a huge deal, but this will make the finished quilt look extra straight.

Tip #2: Use a wide ruler when squaring up the corners.
When you watch the tutorial video on this you'll see that out of habit I first grabbed my most used quilting ruler, the 6" x 24"; however, 6" isn't wide enough for me to line up two corner points.
To remedy that, I ended up using two rulers butted up next to each other so that I could visually line up two separate points and make sure my squares were going to be truly square.
Tip #3: Take lots of photos.
Get in the habit of photographing your quilts! Before I got into this habit I gave away so many quilts that never got documented. Now that I've gotten better at this, it's such a wonderful thing to look back and remember old projects and see how much I've changed and grown!
If you're unsure about your photography skills, check out this post - 6 Quilt Photography Tips from an Expert.


Tip #4: Acquire a helper.
Whether you're behind the camera or behind the quilt, taking photos of your finished project works best when it's a two-person job. Here's a pic of my helper. He is not excited about this photo, but I told him it's needed for educational purposes. I knew you wouldn't understand Tip #4 without it. 😉

Optional Meditation and Thrive Challenge
Our optional meditation this week is taking a moment to bask in the joy of what we have accomplished! After taking some breaths and feeling at ease, lift your heart up and picture warm sunshine streaming onto your face. Enjoy this sense of warmth and lightness. Enjoy the feeling of being happy in this beautiful quilt you have created!
Thrive Challenge: Revisit the schedule above to see the different Thrive challenges we have done. Commit to continuing these challenges. Is there one in particular that you would even want to make a part of your weekly routine? Write reminders and schedule them on your calendar.

The Week 6 Prize
The winner of this week gets such a fun prize! EverSewn has assembled a pressing station just for you! Included in this prize bundle is a Panasonic 360 cordless iron, a Nifty Notions Spray Mist Bottle, a Nifty Notions 14" x 14" wool mat, and a medium size tailors clapper. How fabulous!

How to Win
- Post a pic to Instagram. The photo prompt for Instagram this week is to post a picture of your finished quilt top. Use #ThriveQuiltSA in the caption.
- You must have a public Instagram profile to participate.
- Each photo posted is an entry and you can enter as many times as you want in a single week. Once the week is over, those posts do not count in the next week's giveaway. Every week we start fresh.
- Your photo must be posted between 12:00 a.m. CT on Wednesday, August 5, 2020 and 1:00 p.m. CT on Tuesday, August 11, 2020.
- This prize is open internationally.
- The winner will be picked randomly from all qualifying posts and announced at approximately 4:00 p.m. CT on Tuesday, August 11, 2020.


