A Festive & FREE Christmas Placemats Tutorial
Ho! Ho! Ho! And Meeeerry almost Christmas! It's time to officially launch holiday gift-making season here on the SQ blog. Last week we made adorable quilted ornaments, but this week I have something to spice up your holiday dinner party – a Christmas placemats tutorial!
These placemats use my favorite appliqué technique, raw-edge appliqué. I L-O-V-E, looove this technique!
- Raw-edge appliqué looks complicated but it's not.
- You can use your tiny, weirdly shaped scraps.
- It's incredibly fast once you get the hang of it. (Spoiler: You will get the hang of it after spending 5 minutes reading this tutorial.)
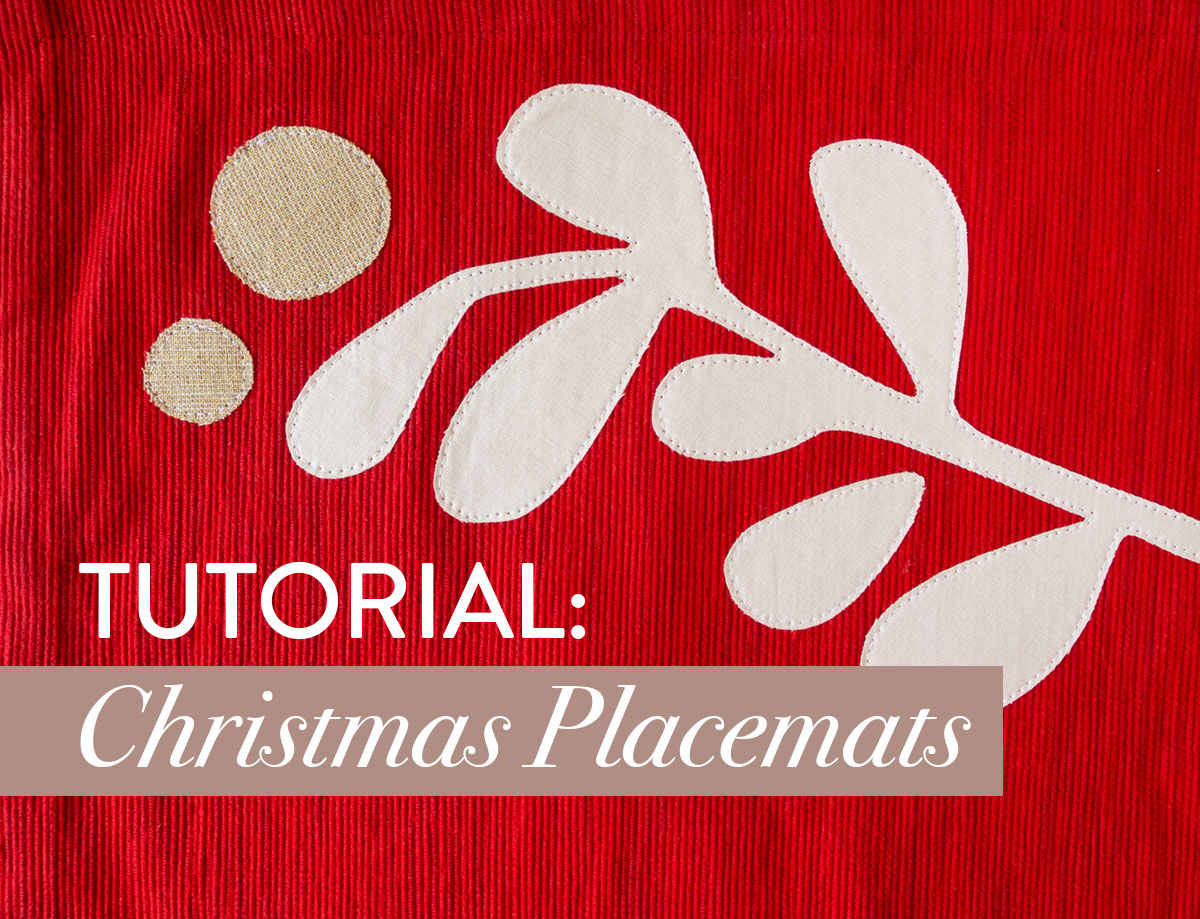
This Christmas placemats tutorial expands on the Bohemian Garden quilt pattern. Inspired by the paper cut-outs of Henri Matisse, it's only fitting that we use those templates with this raw-edge appliqué technique. Why? Because raw-edge appliqué is literally as easy as cutting out paper and gluing it onto fabric.

The reason I'm spending so much time trying to convince you that sewing appliqué is very much within your abilities, is because I recently conducted a poll on Instagram asking quilters how they felt about this technique. Can you guess what the majority of them said?
63% said they were scared of any type of appliqué. Can you believe it? That's not you I'm sure! 😉
Trending patterns!


Quilt Patterns


Quilt Patterns


Quilt Patterns


Quilt Patterns


Quilt Patterns


Quilt Patterns


Quilt Patterns


Quilt Patterns


Quilt Patterns
But, if it is, and you are a little wary, I'll hold your hand and guide you through the process. I even filmed a quickie video tutorial. Ready? Of course you are! Let's sew!
You May Also Like...
Christmas Placemats Tutorial: Supplies
- *Bohemian Christmas templates
- Pre-made solid placemats (Some may say that starting with these is cheating, but I say it's smart gift-making. These are the ones I bought, but I'm sure any kind you find from Target or Amazon would work just as well. Just make sure they are some blend of cotton or linen. Don't get vinyl.)
- Fabric for appliqué pieces. I used some Cotton Couture Cream, Essex Yarn Dyed Metallic in Sand and Metallic Chambray in White Gold
- Fabric scissors
- Marking tool (As a sewing professional, I recommend using a marking tool that won't stain your fabric, like this water soluble marker; however, as your friend and also as someone with pretty bad eyesight, I will admit that I used a thin sharpie. I just made sure to mark widely around my template and I cut inside the line so none of the sharpie lines made it onto my final piece of fabric. Check out the picture below to see what I mean.)
- Pellon Wonder Under Fusible Web 805
- Spray bottle or clean rag
- Iron
6 Simple Steps to Make Christmas Placemats
If you are using brightly colored placemats like the red ones here, prewash them. I say this not so much because the fabric will shrink (which it will), but because the fabric dye will probably bleed. I don't want you to spend time on a project that will look crummy after its first wash.
If you don't prewash and do have a bleed, I've got an article that will help, but wouldn't it be so much better to not need that article?

#1: Trace your template.
With a marking tool, trace the outline of your template onto the right side of your fabric. I like to cluster my templates together so I can use the smallest amount of fabric. This will also allow you to use the smallest amount of fusible web.
As mentioned earlier in the Supplies section, I also traced about an 1/8" outside of the templates because I used a sharpie. Since sharpies are really dark and can bleed, I didn't want any of that ink on my final piece of fabric.

#2: Iron on your webbing.
On the wrong side of your fabric, iron the textured side of your fusible webbing. (That means the smooth paper side will be facing out.) If you clustered your template shapes, then you can use one large piece of webbing for one section of shapes.

#3. Cut your pieces precisely.
Once your fusible webbing is securely fused to the back side of your fabric, use your scissors to precisely cut out your template pieces. You will not be folding over the edges, so what you cut is what you will see.

#4. Peel off the paper and arrange your pieces.
I made some sketches of my placemats so I knew what shapes to cut and where to place them. In these placemats I used a combination of the new Bohemian Christmas templates and the templates from the Bohemian Garden quilt pattern.


#5. Steam the pieces to fuse them.
You can follow the packaging instructions, which will tell you to use a damp cloth, OR you can do what I do and spray a light mist of water over the pieces then gently iron them until they are dry. No cloth needed. Don't move the iron too much or your pieces will move.

(In the picture below my iron is not hot. This is toootally posed for the photo. In real life, PLEASE iron on an ironing board or heat resistant surface.)


#6. Sew around the perimeter.
Once your pieces are secure, straight stitch or zig zag stitch around the edges of each one to completely secure them in place. I'll be honest, this is the one part of raw-edge appliqué that could prove a little bit challenging. The key here is to sew slowly with your needle down.
Check out this video to see how I do it.
And that's all there is to it! Now that I have eight finished Christmas placemats, the only thing left for me to do is...


...make a matching table runner! I didn't use all of the Bohemian Christmas templates in these placemats, so there's ample opportunity for me to get fancy. Until I find the time to make that runner, here is a layout example of what I think it will look like.

If you loved this Matisse-inspired look and appliqué process, pick up the Bohemian Garden quilt pattern. This party doesn't have to end! Do you love appliqué? Have any cool tips or tools? Let us know in the comments!


Thank you for this nice refresher. Given me the urge to do some raw edge appliqué again.
Fun, thanks! “Don’t get vinyl” 😂
Love your tutorials as always! What is that cute little iron you are using?
I love this idea for some holiday pillows too, thanks for the tutorial. I can’t wait to try this.
Yes! You could sew these applique pieces to pillows, bags, jackets, backpacks, table runners…the possibilities are endless!
Hi! You are my arty friend from home!! Love your work enjoy you!! Thank you for a wonderful and beautiful present!! Wish you an yours a blessed Christmas! Cannot eait for next year, love Ina
This is awesome, Suzy! And in defense of my “I’m afraid of appliqué” answer, you didn’t specify that it was raw edge! It’s needle turned appliqué I’m afraid of! I’m definitely down for this! Now, the challenge – can I get these done for my turkey-day table?? You’re the best!
I love this idea!! Thank you so much for sharing! Can’t wait to make some for gifts!
Me again. Just watched the video. The adhesive will also keep it from fraying a bit, right?
Right!
I love the idea. It would be so nice if you could print off the examples and instructions.
Thank you, these are beautiful! I have been known to use thin Crayola washable markers to mark fabrics and quilts.
I’d like to know what foot you are using on your machine? I like the way the edges lined up so well within it.
This is the 37D foot on my BERNINA.
Wow! This was a revelation for sure. I always thought I had to use a zig zag stitch to cover the edges completely and that has often gone very wrong for me! Thank you, my quilting guru.
I used to be afraid of raw edge applique. A couple of years ago I challenged myself to get over it by making one 6 inchish applique block a day for a month some free motion some stitched as you did. No rhyme or reason to the designs chosen, just designs and coloring book and clip art that caught my eye. Ended up making them into a polaroid quilt. I love it, and it’s just for me. If you’re interested it’s at the end of this post https://selinaquilts.blogspot.com/2018/09/welcome-to-my-house-hop.html Thanks for the gentel push you are giving to your followers , they will thank you.
I used this technique and found it to be playing! It was so much fun. I made a sewing machine cover – the appliqued front looks like a sewing room. I have the teensiest pincushion, an iron and ironing board, Featherweight sewing machine on a table, a dress form wearing a button up blouse and skirt, there’s a plant, a measuring tape, and boxes of buttons too. All from this technique.
I enjoyed it so much I’m now making a bag doing the same thing. For me it’s a creative ‘meditation’ that let’s me end up with something useable.
Oh my gosh, those are so cute! Thank you for pictures and tutorials and the hand holding!😁
The placemats and table runner are gorgeous!! Thank you so much!! I actually love to applique. One of my favorite things to do … I will be making these placemats!!! AND as a table runner as well. Goodie!! I needed something else to add to my project list!! lol
Haha! You are the absolute cutest!
Excited to try this next. Could I use a spray adhesive instead of the fusible interfacing?
It will be messier, but I bet you could!
This looks beautiful when it’s new, but how many washed will a straight-stitch raw edge survive? How do you make your machine go around those tight curves so cleanly, lower the feed dogs? And what is the stitch length you use, does it have to be very short so you get around the curves? Thank you!!
Great questions! With these placemats I just went pretty slowly with my needle down and used a standard presser foot and a standard stitch length of 2.5. In this blog post I used free motion quilting to save time (it’s a lot faster!) The edges will fray, more if you stitch further away from the edge and less if you stitch closer to the edge, but even though there will be fraying, the seams will keep the fabric intact. If you don’t like the fraying, after a wash or two you can give the applique a haircut. You should have to do that more than once because once.
Thanks for sharing this idea and the applique shapes! These are so pretty and so quick to make.