Luminous Variation Tutorial
Luminous was the first pattern exclusively designed for subscribers of The Cutting Table — our digital mini magazine that includes monthly tutorials, articles, pattern downloads and a Block of the Month. On March 1, 2024, The Cutting Table will celebrate it's one-year anniversary! That means that all subscribers of The Cutting Table will get a new exclusive quilt pattern and this Luminous design can become available to all. Wahoo!
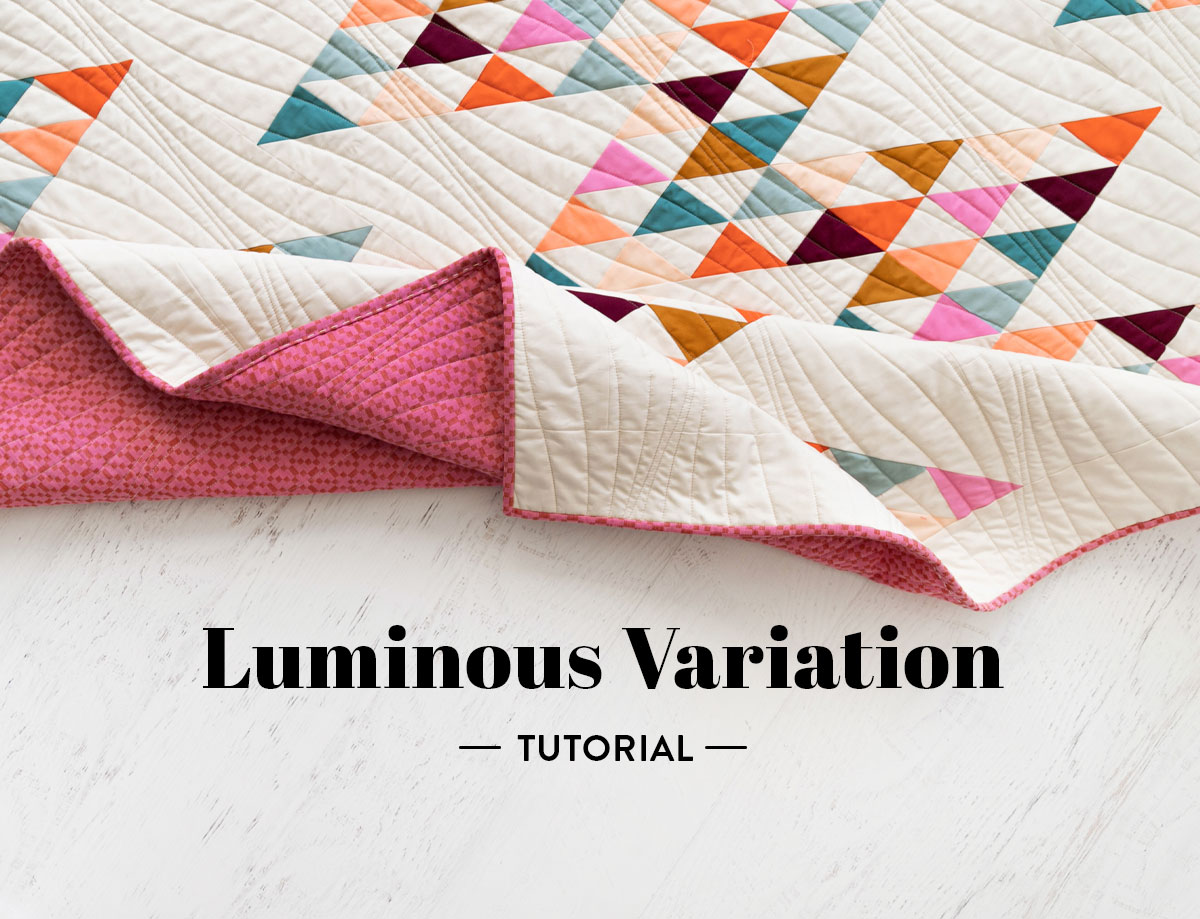
When Suzy first sent me this Luminous pattern, I fell in love. I adore its striking lightning bolt design and immediately saw its potential to be recreated in lots of different ways!
And while it looks bold and punchy in two colors, my natural instinct is to use LOTS of colors. Anyone else with me on that? I saw the original black and white version and wondered how it would look with multiple colors scattered throughout. So I grabbed my Art Gallery Fabrics color swatch card and the multi-color Luminous quilt came to life.


When picking colors I chose a range of warm and cool hues (colors) all with varying levels of value (lightness and darkness). If you are ever stumped on picking fabrics and need some inspiration, there's no better source than nature.


Since the Luminous quilt pattern looks like lightning, I thought it would be cool at use a quilting motif that looks like wind. Sunset, beaches, lightning, wind — I've got a nature theme going if you can't tell. I also like this quilting motif because it's pretty subtle, which helps the quilt piecing pop even more.

Trace Creek Quilting did the edge-to-edge quilting. If you are interested in having your Luminous quilt longarm quilted, Trace Creek Quilting does two different discounts running for subscribers of The Cutting Table — if you needed an excuse to join 😉 You can find the details on the Discounts page.

Backing & Binding Tip!
One of my favorite things to do with backing and binding fabric is pick something I love and then use it for both the backing and binding. This works great if you are using mostly solid fabrics on the front of the quilt and a print or woven as the backing.
Using the same backing fabric as the binding is a fun way to "peek-a-boo" the fabric on the front while still maintaining an overall minimal look. Doing this gets really exciting if you decide to introduce a totally new color as the backing.
For example if you made a two-color black and white Luminous quilt, but wanted a bold burst of color as the backing, let's say neon yellow, pop that into the front as the binding for a subtle touch of color. Just something to think about 😉
The two color Luminous Quilt kit is available at Sarah Made.

Luminous Variation Tutorial
These multi color luminous quilt kits are available at Sarah Made.
The only difference in this Luminous variation and what's written in the pattern is how we cut Color 2. Using 8 fabrics in place of Color 2, the math works out really easily for either fat quarters or quarter yards.
From 4 colors, cut (3) 7" squares and (10) 3 3/8" squares
From 1 color, cut (3) 7" squares and (8) 3 3/8" squares
From 3 colors, cut (4) 7" squares and (8) 3 3/8" squares
The grand total will be the same as Color 2 of the two color quilt, (27) 7" squares and (72) 3 3/8" squares. Now simply follow the directions in the pattern.
The cutting charts below show how to make your cuts.
Variation Fabrics
- Background: 3 3/4 yd AGF Coconut Milk
- Colors: 1/4 yd or FQ AGF Tiger Lily, Rock Candy, Raw Gold, Grapefruit, Peach Sherbet, Plum Preserve, Ocean, Swimming Pool
Fat Quarters Cutting Diagram

Quarter Yards Cutting Diagram


If you have more or less than 8 fabrics you love, you can use as many colors as you want for Color 2 as long as you cut the required total squares. With this pattern, the color options are endless!
How will you be making your Luminous quilt? Tag us at @suzyquilts on Instagram and use #LuminousQuilt to show us what you've made!


Beautiful quilt! Where can I access the pattern?
You can always find the Luminous pattern on the homepage – https://suzyquilts.com/subscribe/. Navigate to the middle of the page and you will see a video with a Download button. Here is a direct link too.
What a fun pattern -thank you! Brainstorming colors now…
I’m glad to hop right into your new adventure! I have a question…. I have this pack of liberty of London variety charm pack that has been hanging out with me for a project and I think it would look great in this quilt. How many charm packs would I need for the throw? baby? could I adjust the block sizes to be larger, HST be maybe 4.5 inches instead of 3? and then adjust the setting triangles?
Hey Cynthia, thanks for this great question! Sorry about the delay in our response. We wanted to give you a thorough answer.
To maximize the precut 5” and 10” squares, change your HST method to the 4-at-a-time method. Follow the instructions in this post to make 4 HSTs rather than 8, like in the pattern: https://suzyquilts.com/half-square-triangles-tutorial/.
The precuts will be used in place of the Color 2 yardage. You’ll also need to adjust the Color 1 a pieces to match the precut pieces. This will affect the Color 1 fabric requirements and cutting instructions. Color 1 pieces c, d, and e remain the same.
Keep in mind that using the 4-at-a-time method places all the outside edges of the HSTs on the bias, so handle them very carefully when pressing and sewing.
To make the HSTs from a 10” layer cake, cut the necessary 10” squares (listed below) in half vertically and horizontally to create four 5” squares from each, then use the 5” squares for the 4-at-a-time HST method. Each 10” LC square + background will yield 16 HSTs.
* Throw needs 216 HSTs + 72 3 3/8″ b squares
–14 LC squares for HSTs (cut to 54 5” squares; you’ll have two extra)
–18 LC squares for b squares (cut each square into four 3 3/8″ squares, then cut these squares in half once on the diagonal to create two triangles)
= 32 LC squares plus background
* Baby needs 96 HSTs + 32 3 3/8″ squares
–6 LC squares for HSTs (cut to 24 5” squares)
–8 LC squares for b squares (cut each square into four 3 3/8″ squares, then cut these squares in half once on the diagonal to create two triangles)
= 14 LC squares plus background
To make the HSTs from a 5” charm pack, use the squares as is (paired with matching 5” background squares) for the 4-at-a-time HST method. Each 5” charm-pack square + background will yield 4 HSTs.
* Throw needs 216 HSTs + 72 3 3/8″ b squares
–54 charm-pack squares for HSTs
–72 charm-pack squares for b squares (trim the charm-pack squares to 3 3/8″ squares, then cut these squares in half once on the diagonal to create two triangles)
= 126 charm-pack squares plus background
* Baby needs 96 HSTs + 32 3 3/8″ squares
–24 charm-pack squares for HSTs
–32 charm-pack squares for b squares (trim the charm-pack squares to 3 3/8″ squares, then cut these squares in half once on the diagonal to create two triangles)
= 56 charm-pack squares plus background
In my ongoing quest to empty my fabric closet, I am excited to sew up a Luminous project with a mix of vintage reproduction fabrics. As Sarah said, this pattern has potential to be recreated in a multitude of ways and my fabric obsessed brain is spinning with at least 4 versions right now. You can not go wrong with half square triangles; this fabulous new design employs them in great style.
I’m so glad you like the pattern!!