Gather Quilt Sew Along: Week 6: Assemble Top
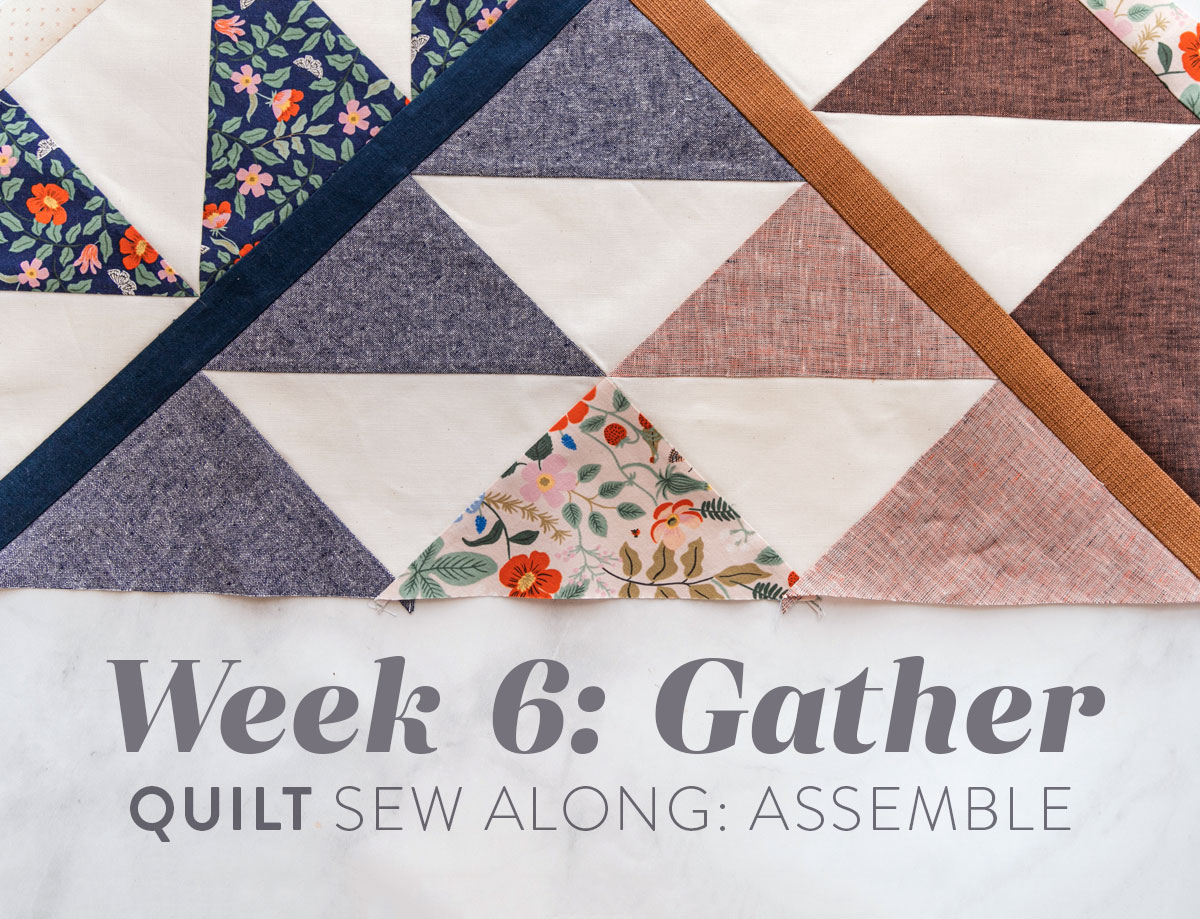
Week SIX of our Gather sew along! Can you believe it? Homestretch, Quiltketeers! This week we build the foundation of our quilt top, or quilt house, as I like to think about it. Gather is unique in the way we build it from the bottom up. It may take a little extra care and attention, but with a few tips, we can do it together!
For details on how this Gather sew along works, check out the original informational post here. And don't forget to join me for the live video this Wednesday at 7:30pm CST on both Instagram and in the Suzy Quilts Patterns Facebook group.
Gather Quilt Sew Along Schedule
- Week 1, January 20: Pick fabric and gather supplies
- Week 2, January 27: Cut all fabric
- Week 3, February 3: Sew, trim and press HSTs for Colors 1-5
- Week 4, February 10: Sew, trim and press HSTs for Colors 6-9
- Week 5, February 17: Sew HSTs into rows
- Week 6, February 24: Sew strips as needed and assemble the quilt top up to row k
- Week 7, March 3: Assemble the rest of the quilt top and trim
Week 6 Assignment: Sew Strips and Assemble the Top
The first part of this week's assignment is simple. Just like you sew binding strips together, sew matching strips together using a 45-degree angle. See Fig. 11 on page 7 for directions and an illustration.
Let's move on cause part two of this week's assignment is so FUN!
A quick sidebar with my newer quilters or quilters who might feel a little anxiety at trying something out of the box: One thing I've learned over the years is that any time I feel a little ripple of nervous energy, I can define how to interpret it. So, as often as possible I say to myself, "I'm excited! This will be FUN!"
Trending patterns!


Quilt Patterns


Quilt Patterns


Quilt Patterns


Quilt Patterns


Quilt Patterns


Quilt Patterns


Quilt Patterns


Quilt Patterns


Quilt Patterns
Because the truth is, anxiety and excitement are two sides of the same coin. It's up to us on how to interpret those feeling. In this case, the interpretation is easy, so I'll do it for you – we're creating something beautiful and learning a new skill. How exciting!!
If you missed the link in the pattern, be sure to check out this video tutorial on sewing the base triangle for our Gather quilt.
Tip #1: PIN!
Sorry to shout, but you need to PIN! Pin your rows and especially pin your strips. It's way too easy to get to a strip sewing section and just zip through it on your machine without a single pin.
ACK! Don't do it! This will cause your fabrics to stretch unevenly through your sewing machine and create warping and distortion. Chances are, if you do this you will finish Week 6 with a seriously stretched foundation. I don't want that to be you!


Tip #2: You don't have to trim.
Since you will be trimming your quilt top at the very end of Week 7, you don't need to worry about snipping dog ears...unless you want to. I prefer to leave them and do all of my trimming at the very end.
In the photos below you can see that I have some extra wiggle room for getting my 1/4" seam allowance.


Tip #3: Sew across the intersecting seams to get a perfect point.
This is something we talked a lot about during the Mod Mountains sew along. I believe it was Week 8. Even though when making that pattern we were sewing 60-degree triangles instead of half square triangles, the concept is still the same.

To get the tippy top of your triangle point to touch the finished seam rather than get eaten up by the seam, do this...


Sew with the HST block facing up (like in the photo above) and sew through the triangle tip intersection. You can even pin first with the strip facing up and then flip it if you find that to be easier.


Tip #4: Don't underestimate the importance of finger pressing.
Finger pressing? Is that like a tiny push up for your fingers? Although that sounds very cute, no, it's not. Finger pressing is when you peel back the top layer of fabric and press it open first with your fingers and then with your hot iron.
This allows you to press open a seam without stretching the fabric with heat or steam. I go over finger pressing in the video below.
The reason I tell you not to underestimate the importance of finger pressing is because in the first few steps of building our Gather triangle foundation we are sewing narrow strips to bias triangle edges. And what do we know about bias edges?
They like to stretch! So the name of the game is to be gentle, finger press your strips open and then hit that seam with some heat, steam and your tailor's clapper.
If you notice your base triangles are stretching a lot, just try your best not add to the stretch with aggressive pressing. It will work out in the end 😉

Tip #5: There's a lot of row overhang. You're doing it right. Just keep going.
I've gotten emails from people worried that they did something wrong because their rows (particularly rows b and c) are majorly overhanging from the base triangle. YES! You're doing it right. Just keep going!
Next week we will trim all of that worrisome overhanging fabric and all will be made well. Just a reminder, don't trim as you go, wait until the end.

Questions?
Do you have questions about supplies, sewing, trimming, pressing or converting your HSTs using the charts provided? For any question you have that's Gather quilt related, there are multiple places for you to ask them!
- Here in the blog comments.
- In the Suzy Quilts Patterns Facebook group.
- During one of the weekly live videos. (Honestly though, this one is the least reliable. I miss a lot of questions during those videos.)

Week 6 Sponsor & Prize
The coastal Maine fabric shop, Saltwater Fabrics is our Week 6 sponsor! Giving away a $100 gift certificate to spend on anything in their online shop, you will have a hard time narrowing down your shopping cart. This sweet shop offers bundles of all sizes, yardage, notions, and even yarn!
How to Win
- Post a pic to Instagram. The photo prompt for Instagram this week is to post a picture of your Gather quilt progress. Use #GatherQuiltSA in the caption.
- You must have a public Instagram profile to participate.
- Each photo posted is an entry and you can enter as many times as you want in a single week. Once the week is over, those posts do not count in the next week's giveaway. Every week we start fresh.
- Your photo must be posted between 12:00 a.m. CST on Wednesday, February 24 and 1:00 p.m. CST on Tuesday, March 2, 2021. The winner will be picked randomly from all qualifying posts and announced at approximately 4:00 p.m. CST on Tuesday, Tuesday, March 2, 2021.


Hi Suzy. I’ve found I’ve got some stretch in my triangles after sewing them to the strips. Is there anything I can do about it now or will it be okay In the end?
Just to be clear, your HSTs are fully sewn to the strips and they are still stretching? Once they are sewn into the quilt, especially to a strip that’s cut on grain, they will be stable.
What’s an easy way to baste a quilt topping to prepare it to be quilted.
Check out this post – https://suzyquilts.com/how-to-baste-a-quilt/
Hi. I’m doing the baby size. When all the strips are sewn together, and you sew on the final background triangle in the left and right corners, do you center that triangle on the last row? In the directions there wasn’t a layout format diagram for the baby size like there was for the other sizes and the construction of this quilt is a little scary. Oh. Um. Exciting.
Yes exactly! Just like the the other quilt layouts you center the final background triangles.
I am also doing the baby size and understand centering the last triangle, but are you saying the last strip of HSTs should also be centered. Or the last two strips of HSTs should be centered on the baby size?
Yes, sorry about the confusion. Center the HST row on the left and right as well as both corner-setting triangles.
Hey Suzy, when I hold up my quilt top I’m noticing a few gaps where some fabric didn’t get sewn together (or came undone somehow). Is there a fix for this??
The best way to fix this would be to sew over that seam again. You want your seams to be stable before moving on to the next step of basting and quilting.
I’m having the same issue as above—noticing gaps where my fabric didn’t totally sew together. Not sure how to fix this—just pinch fabric together and re-sew?
Depending on where the missing stitches are, yes, resew over the area as much as you can. If it’s in a really awkward spot, you can also hand some hand stitching to reinforce the seam.