Free Evolve Wall Hanging Appliqué Pattern
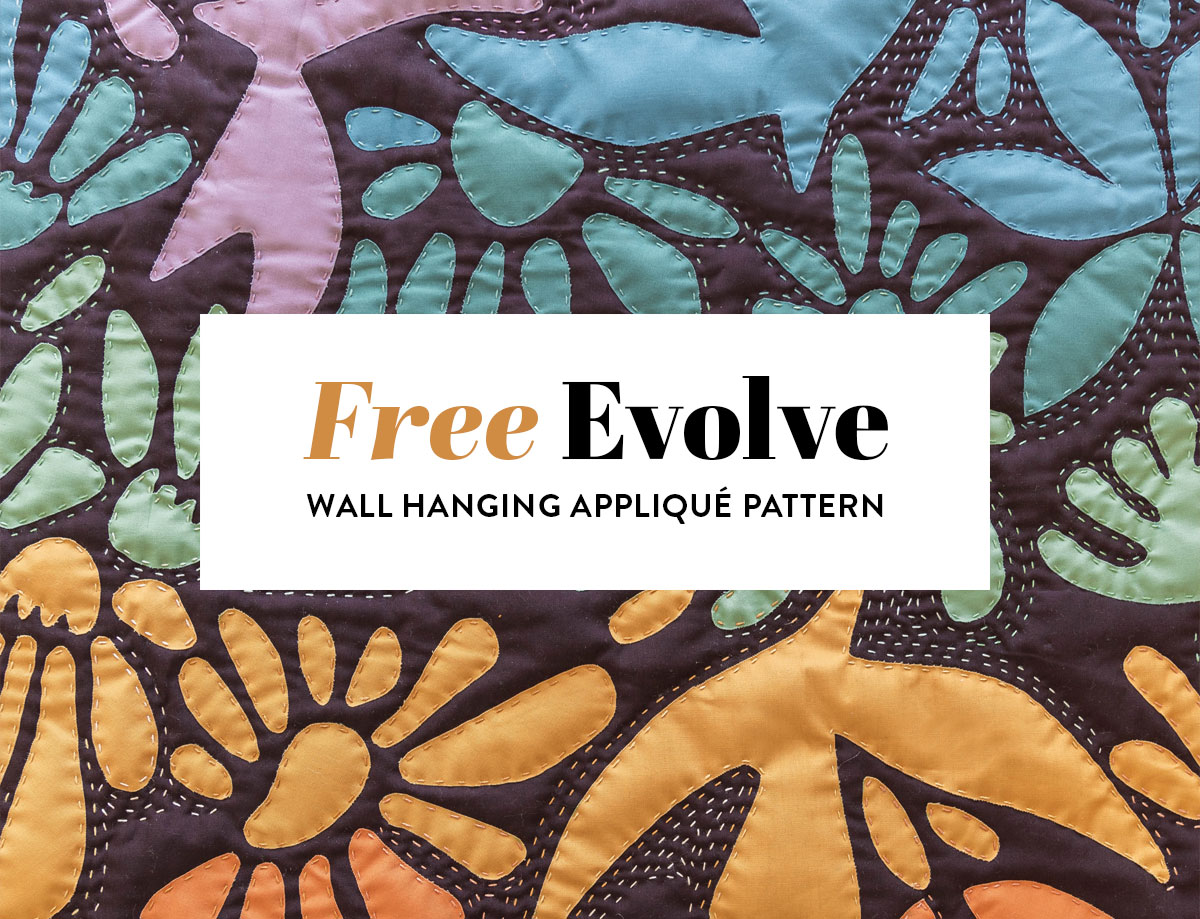
Hello friends, and welcome to a very fun, fresh take on raw-edge appliqué! Making this wall hanging appliqué pattern was a last-minute decision after receiving a lot of requests from you at QuiltCon 2024 and in the comments of this Aurifil announcement post.
When I initially designed and made this it was purely with the intention of trying out my new 8wt thread and sewing a quilt sample to reflect the packaging design of that thread. As some of you may know, I went to school and worked as a professional graphic designer for many years before starting Suzy Quilts and pivoting to textile design.
I have a passion for bold graphics and consistent company branding. I think not only can branding be beautiful, it can also be multi-faceted and interactive. So on that note, I'm excited to share this FREE Evolve wall hanging appliqué pattern with you!

Evolve Wall Hanging Appliqué Inspiration & Design
As I mentioned before, the design for this wall hanging appliqué pattern is pulled from the packaging design of my new 8wt thread with Aurifil. Here's a photo of that so you can see what I mean.

This is a 20-spool set that coordinates perfectly with my fabric collections for Art Gallery Fabrics — Duval, Signature Solids, and Evolve. You can see some of the motifs in the packaging are pulled directly from Duval and Evolve.
Trending patterns!


Quilt Patterns


Quilt Patterns


Quilt Patterns


Quilt Patterns


Quilt Patterns


Quilt Patterns


Quilt Patterns


Quilt Patterns


Quilt Patterns
Here is my daughter, Joanna, showing off her Boho Birds Snapdragon dress from Duval.

And this Thrive quilt uses fabric from Evolve — which showcases even more of the design elements used in the packaging.


The Aurifil booth at QuiltCon is where the wall hanging first made its appearance. Above is a photo of me holding my Evolve appliqué wall hanging sideways...oops!
Another very exciting thing I got to do while at QuiltCon was share about the making of this quilt in a Go Tell It video through The Quilt Alliance. Through our Suzy Quilts Gives Back program, we are proud supporters of The Quilt Alliance and it felt incredibly special to be able to participate in what they do on a personal level.
Oh, and I was 34 weeks pregnant with baby #3 here...

Evolve Wall Hanging Appliqué Pattern Supplies
- Evolve Wall Hanging Appliqué pattern templates
- Pellon Wonder Under Fusible Web 805
- Appliqué pieces - FQs of the following fabrics: Suzy Quilts Signature Solid Poppy, Spiced, Queen Bee, Matcha, Hemlock, Honeymoon, Haze NOTE: You could use scraps of fabrics and even get away with using FEs if you're careful. You will have leftover fabric from the FQs.
- Background - 2 yd. Suzy Quilts Signature Solid Truffle
- Evolve 8wt thread collection by Suzy Quilts for Aurifil (includes 20 colors)
- Clover Gold Eye Embroidery Needles
- Leather thimble (I use a size small - they stretch as they are used)
- Snips
- Water soluble marker
- Light fabric chalk (this is because the water soluble marker doesn't show up well on the dark Truffle fabric.
- Quilting ruler and rotary cutter or fabric scissors
- Batting - I wanted my appliqué to really POP, so I opted for a high-loft wool batting. However, this is the trickiest batting to hand quilt with for two reasons:
1. It can beard a little bit so you need to use a sharp needle and just pick off the bearding as it happens. 2. Because it's a high-loft batting it is harder to pull the needle through all of the fabric layers. If you are new to appliqué and hand quilting, choose a low-loft batting like cotton or bamboo.
Actually, now that I think about it, a great option would be black batting if you are OK with using a synthetic material. - Spray Bottle for water
- Safety Pins
How to Make the Evolve Wall Hanging Appliqué Pattern
One big reason I am choosing to post this pattern for free on our blog rather than releasing it as a pattern for purchase is because to make this, you need a moderate amount of sewing skills. We have free tutorials here on the blog that cover every aspect of making this wall hanging, however because I'm 36 weeks pregnant, I don't have the capacity to offer the amount of help many people in our community will need to make this project.
So with that said, let's dive in and make a fabulous appliqué wall hanging! Just don't ask any follow-up questions. 😉 Just kidding! Kind of...
Step 1: Prepare the Appliqué Pieces
This wall hanging appliqué pattern uses the raw-edge appliqué technique. I did this to save time (it's A LOT faster than needle-turn appliqué) and I knew it wouldn't be getting touched and washed very much since it's a wall hanging. (As you know, raw edges like to fray the more they are handled.)
- With your water soluble marker, trace the outline of your templates onto the right side of your fabric. (We are working with solid fabrics, so there technically is no right or wrong side.)
NOTE! I actually never printed any of these templates. I just made sure they were 100% to-scale on my computer screen, held my fabric up to my screen, and traced them that way. - On the wrong side of your fabric, iron the textured side of your fusible webbing. Make sure there is webbing on all of your appliqué pieces.
- Peel off the paper and cut out your shape precisely.
- Set the pieces aside in a safe place where they won't get wet or be touched.

Step 2: Prepare the Background of the Appliqué Wall Hanging
I didn't make my wall hanging in this order, but after doing it once I think this is a better way to go. I originally fused my appliqué pieces to the background fabric and then made my quilt sandwich. However, since I am flipping and stuffing my quilt sandwich quite a bit to avoid using binding, some of my appliqué pieces came off in the process.
I'm just telling you this so you don't get confused when you see in the pictures that things are in a different order. Below is a closeup of the edging of my wall hanging. I finished it like I finish my table runners.

We will be following this table runner tutorial.
- Cut two 31" x 31" squares of Solid Truffle fabric and one 31" x 31" square of batting. I think the simplest way to do this is to stack all three on top of each other on your cutting mat and cut them at the same time. You can use a measuring tape and your water soluble marker to draw guides and then either scissors or a rotary cutter to cut along the guides. Below is a video on cutting large pieces of fabric.
- Stack your layers in this order: batting on the bottom then the two layers of solid fabric on top — giving you three layers (top, middle, and back).
- Pin around the edges, leaving a hole large enough for your hand on one side.
- Sew a 1/2-inch around the perimeter of the wall hanging, pivoting at the corners, and backstitching where you start and stop.
- Trim the pointy parts off the corners to alleviate excess bulk.
- Put your hand through the hole and pull your wall hanging inside out – like a sock!
- Press the edges with an iron to get them as flat as possible then pin them down. You may need to put extra pins in the hole area so it stays closed.
- After fusing your appliqué pieces to this background fabric, you will secure the edges with a hand quilted topstitch.

Just to remind you, I did Steps 2 and 3 in opposite order when I made this, but you can still see in the photo above how I pinned my edges before topstitching.
Step 3: Mark a Grid on the Background Fabric
Using your light-colored chalk, mark vertical and horizontal lines every 7 1/2". It will look like this...

Step 4: Layout and Fuse the Appliqué Pieces
Using the lines of the grid as a guide, place your appliqué pieces on the background fabric. It's OK if it's not exactly the same as mine. The main visual is the circle these shapes make, so before sewing them down, just make sure your pieces form a roundish shape.

I chose to do this at my ironing board with the picture set up in front of me. Once I got a section in place I would fuse it down so I could move on to the next part without all of the appliqué pieces falling on the floor.
How to Fuse Raw-Edge Appliqué
I'm going to let you in on a little secret I learned through trial and error. I still think following the fusible webbing instructions is a good idea, BUT I found that spraying water directly on the appliqué pieces you wish to fuse down is quicker and more effective than using a damp pressing cloth. So here are the Suzy Quilts instructions. Follow at your own risk...
- After you've laid your appliqué pieces in place, and removed the paper backing, lightly spray a little mist over the fabric. When I say lightly, I mean LIGHTLY. I think this is why the instructions tell people to use a damp pressing cloth. It's because they don't trust people to use a little mist rather than drenching the fabric. But I trust you! SPRAY LIGHTLY!!
- Change the heat setting on your iron to wool/silk. Or if you only have numbers from 1-10 with 10 being the hottest, change it to a 7.
- Gently place the iron directly on the appliqué piece and hold it there for about 4 seconds, then slowly start moving it around so the fabric doesn't burn.
- Before shifting your wall hanging to work on the next section, check to make sure all of your pieces are, in fact, secured down.

There's my coordinating Evolve sticker making a sneaky appearance on my water bottle.

Step 5: Baste Around the Appliqué Pieces with Safety Pins
This will help your three layers stay in place while you're hand sewing.
Step 6: Sew a Topstitch Around the Perimeter of the Wall Hanging
You can do this with your sewing machine or by hand. I chose to do it by hand so visibly there would only be hand stitching on my wall hanging. Just remember that these stitches will be seen so use a thread color that blends.
I used the dark velvet color (2345) seen below.

Step 7: Hand-Stitch the Appliqué Pieces in Place
Typically when hand quilting I can grab multiple stitches at a time before pulling my needle through. Because of the curving shapes and angles of these appliqué pieces, I mostly just kept to one stitch at a time. This ain't a speedy process!
For a full tutorial on hand quilting, visit How To Hand Quilt. Here is a tutorial video.

Sometimes I matched the thread to the fabric, and sometimes I used a coordinating thread that matched the fabric next to it. When making mine, I chose to add echoing decorative stitches to the negatives spaces as I was sewing down the appliqué pieces, but if you have the patiences, I recommend waiting until all of your appliqué pieces are secured to the wall hanging before getting fancy.
I say this just because you don't want to run the risk of a dog or child or strong breeze messing up your appliqué pieces before they get the chance to be locked into their correct place.

I also want to mention that I made this process easier by not popping my knots AND by fully ignoring what the back of this Evolve wall hanging was going to look like. I mean, it's going to hang on a wall! Who cares?
So I hopped around and sewed multiple pieces down without snipping my thread and rethreading my needle. Here's a pic of the back to show you. I actually kind of love how wild it is.

Step 8: Add Decorative Stitching
This is where you can have a lot of fun. Play with thread colors! Add stitches here and there and anywhere you think they would look good. My one suggestion is that you hop all around the quilt while doing this so no one area becomes more densely stitched than another.
If you want to add stitching in the corners like I did, here is the design I followed. Below is a link to the PDF of the entire design. Make sure you are tracing the templates to-scale. I reused a lot of the same shapes too.
Evolve Wall Hanging Appliqué Pattern PDF - 100% To-Scale

As you can see in this pic, to get just the stitching of the shapes without the actual appliqué as a guide, I cut out paper, pinned it in place, then stitched around it.


And that's it! You're finished whenever you feel like being finished. 🙂 What do you think about this Evolve wall hanging appliqué pattern? Will you give it a try?
Even if you don't feel up for making a full wall hanging, what I love about appliqué is that you can just do a little bit here and there to jazz something up! Clothes, bags, pillows — whatever! And this 8wt Evolve thread collection is the perfect companion.
If you do make this and post to social media, be sure to tag @suzyquilts and use #suzyquiltsblog and/or #suzyquiltsfabric so we can see your beautiful work!


I absolutely love this wall hanging pattern! I have beginner level experience but I still would love to make this. ❤️
I bet you’ll be able to figure it out and feel free to ask questions here in the comments ❤️
I’m loving it! Thank you for sharing.
Beautiful pattern! Thanks so much for sharing it. I’ve been a sewist and needleworker for years. But only very recently tried appliqué, one of Jo Avery’s Dream Birds. I’m anxious to try out your method with this gorgeous wall hanging!
I’ve dabbled in appliqué years ago. While time consuming, the results are so rewarding. Thanks for this modern twist on a traditional technique!
Thank you very much!
Thank you for the free pattern but even more for sharing the process and writing it down in such a fun matter. I really enjoyed reading you post!
Will I make a wall hanging? Probably not (sob). But it will stay on that “awesome project I would do if I just had the time and the endurance” list for good.
All the best for you and baby no. 3!
Thank you, Tina!
I can’t wait to make this in a neutral color for my hallway. Suzy, you are so generous to share. Thank you.
Thank you for sharing this pattern. It’s so cool and I’m excited to give it a go. Your patterns, fabrics, threads, tutorials, videos — everything(!) are the best. Your spirit of sharing and encouragement to all your quilting friends and followers is appreciated so much. What’s hard to believe is that you started and finished this beautiful hand-quilted wallhanging in such a time crunch! You are amazing! I love Suzy Quilts! You are definitely a bright, warm light in what can be a dreary world. Thank you!
Thank you for sharing this pattern and the detailed instructions. I’ve been wanting to try hand quilting following your tutorial but was apprehensive about starting with a quilt. Now I have this beautiful project to try it with. I love making wall hangings for my sewing space and this will be a perfect addition. Can’t wait to get started! Thanks again and best wishes for safe delivery of Baby #3.
Hi, I am n ot able to download the free Evolve pattern. I wanted to read the article fist and did not respond to the email request to load the pattern. I have printed the templates. Can you please send the the pattern for Evolve. Its very appealing to make.
Thanks. Sjaan
Hi Sjaan! All you need is the templates and then follow the tutorial in the blog post. There is no other pattern that you need. Yay!
I took, need to print it to be able to read as I go and refer to. I find it difficult to have to follow on a computer screen.
This is so lovely! It appeals to my love of bold, bright colors on a dark background, organic elements in a not-perfect-but-yet-very-balanced flow, and recent interest in hand quilting. I remember my mom doing machine appliqué when I was little, so attempting a bit of this for a throw pillow to start seems like a fun challenge and a nod to her. This option for putting your work out is brilliant…beautiful way to share your gift, encourage quilters to sink into this wonderful community you’ve built, and also share without committing yourself to something that would take away from your sweet coming baby. Can’t wait to see all the quilty goodness in your nursery soon!!!
Thank you thank you for making this absolutely beautiful quilt pattern free for us! I am looking forward to trying this out.
Many blessings for baby 3!!!
It’s my pleasure! Thank you, Peggy! ❤️
Thanks so much for the free pattern and instructions! I definitely have plans of doing this! I’ve got your table runner on my list of to do’s, so I’d better get going! Love, love your style of design.
That’s so kind of you to say! Thank you, Della ❤️
Thank you for your pattern, tips and talent shared!!
This wall hanging is stunning! Thank you for the pattern.
You’re welcome! I’m so glad you like it 🥰❤️
I really appreciate you offering this as a free pattern. Loved it when I first saw it. I will hand appliqué, hand quilt and then face it rather than applying a binding.
Thank you for the pattern and such great instructions. I do plan on making this in the not so near future. Best of luck with baby number three.🌸
What a beautiful wall hanging!! I love your Evolve design. The color gradient set on the brown velvety background really pops. Thank you for sharing how you made your wall hanging.
It’s sorry to ask this but is the link to the pattern working? I get an error on both safari and google when I try to access it.
It’s working on my end, so try this direct link – https://suzyquilts.com/wp-content/uploads/2024/03/EvolveWallHangingApplique-Pattern_SuzyQuilts.pdf
Thank you
I LOVE hand stitching! I find the process so relaxing. Even if I machine piece something, as I did with your “Gather”pattern, I’m more likely than not to add my own hand stitching to it.Thank you for offering this pattern for free….looking forward to sharing my spin on it sometime soon. CLS
Thank you so much for ALL the great tips! You made this seem so simple by breaking it down into bites that are very easy to do. I’m excited about trying this!
Oh good! Once you get started, I bet you’ll zip right along. I hope you have fun!
Thank you so much for the free pattern. The hand quilting on your wall hanging is so beautiful!!! Best wishes to you and your family!!!!
Thank you!
So stinkin cute! Thanks for sharing!
Thanks Suzy for sharing how to make the beautiful wall hanging!
This is a lovely excuse to finally try applique.
I love this!! Curious why you call it Evolve? Thank you for making it available. Aspire to creating the whole thing but will certainly incorporate some of the shapes on my future work…
Beautiful! Thank you for the pattern and your blog! I love what a wonderful maker and Mama you are❤️🙏
That’s so kind of you to say! Thank you!!
I love your beautiful daughter’s wonderful smocked dress. I used to do that way back in the 70’s for my girls. SO lovely to see this beautiful needlework. Thanks for sharing, CarolG
Are there separate templates for the quilt corners or should the applique pattern be pulled from the main part of wall hanging appliqué templates? Like your choice of appliqué colors and subject matter—how creative!
Those corner areas do use a lot of the same shapes as the center portion. Toward the bottom of the tutorial I include a full-scale PDF of the entire design with those those shapes.
I love this Evolve pattern. Thank you. I’ve already used the birds in something else. I’ll post it once it’s done.
I would love to purchase your evolve black t-shirt. Are they available for purchase?
I’m so glad to hear it! Those shirts and sweatshirts were a very limited-run so they could be shipped to people in time for QuiltCon 2024 this past February. I will make them available again for a longer time in August. I’ll add some fun new options too! If you sign up for our newsletter, you won’t miss the next apparel launch – https://suzyquilt.com/newsletter
Thank you Suzy for the Evolve pattern-so generous of you. Can’t wait to try it.
Hello! Whenever I try to download the PDF, it says a problem repeatedly occurred and fails to download.
Hi Cathy! Can you please send us an email at [email protected]
We can better assist you via email 🙂
Thanks! a wonderful pattern.
I love your Evolve pattern and am in the process of making it. I’m about to start quilting the pieces on but was wondering if it would look good to use contrasting thread colours, or if that would make it too busy. What do you think? I chose different colours with my fabric, mine go from pinks to blues, so I was going to hand quilt with blue threads on the pink and vice versa.
I’m glad you like this pattern! There is a lot going on with it already, so I understand you not wanting the quilting to get overly busy. Since it’s pretty easy to pull stitching out if you don’t like it, why don’t you go ahead with your plan for an hour and if it’s not suiting you, rip it out and do something different. That way you can know for sure. You could also opt to use contrasting thread in just the negative background spaces and not the appliqué pieces.